Creating a new tutorial
| Author(s) |
|
| Reviewers |
|
OverviewQuestions:
Objectives:
How to integrate a new tutorial?
How to make a tutorial robust and reproducible?
Create a tutorial from scratch
Link a tutorial to a topic
Create hands-on
Add technical support for a tutorial
Time estimation: 15 minutesSupporting Materials:Published: Jun 20, 2018Last modification: Nov 20, 2025License: Tutorial Content is licensed under Creative Commons Attribution 4.0 International License. The GTN Framework is licensed under MITpurl PURL: https://gxy.io/GTN:T00057rating Rating: 5.0 (0 recent ratings, 2 all time)version Revision: 33
Galaxy is a great solution to train bioinformatics concepts:
- numerous bioinformatics tools are available (over 8,000 in the ToolShed)
- it can be used by people without any computer science skills
- it trains to use technology, outlining available resources and efforts that have made them accessible to researchers
- it is scalable
In 2016, the Galaxy Training Network decided to set up a new infrastructure for easily delivering Galaxy-related training material. The idea was to develop something open, online, based on a community effort, and on top of the Galaxy platform.
We took inspiration from Software Carpentry and collected everything on a GitHub repository: https://github.com/galaxyproject/training-material. We decided on a structure focusing on tutorials with hands-on activities; fitting both for online self-training but also for workshops. Each tutorial follows the same structure and comes with a virtualised instance, allowing you to run the training anywhere you have resources available.
Here you will learn how to create a new tutorial by developing a small tutorial explaining how to retrieve climate data from Copernicus (using Copernicus Climate Data Store tool).
AgendaIn this tutorial, we will cover:
CommentThis tutorial explains the different steps to create a tutorial for the Galaxy Training Material. It may require some knowledge that you may not have or do not have the time to learn. If this is the case, you can create a skeleton of a tutorial with whatever existing materials you have, using your prefered text editor, and then share it with us by opening issue on GitHub, writing us on Gitter, or sending us an email.
Define the topic
The first step we need to do is to identify in which topic to place our new tutorial. This can be tricky. When we structured the GTN, we decided that each training material should be related to a topic.
We decided to use the categories from the ToolShed as our initial list of topics. Since every tool uploaded to the ToolShed must be in at least one category, you can look at the main tools in your tutorial and see which categories they are placed in within the ToolShed. This can provide a guide for where you might put your new tutorial. For example, if your tutorial will rely on the Copernicus tool:
Hands On: Defining the topic for the tutorial
- Search for Copernicus on the ToolShed
- Check in which category it has been placed
There are a couple of steps to reaching the answer:
- Search for
Copernicus- Press the Enter key to search
- Click on the result named
c3s- At the bottom of this page, there is a box labelled “Categories”
It is placed in one category: “Climate Analysis”
- Look if the categories fit to existing topics in the Galaxy Training Material
Comment: No fitting topic for the tools in your tutorial?If the categories in ToolShed do not fit to any existing topics, we recommend to use your better judgment to identify in which topic your tutorial should go. You can also ask us on Gitter or raise an issue on GitHub explaining the aim of the tutorial. We will be happy to help you there.
Comment: Creating a new topicWant to create a new topic? Check out our tutorial to create a new topic
Store a tutorial
All training materials (slides, tutorials, …) related to a topic are found in a dedicated directory (e.g. climate directory contains the material related to Climate analyses). Each topic has the following structure:
├── README.md
├── metadata.yaml
├── images
├── docker
│   ├── Dockerfile
├── slides
│   ├── index.html
├── tutorials
│   ├── tutorial1
│   │   ├── tutorial.md
│   │   ├── slides.html
│   │   ├── data-library.yaml
│   │   ├── workflows
│   │   │   ├── workflow.ga
│   │   ├── tours
│   │   │   ├── tour.yaml
Once the topic has been chosen, we can create the tutorial. An ideal tutorial in the Galaxy Training Network contains:
- a tutorial file
tutorial.mdwritten in Markdown with hands-on - an optional slides file
slides.htmlin Markdown with slides to support the tutorial - a directory
workflowswith workflows extracted from the tutorial - a YAML file
data-library.yamlwith the links to the input data needed for the tutorial
The most important file is the tutorial.md, where the content of the tutorial is. The other files are not mandatory. They are there to support the tutorial and make it robust and usable across many environments. But they can help a lot in the development of a new tutorial.
The data-library.yaml is used by Galaxy servers to create a Shared Data Library containing your tutorial data, allowing you quicker access during training courses. If you have defined a zenodo_link in your tutorial metadata, then the data-library.yaml file will be automatically added by one of the GTN GitHub Actions if it is missing, so there is no need to add it yourself.
Create the workflow
Our tutorials try to follow the “learn by doing” approach; they combine both theoretical and practical sections done on Galaxy.
Most tutorials explain step-by-step a data analysis by running the tools. The steps taken in the tutorial can be represented as a workflow.
Before writing the tutorial, it is a good practice to get a workflow with the different steps that will be run during the tutorial. The workflow does not have to be the final one, but at least the major steps should be included. It helps to get a direction for the tutorial, but also to generate a skeleton of the tutorial, as we will see later.
Comment: Use tools that are available on the ToolShedWe recommend using tools in your workflows, especially for training, that are available on the Galaxy ToolShed.
Hands On: Prepare the workflow for the training
- Go to your favorite Galaxy server
Create a workflow with the different steps (tools) of your tutorial either from scratch or from an existing history
- Click Workflow on the top bar
- Click the new workflow galaxy-wf-new button
- Give it a clear and memorable name
- Clicking Save will take you directly into the workflow editor for that workflow
- Need more help? Please see the How to make a workflow subsection here
Clean up your history: remove any failed (red) jobs from your history by clicking on the galaxy-delete button.
This will make the creation of the workflow easier.
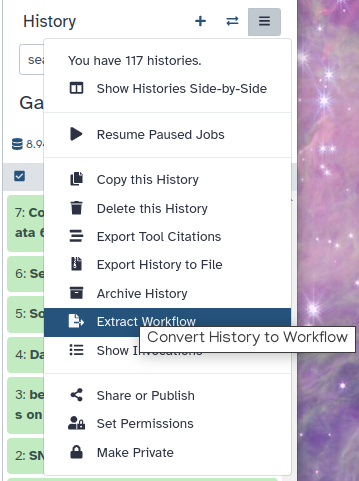
Click on galaxy-gear (History options) at the top of your history panel and select Extract workflow.
The central panel will show the content of the history in reverse order (oldest on top), and you will be able to choose which steps to include in the workflow.
Replace the Workflow name to something more descriptive.
Rename each workflow input in the boxes at the top of the second column.
If there are any steps that shouldn’t be included in the workflow, you can uncheck them in the first column of boxes.
Click on the Create Workflow button near the top.
You will get a message that the workflow was created.
For the Copernicus tutorial:
- Add an Input Dataset
- Add Copernicus Climate Data Store
- Link the Input Dataset to Copernicus Climate Data Store on
API Request filename- Rename Input Dataset to
API Request file- Save the workflow
Add the topic name as a Tag and the tutorial title as Annotation/Notes to the workflow using the workflow editor
- Open the workflow editor for the workflow
- Click on galaxy-pencil Edit Attributes on the top right
- Write a description of the workflow in the Annotation box
- Add a tag (which will help to search for the workflow) in the Tags section
For the Copernicus tutorial:
- Annotation:
Retrieve climate data from Copernicus- Tag:
climateMake the workflow accessible (publishing is not necessary)
- Click on galaxy-workflows-activity Workflows in the Galaxy activity bar (on the left side of the screen, or in the top menu bar of older Galaxy instances). You will see a list of all your workflows
- Click on the history-share Share button of the workflow you would like to publish
- Click on Make Workflow accessible. This makes the workflow publicly accessible but unlisted.
- To also list the workflow for all users on the Public workflows tab of the galaxy-workflows-activity Workflows page, click Make Workflow publicly available in Published Workflows
Get a toy dataset
To run the different steps, the tutorial needs some data. The selected data must be informative enough to illustrate the meaning of using a tool or a given technique, but not too big to require long waiting times for processing during a workshop. Upload and download of files into and out of Galaxy is usually quick, but the time taken for a tool to run can be long. Tool run times of no more than 10-15 mins are recommended. Typically, the selected data should be the informative subset of a full real-life dataset.
Below we describe two examples of how toy datasets were generated for tutorials:
- Example 1: creating a toy dataset from scratch
- Take one 16S sequence (for example found in the test case of a Galaxy tool):
- Generate a reference database
- Blast it on the NR database on NCBI Blast
- Extracting one similar sequence found with Blast
- Search and extract 2 other sequences of the same species using the NCBI Nucleotide database
- Example 2: creating a toy dataset from an existing larger one
- When the experiment takes a FASTQ as input and a few reads are sufficient:
- Use seqtk_sample tool to extract randomly reads from your input fastq.
- However, when it requires a lot of reads to be meaningful, you can use the following strategy (used for the ATAC-seq tutorial using this workflow):
- Run the workflow until the mapping step on the full dataset (or big enough to have good results).
- Select IDs of reads which map on the smallest chromosome (for example chr22 for human data).
- In order to keep in the toy dataset enough diversity, you can also take randomly 1% of the reads IDs.
- Concatenate the two lists and remove the duplicated IDs.
- Use seqtk_subseq tool to sample your original FASTQ with the list of IDs.
- When the experiment takes a FASTQ as input and a few reads are sufficient:
We would then develop the tutorial and test it on this toy dataset. Once we were ready to share it, we would upload the datasets to Zenodo to store them on long-term and obtain a dedicated DOI in the Galaxy training network community.
Hands On: Upload the dataset to Zenodo
- Go to Zenodo
Log in using your GitHub credentials
You may need to authorize Zenodo to access your GitHub account (only to read your information)
- Click on Upload (top panel)
- Start a new upload
Upload the files corresponding to your datasets
Comment: No possible changes in the files after publicationFile addition, removal or modification is not allowed after you have published your upload. So be careful when you start your upload that all the files you need are ready.
The metadata can be changed after publication.
- Search for and Select Galaxy Training Network in Communities
- Select Dataset in Upload type
- Use the title of your tutorial and mention also Galaxy Training Material
- Add all the persons who contributed to the tutorial as authors
- Add a short description of the tutorial and a link to the training material website
- Keep Open Access as Access right and Creative Commons Attribution 4.0 as License
- Fill out any remaining information
- Click on Save
- Click on Publish
- Copy the DOI link in the new page
Create the skeleton of the tutorial
Once we have the workflows and toy dataset (optionally already on Zenodo), we can generate the tutorial folder, including the tutorial.md.
Writing the tutorial while adding the different tools and their parameters, and following good formatting, can be quite cumbersome. To help in that process, we developed a training development kit available with Planemo. The tool has several commands. But the main one can be used to create the skeleton of a tutorial (folder, well-located, with good structure). It can also take a workflow as input and add it to the workflows folder. But more interestingly, the tool can extract from the workflow and add in the tutorial.md file the different steps with which tools to run and which parameters to select. If a Zenodo URL is provided, it also creates the data-library.yaml file.
This tool can be used via the command-line but also via a webserver. The webserver can take a public workflow that is available on usegalaxy.org, usegalaxy.eu or usegalaxy.org.au.
Hands On: Create the skeleton of a tutorial using the webserver
Make the workflow public
- Click on galaxy-workflows-activity Workflows in the Galaxy activity bar (on the left side of the screen, or in the top menu bar of older Galaxy instances). You will see a list of all your workflows
- Click on the history-share Share button of the workflow you would like to publish
- Click on Make Workflow accessible. This makes the workflow publicly accessible but unlisted.
- To also list the workflow for all users on the Public workflows tab of the galaxy-workflows-activity Workflows page, click Make Workflow publicly available in Published Workflows
- Copy the workflow ID that can be found in the URL of the current page (after
?id=)- Open the PTDK webserver
- Fill in the information
- Tutorial name (the name will be the name of the folder of the tutorial)
- Tutorial title
- Galaxy instance with the public workflow
- Id of the workflow
- (Not mandatory) Zenodo URL with the input data
For the Copernicus tutorial:
- Tutorial name (the name will be the name of the folder of the tutorial):
climate-data-retrieval-copernicus- Tutorial title:
Retrieve climate data from Copernicus- Galaxy instance with the public workflow:
usegalaxy.eu- Id of the workflow:
ac5b66c42681e7a8- Click on Submit
Download the generated archive
This archive contains the tutorial skeleton, including:
- tutorial content,
tutorial.mdfile, filled with all steps from the workflow and their parameters- its workflow (
workflowfolder)- a
data_library.yamlfile if Zenodo link was providedAdd the new material to Galaxy Training Material by unzipping the downloaded archive in the tutorials folder of the topic for the new tutorial
Comment: Using the GitHub interfacePrefer to use the GitHub interface?
- Unzip the downloaded archive
- Edit the content of the
tutorial.md(as explained below)- Go to the GitHub repository of the Training Material
- Fork the GitHub repository
- Click on
topics- Select the topic for the new tutorial
- Go to
tutorials- Click on Create new file
- Type
name/tutorial.md, replacing “name” by the name of your tutorial (not the title)- Copy the content of the downloaded and edited
tutorial.mdfile there- Fill the Commit new file form
- Create a new branch using the name of the tutorial
- Click on Propose new file
- Open a Pull Request, as explained in our tutorial
- Add the workflow file (in
workflowfolder) by updating the Pull Request
If the workflow is not available on one of the previously listed Galaxy servers, we recommend that you run the tool via the command line:
Hands On: Create the skeleton of a tutorial via the command line
Get the workflow ID
The ID can be found on the URL when running, editing or sharing the workflow (after
?id=)Get your API key on the Galaxy instance
- In your browser, open your Galaxy homepage
- Log in, or register a new account, if it’s the first time you’re logging in
- Go to
User -> Preferencesin the top menu bar, then click onManage API key- If there is no current API key available, click on
Create a new keyto generate it- Copy your API key to somewhere convenient, you will need it throughout this tutorial
(If not done yet) Get the Galaxy Training Material repository locally and move into it
- (If not done yet) Clone the training material GitHub repository:
git clone https://github.com/galaxyproject/training-material.git- Navigate to the
training-material/folder withcdGet planemo
- Option 1: Using Conda:
Set up the conda environment
It will install some needed tools (ruby, nodejs, etc) in a protected environment, without interfering with the existing tools or versions.
- Install conda (if not already installed):
make install-conda- (You may need to exit the terminal and re-open for conda to be recognised. Navigate back to the same place.)
- Create the
galaxy_training_materialconda environment:make create-envActivate the conda environment with
conda activate galaxy_training_material- Option 2: Using pip by running
pip install planemoGenerate the skeleton of your tutorial (by adapting the information between the quotes)
  $ planemo training_init \
         --topic_name "my-topic" \
         --tutorial_name "my-new-tutorial" \
         --tutorial_title "Title of the tutorial" \
         --galaxy_url "URL to Galaxy instance in which you created the workflow" \
         --galaxy_api_key "Your API key on the Galaxy instance" \
         --workflow_id "ID of the workflow on the Galaxy instance" \
         --zenodo_link "URL to the Zenodo record"
Check that a new directory (with your tutorial name) has been generated in the topic folder
Write the tutorial
Now that you have the structure in place, you can then fill the tutorial, per se.
Hands On: Write the tutorial
- Open the
tutorial.mdfile with your favorite text editorFill out the tutorial by following the dedicated tutorial
- Add metadata at the top of the tutorial
- Add a proper introduction
- Organize the tutorial into different sections
- Introduce the different concepts and the different steps of the analysis
- Check the hands-on boxes
- Comment on the outputs of the different steps
- Add some question/solution boxes for assessment
- Add a conclusion
- (Optional) Build the website locally and check that the tutorial is there by following the Jekyll tutorial
Keep track of the changes
The material is stored in a GitHub repository, a code hosting platform for version control and collaboration. So to develop training material, we are following the GitHub flow, which is based on fork, branches, and pull requests.
This can be done online via the GitHub interface or locally on your computer via the command line.
Comment: Learning how to contributeWant to learn how to contribute? Check our tutorials:
Add slides (optional)
Sometimes, you may want to have slides to support a tutorial and introduce it during a workshop. Sometimes, a set of slides is better than a tutorial to cover a specific topic.
Hands On: Add slides
- Create a slide deck in
slides.htmlfollowing the Slide tutorial
Conclusion
To develop a new tutorial:
- Determine the topic
- Create a workflow
- Find a good toy dataset and upload it to Zenodo
- Create the skeleton for the tutorial
- Add the skeleton to the training material
- Write the tutorial
- Keep track of the changes
- Add slides (optional)
- Submit as a Pull Request to GitHub
For the next time, you can make it quicker.
Hands On: Generation of a tutorial
- Determine the topic
- Create your workflow on a running Galaxy instance
- Add the topic name as a Tag and the tutorial title as Annotation/Notes to the workflow using the workflow editor
- Create a Zenodo record with the input data
Generate the skeleton of your tutorial
- Option 1: from the PTDK webserver and get the skeleton in the training material
Option 2: from a workflow located on a Galaxy
$ planemo training_init \ --topic_name "my-topic" \ --tutorial_name "my-new-tutorial" \ --tutorial_title "Title of the tutorial" \ --galaxy_url "URL to Galaxy instance in which you created the workflow" \ --galaxy_api_key "Your API key on the Galaxy instance" \ --workflow_id "ID of the workflow on the Galaxy instance" \ --zenodo_link "URL to the Zenodo record"- Fill the remaining metadata in the
tutorial.md- Fill the content of the
tutorial.mdCheck it by serving the website locally
Comment: Serving the website locallyWant to learn how to see the change on the website locally? Check out our dedicated tutorial
- Submit it to GitHub
You've Finished the Tutorial
Key points
Finding good training datasets is hard!
Creating a new tutorial involves several steps: some are mandatory, some can be skipped even if they are recommended
Frequently Asked Questions
Have questions about this tutorial? Have a look at the available FAQ pages and support channelsFeedback
Did you use this material as an instructor? Feel free to give us feedback on how it went.
Did you use this material as a learner or student? Click the form below to leave feedback.

Citing this Tutorial
- Bérénice Batut, Helena Rasche, Saskia Hiltemann, Lucille Delisle, Creating a new tutorial (Galaxy Training Materials). https://training.galaxyproject.org/training-material/topics/contributing/tutorials/create-new-tutorial/tutorial.html Online; accessed TODAY
- Hiltemann, Saskia, Rasche, Helena et al., 2023 Galaxy Training: A Powerful Framework for Teaching! PLOS Computational Biology 10.1371/journal.pcbi.1010752
- Batut et al., 2018 Community-Driven Data Analysis Training for Biology Cell Systems 10.1016/j.cels.2018.05.012
Congratulations on successfully completing this tutorial!@misc{contributing-create-new-tutorial, author = "Bérénice Batut and Helena Rasche and Saskia Hiltemann and Lucille Delisle", title = "Creating a new tutorial (Galaxy Training Materials)", year = "", month = "", day = "", url = "\url{https://training.galaxyproject.org/training-material/topics/contributing/tutorials/create-new-tutorial/tutorial.html}", note = "[Online; accessed TODAY]" } @article{Hiltemann_2023, doi = {10.1371/journal.pcbi.1010752}, url = {https://doi.org/10.1371%2Fjournal.pcbi.1010752}, year = 2023, month = {jan}, publisher = {Public Library of Science ({PLoS})}, volume = {19}, number = {1}, pages = {e1010752}, author = {Saskia Hiltemann and Helena Rasche and Simon Gladman and Hans-Rudolf Hotz and Delphine Larivi{\`{e}}re and Daniel Blankenberg and Pratik D. Jagtap and Thomas Wollmann and Anthony Bretaudeau and Nadia Gou{\'{e}} and Timothy J. Griffin and Coline Royaux and Yvan Le Bras and Subina Mehta and Anna Syme and Frederik Coppens and Bert Droesbeke and Nicola Soranzo and Wendi Bacon and Fotis Psomopoulos and Crist{\'{o}}bal Gallardo-Alba and John Davis and Melanie Christine Föll and Matthias Fahrner and Maria A. Doyle and Beatriz Serrano-Solano and Anne Claire Fouilloux and Peter van Heusden and Wolfgang Maier and Dave Clements and Florian Heyl and Björn Grüning and B{\'{e}}r{\'{e}}nice Batut and}, editor = {Francis Ouellette}, title = {Galaxy Training: A powerful framework for teaching!}, journal = {PLoS Comput Biol} }
Developing GTN training materialThis tutorial is part of a series to develop GTN training material, feel free to also look at:
- Contributing to the Galaxy Training Network with GitHub
- Overview of the Galaxy Training Material
- Adding auto-generated video to your slides
- Design and plan session, course, materials
- Including a new topic
- Tools, Data, and Workflows for tutorials
- Updating diffs in admin training
- Principles of learning and how they apply to training and teaching
- Teaching Python
- GTN Metadata
- Creating Interactive Galaxy Tours
- Adding Quizzes to your Tutorial
- Contributing with GitHub via its interface
- Generating PDF artefacts of the website
- Preview the GTN website as you edit your training material
- Creating a new tutorial
- Single Cell Publication - Data Analysis
- Single Cell Publication - Data Plotting
- FAIR Galaxy Training Material
- Creating content in Markdown
- Creating Slides
- Updating tool versions in a tutorial
You can use Ephemeris's
shed-tools installcommand to install the tools used in this tutorial.shed-tools install [-g GALAXY] [-a API_KEY] -t <(curl https://training.galaxyproject.org/training-material/api/topics/contributing/tutorials/create-new-tutorial/tutorial.json | jq .admin_install_yaml -r)Alternatively you can copy and paste the following YAML
---
install_tool_dependencies: true
install_repository_dependencies: true
install_resolver_dependencies: true
tools:
- name: text_processing
  owner: bgruening
  revisions: ddf54b12c295
  tool_panel_section_label: Text Manipulation
  tool_shed_url: https://toolshed.g2.bx.psu.edu/
- name: text_processing
  owner: bgruening
  revisions: d698c222f354
  tool_panel_section_label: Text Manipulation
  tool_shed_url: https://toolshed.g2.bx.psu.edu/
- name: text_processing
  owner: bgruening
  revisions: d698c222f354
  tool_panel_section_label: Text Manipulation
  tool_shed_url: https://toolshed.g2.bx.psu.edu/
- name: text_processing
  owner: bgruening
  revisions: d698c222f354
  tool_panel_section_label: Text Manipulation
  tool_shed_url: https://toolshed.g2.bx.psu.edu/
- name: c3s
  owner: climate
  revisions: 250554670f72
  tool_panel_section_label: Climate Analysis
  tool_shed_url: https://toolshed.g2.bx.psu.edu/
- name: bam_to_sam
  owner: devteam
  revisions: 88eedb4abea0
  tool_panel_section_label: SAM/BAM
  tool_shed_url: https://toolshed.g2.bx.psu.edu/
- name: bowtie2
  owner: devteam
  revisions: 017aba02828d
  tool_panel_section_label: Mapping
  tool_shed_url: https://toolshed.g2.bx.psu.edu/
- name: fastq_to_tabular
  owner: devteam
  revisions: 614a63f14adf
  tool_panel_section_label: FASTA/FASTQ
  tool_shed_url: https://toolshed.g2.bx.psu.edu/
- name: seqtk
  owner: iuc
  revisions: 3da72230c066
  tool_panel_section_label: FASTA/FASTQ
  tool_shed_url: https://toolshed.g2.bx.psu.edu/
- name: cutadapt
  owner: lparsons
  revisions: 49370cb85f0f
  tool_panel_section_label: FASTA/FASTQ
  tool_shed_url: https://toolshed.g2.bx.psu.edu/