Running Jobs on Remote Resources with Pulsar
| Author(s) |
|
| Reviewers |
|
OverviewQuestions:
Objectives:
How does pulsar work?
How can I deploy it?
Requirements:
Have an understanding of what Pulsar is and how it works
Install and configure a RabbitMQ message queueing server
Install and configure a Pulsar server on a remote linux machine
Be able to get Galaxy to send jobs to a remote Pulsar server
- slides Slides: Ansible
- tutorial Hands-on: Ansible
- slides Slides: Galaxy Installation with Ansible
- tutorial Hands-on: Galaxy Installation with Ansible
- slides Slides: Connecting Galaxy to a compute cluster
- tutorial Hands-on: Connecting Galaxy to a compute cluster
- tutorial Hands-on: Mapping Jobs to Destinations using TPV
- slides Slides: Reference Data with CVMFS
- tutorial Hands-on: Reference Data with CVMFS
- A server/VM on which to deploy Pulsar
Time estimation: 1 hourSupporting Materials:Published: Jan 28, 2019Last modification: Jan 23, 2026License: Tutorial Content is licensed under Creative Commons Attribution 4.0 International License. The GTN Framework is licensed under MITpurl PURL: https://gxy.io/GTN:T00017rating Rating: 4.9 (0 recent ratings, 8 all time)version Revision: 59
Pulsar is the Galaxy Project’s remote job running system. It was written by John Chilton (@jmchilton) of the Galaxy Project. It is a python server application that can accept jobs from a Galaxy server, submit them to a local resource and then send the results back to the originating Galaxy server.
More details on Pulsar can be found at:
Transport of data, tool information and other metadata can be configured as a web application via a RESTful interface or using a message passing system such as RabbitMQ.
At the Galaxy end, it is configured within the job configuraiton, and uses one of two special Galaxy job runners.
galaxy.jobs.runners.pulsar:PulsarRESTJobRunnerfor the RESTful interfacegalaxy.jobs.runners.pulsar:PulsarMQJobRunnerfor the message passing interface.
Agenda
Comment: Galaxy Admin Training PathThe yearly Galaxy Admin Training follows a specific ordering of tutorials. Use this timeline to help keep track of where you are in Galaxy Admin Training.
This tutorial assumes that
- You have a VM or machine where you will install Pulsar, and a directory in which the installation will be done. This tutorial assumes it is
/mnt - You have completed the “Galaxy Installation with Ansible”, “Connecting Galaxy to a Compute Cluster”, and the “CVMFS” tutorials
- You have access to the VM/computer where it is installed.
This tutorial is not intended to be a standalone Pulsar setup guide. If you read carefully and understand Ansible, it is likely you can figure out which portions are required to just setup Pulsar.
Overview
We will be installing the RabbitMQ server daemon onto the Galaxy server to act as an intermediary message passing system between Galaxy and the remote Pulsar. The figure below shows a schematic representation of the system.
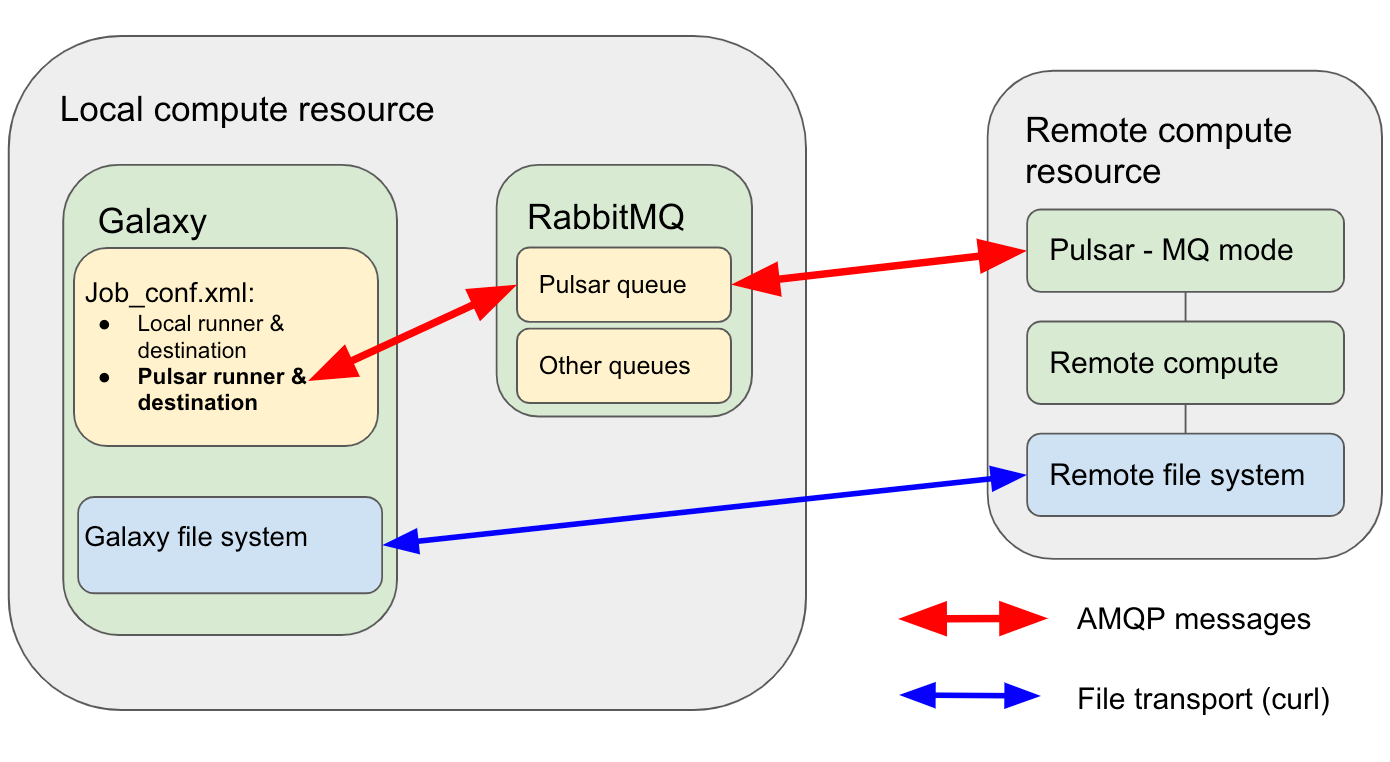 Open image in new tab
How it will work
- Galaxy will send a message to the RabbitMQ server on the Pulsar server’s particular queue saying that there is a job to be run and then will monitor the queue for job status updates.
- The Pulsar server monitors this queue and when the job appears it will take control of it.
- The Pulsar server will then download the required data etc. from the Galaxy server using
curl. - The Pulsar server will install any required tools/tool dependencies using Conda.
- The Pulsar server will start running the job using it’s local mechanism and will send a message to the “queue” stating that the job has started.
- Once the job has finished running, the Pulsar server will send a message to the queue stating that the job has finished.
- Pulsar then sends the output data etc. back to the Galaxy server by
curlagain. - The Galaxy server acknowledges the job status and closes the job.
Some notes
- RabbitMQ uses the Advanced Message Queueing Protocol (AMQP) to communicate with both the Galaxy server and the remote Pulsar VM.
- Transport of files, meta-data etc. occur via
curlfrom the Pulsar end. - RabbitMQ is written in erlang and does not add much overhead to the Galaxy VM, although in larger installations, RabbitMQ is commonly installed on a separate VM to Galaxy. e.g. Galaxy Europe, Galaxy Main and Galaxy Australia.
Pulsar can use a variety of file transport methods including:
- Default: Galaxy initiates file transfer and stages files to Pulsar via http transfer.
- This requires that a http transfer port be open on the remote Pulsar.
- Remote transfer: Pulsar initiates file transfer. This can use a variety of lso available and can use a variety of methods:
- Curl
- Rsync
- Http
We use remote transfer using Curl here so we don’t need an open port on the Pulsar server and tranfer robustness respectively.
We are teaching you to install Pulsar and configure it in MQ mode in this tutorial. Configuring Pulsar in RESTful mode is also possible and is quite useful in certain situations. However, in the most common situation MQ mode is preferable for a number of reasons:
- When running Pulsar in RESTful mode, all of the job control and data transfer is controlled by the Galaxy server usually using http transfers. This can place a limit on the size of files that can be transferred without constant configuring of the webserver.
- When running in RESTful mode, Pulsar also needs to have an https server such as nginx, including securing it, configuring it, getting certificates and opening ports. This can be very difficult to do if you are attempting to submit jobs to an institutional HPC where the admins probably won’t let you do any of these things.
- In MQ mode, you only need to open a port for the RabbitMQ server on a machine you are more likely to control. The HPC side running Pulsar can just connect back to you.
See the Pulsar documentation for details.
Install and configure a message queueing system
In this section we will install the RabbitMQ server on your Galaxy server VM.
RabbitMQ is an AMQP server that can queue messages between systems for all sorts of reasons. Here, we will be using the queue so that Galaxy and Pulsar can communicate jobs, job status and job metadata between them easily and robustly. More information on RabbitMQ can be found on their website.
Installing the roles
Firstly we will add and configure another role to our Galaxy playbook - a community role which runs RabbitMQ in docker and configures it. In order to have docker installed automatically, we use geelingguy’s docker role, which luckly needs no configuration changes. Additionally we will use the Galaxy community role for deploying Pulsar
Hands On: Install the Ansible roles
From your ansible working directory, edit the
requirements.ymlfile and add the following lines:--- a/requirements.yml +++ b/requirements.yml @@ -30,3 +30,10 @@ # TPV Linting - name: usegalaxy_eu.tpv_auto_lint version: 0.4.3 +# RabbitMQ for Pulsar +- src: geerlingguy.docker + version: 6.1.0 +- src: usegalaxy_eu.rabbitmqserver + version: 1.4.4 +- src: galaxyproject.pulsar + version: 1.0.10If you haven’t worked with diffs before, this can be something quite new or different.
If we have two files, let’s say a grocery list, in two files. We’ll call them ‘a’ and ‘b’.
Code In: Old$ cat old
🍎
🍐
🍊
🍋
🍒
🥑Code Out: New$ cat new
🍎
🍐
🍊
🍋
🍍
🥑We can see that they have some different entries. We’ve removed 🍒 because they’re awful, and replaced them with an 🍍
Diff lets us compare these files
$ diff old new
5c5
< 🍒
---
> 🍍
Here we see that 🍒 is only in a, and 🍍 is only in b. But otherwise the files are identical.
There are a couple different formats to diffs, one is the ‘unified diff’
$ diff -U2 old new
--- old	2022-02-16 14:06:19.697132568 +0100
+++ new	2022-02-16 14:06:36.340962616 +0100
@@ -3,4 +3,4 @@
 🍊
 🍋
-🍒
+🍍
 🥑
This is basically what you see in the training materials which gives you a lot of context about the changes:
--- oldis the ‘old’ file in our view+++ newis the ‘new’ file- @@ these lines tell us where the change occurs and how many lines are added or removed.
- Lines starting with a - are removed from our ‘new’ file
- Lines with a + have been added.
So when you go to apply these diffs to your files in the training:
- Ignore the header
- Remove lines starting with - from your file
- Add lines starting with + to your file
The other lines (🍊/🍋 and 🥑) above just provide “context”, they help you know where a change belongs in a file, but should not be edited when you’re making the above change. Given the above diff, you would find a line with a 🍒, and replace it with a 🍍
Added & Removed Lines
Removals are very easy to spot, we just have removed lines
--- old	2022-02-16 14:06:19.697132568 +0100
+++ new	2022-02-16 14:10:14.370722802 +0100
@@ -4,3 +4,2 @@
 🍋
 🍒
-🥑
And additions likewise are very easy, just add a new line, between the other lines in your file.
--- old	2022-02-16 14:06:19.697132568 +0100
+++ new	2022-02-16 14:11:11.422135393 +0100
@@ -1,3 +1,4 @@
 🍎
+🍍
 🍐
 🍊
Completely new files
Completely new files look a bit different, there the “old” file is
/dev/null, the empty file in a Linux machine.$ diff -U2 /dev/null old
--- /dev/null 2022-02-15 11:47:16.100000270 +0100
+++ old 2022-02-16 14:06:19.697132568 +0100
@@ -0,0 +1,6 @@
+🍎
+🍐
+🍊
+🍋
+🍒
+🥑And removed files are similar, except with the new file being /dev/null
--- old	2022-02-16 14:06:19.697132568 +0100
+++ /dev/null	2022-02-15 11:47:16.100000270 +0100
@@ -1,6 +0,0 @@
-🍎
-🍐
-🍊
-🍋
-🍒
-🥑
Now install it with:
Code In: Bashansible-galaxy install -p roles -r requirements.yml
Configuring RabbitMQ
We need to configure RabbitMQ to be able to handle Pulsar messages. To do this we will need to create some queues, Rabbit users, some queue vhosts and set some passwords. We also need to configure rabbit to listen on various interfaces and ports.
Defining Virtual Hosts
Each set of queues in RabbitMQ are grouped and accessed via virtual hosts. We need to create one of these for the transactions between the Galaxy server and Pulsar server. They are set as an array under the rabbitmq_vhosts variable.
Defining users
Users need to be defined, given passwords and access to the various queues. We will need to create a user that can access this vhost. We will also create an admin user. The queue will need access to the Pulsar queue vhost. They are set as an array under the rabbitmq_users variable with the following structure:
rabbitmq_users:
  - user: username
    password: "{{ rabbitmq_password_username }}"
    vhost: /vhostname
Notice the variable we used instead of directly placing the password there. It will be read from vault instead.
Optional: You can add tags to each user if required. e.g. For an admin user it could be useful to add in a administrator tag. These tags allow you to grant permissions to every user with a specific tag.
RabbitMQ server config
We also need to set some RabbitMQ server configuration variables. Such as where its security certificates are and which ports to listen on (both via localhost and network).
We will need to make sure that the RabbitMQ default port is open and accessible on the server we are installing RabbitMQ onto. (In our case this is the Galaxy server). Additionally, RabbitMQ provides a management interface for us, where we can see e.g. queues, connections and statistics.
Port Usage Suggested Restrictions 5671SSL Listener None 5672Plain text listener Limit to just 172.0.0.0/8to ensure only the host machine and other containers can access it, and we aren’t sending plain text credentials over the internet.15672Management interface Limit to 172.0.0.0/8to only permit accessing management interface locally.
More information about the rabbitmq ansible role can be found in the repository.
Add RabbitMQ configuration to Galaxy VM.
Hands On: Add RabbitMQ settings to Galaxy VM groupvars file.
Edit your
group_vars/secret.ymland define some random passwords:Code In: Bashansible-vault edit group_vars/secret.ymlvault_rabbitmq_password_vhost: "a-really-long-password-here" vault_rabbitmq_admin_password: "a-different-really-long-password"This is going in the vault as they are secrets we need to set. Both of our services, Galaxy and Pulsar, need these variables, so we’ll need to make sure they’re in both playbooks. Both Galaxy in the job configuration, and Pulsar in its configuration.
Replace both with long random (or not) string.
From your ansible working directory, edit the
group_vars/galaxyservers.ymlfile and add make the following changes.--- a/group_vars/galaxyservers.yml +++ b/group_vars/galaxyservers.yml @@ -174,8 +174,11 @@ certbot_environment: staging certbot_well_known_root: /srv/nginx/_well-known_root certbot_share_key_users: - www-data +certbot_share_key_ids: + - "999:999" certbot_post_renewal: | systemctl restart nginx || true + docker restart rabbit_hole || true certbot_domains: - "{{ inventory_hostname }}" certbot_agree_tos: --agree-tos @@ -226,6 +229,47 @@ slurm_config: SelectType: select/cons_tres SelectTypeParameters: CR_CPU_Memory # Allocate individual cores/memory instead of entire node +#Install pip docker package for ansible +pip_install_packages: + - name: docker +# RabbitMQ +rabbitmq_container: + name: rabbit_hole + image: rabbitmq:3.11-management + hostname: "{{ inventory_hostname }}" + +rabbitmq_plugins: + - rabbitmq_management + +rabbitmq_config: + listeners: + tcp: none + ssl_listeners: + default: 5671 + ssl_options: + verify: verify_peer + cacertfile: /etc/ssl/certs/fullchain.pem + certfile: /etc/ssl/certs/cert.pem + keyfile: /etc/ssl/user/privkey-999:999.pem + fail_if_no_peer_cert: 'false' + management_agent: + disable_metrics_collector: "false" + management: + disable_stats: 'false' + consumer_timeout: 21600000 # 6 hours in milliseconds + +rabbitmq_vhosts: + - /pulsar/pulsar_au + +rabbitmq_users: + - user: admin + password: "{{ vault_rabbitmq_admin_password }}" + tags: administrator + vhost: / + - user: pulsar_au + password: "{{ vault_rabbitmq_password_vhost }}" + vhost: /pulsar/pulsar_au + # TUS galaxy_tusd_port: 1080 galaxy_tus_upload_store: /data/tusRabbitMQ depends on specific Erlang versions. If the Erlang version has been updated, you may need to change the value of
rabbitmq_version:in the configuration above. Information on the RabbitMQ Erlag version requirements.Update the Galaxy playbook to include the usegalaxy_eu.rabbitmq role.
--- a/galaxy.yml +++ b/galaxy.yml @@ -43,6 +43,8 @@ become: true become_user: "{{ galaxy_user_name }}" - galaxyproject.nginx + - geerlingguy.docker + - usegalaxy_eu.rabbitmqserver - galaxyproject.gxadmin - galaxyproject.cvmfs post_tasks:This is one of the constant problems with Ansible, how do you order everything correctly? Does an ordering exist such that a single run of the playbook will have everything up and working? We encounter one such instance of this problem now.
Here are the dependencies between the roles:
From To Purpose nginx galaxy The nginx templates depend on variables only available after the Galaxy role is run SSL certificates nginx A running nginx is required RabbitMQ SSL certificates RabbitMQ will silently start with incorrect configuration if SSL certificates are not present at boot time. Galaxy RabbitMQ Galaxy needs the RabbitMQ available to submit jobs. And as you can see there is a circular dependency. Galaxy requires RabbitMQ, but RabbitMQ depends on a long chain of things that depends finally on Galaxy.
There are some mitigating factors, some software will start with incomplete configuration. We can rely on Galaxy retrying access to RabbitMQ if it isn’t already present. Additionally on first run, Galaxy is restarted by a handler which runs at the end. (Except that the nginx role triggers all pending handlers as part of the SSL certificate deployment.)
We try to present the optimal version here but due to these interdependencies and Ansible specifics, sometimes it is not possible to determine a good ordering of roles, and multiple runs might be required.
Run the playbook.
Code In: Bashansible-playbook galaxy.ymlThe rabbitmq server daemon will have been installed on your Galaxy VM. Check that it’s running now:
Code In: Bashdocker psCode Out: BashCONTAINER ID IMAGE COMMAND CREATED STATUS PORTS NAMES d0d69d035768 rabbitmq:3.9.11 "docker-entrypoint.s…" 6 months ago Up 5 hours 4369/tcp, 0.0.0.0:5671->5671/tcp, 5672/tcp, 15691-15692/tcp, 25672/tcp, 0.0.0.0:15672->15672/tcp rabbit_holeBut this doesn’t tell the whole story, so run the diagnostics command to check that the interfaces are setup and listening. RabbitMQ has a bad habit of silently failing when processing the configuration, without any logging information If RabbitMQ has any problem reading the configuration file, it falls back to the default configuration (listens without ssl on
tcp/5672) so be sure to check that everything is OK before continuing.Code In: Bashdocker exec rabbit_hole rabbitmq-diagnostics statusCode Out: Bash... Listeners Interface: [::], port: 15672, protocol: http, purpose: HTTP API Interface: [::], port: 25672, protocol: clustering, purpose: inter-node and CLI tool communication Interface: [::], port: 5672, protocol: amqp, purpose: AMQP 0-9-1 and AMQP 1.0 Interface: 0.0.0.0, port: 5671, protocol: amqp/ssl, purpose: AMQP 0-9-1 and AMQP 1.0 over TLSSince we enabled metrics, let’s check if the api works:
Code In: BashMake sure to replace <password> with the one from your vault. If you don’t have jq installed, just leave that part with the pipe out, it just makes it prettier.
curl --silent -s -u admin:<password> http://localhost:15672/api/whoami | jqCode Out: BashThis should report the following response:
{
  "name": "admin",
  "tags": [
    "administrator"
  ]
}
But wait! There are more ways it can go wrong. To be extra sure, run a quick
curlcommand.Code In: Bashcurl http://localhost:5672(the non-encrypted port)
Code Out: BashThis should report the following response:
curl: (7) Failed to connect to localhost port 5672: Connection refusedif it doesn’t, consider the following debugging steps:
- Restarting RabbitMQ
- Check that the configuration looks correct (ssl private key path looks valid)
- Check that the private key is shared correctly with the rabbitmq user
Code In: Bashcurl -k --http0.9 https://localhost:5671 --output - && printf "\n"Code Out: BashThis should report the following response:
AMQPif it doesn’t, consider the following debugging steps:
- Restarting RabbitMQ
- Check that the configuration looks correct (ssl private key path looks valid)
- Check that the private key is shared correctly with the rabbitmq user
By this point you should have a functional RabbitMQ! Let’s check out the dashboard:
Hands On: Accessing the RabbitMQ Dashboard
RabbitMQ has a fancy dashboard, so we should make that accessible with our NGINX:
--- a/templates/nginx/galaxy.j2
+++ b/templates/nginx/galaxy.j2
@@ -84,4 +84,14 @@ server {
 	location /training-material/ {
 		proxy_pass https://training.galaxyproject.org/training-material/;
 	}
+
+	location ~* /rabbitmq/(.*) {
+		rewrite ^/rabbitmq/(.*)$ /$1 break;
+		proxy_pass http://127.0.0.1:15672;
+		proxy_buffering                    off;
+		proxy_set_header Host              $http_host;
+		proxy_set_header X-Real-IP         $remote_addr;
+		proxy_set_header X-Forwarded-For   $proxy_add_x_forwarded_for;
+		proxy_set_header X-Forwarded-Proto $scheme;
+	}
 }
Run the playbook.
Code In: Bashansible-playbook galaxy.ymlNow we can take a look at the RabbitMQ dashboard.
- Open a new tab in your browser and enter your server’s hostname followed by
/rabbitmq/- A login window should appear. Use the admin credentials you defined earlier in this tutorial.
- Click on connections and you can see how connections will be established and appear there during the next parts of the tutorial.
Installing and configuring Pulsar on a remote machine
Now that we have a message queueing system running on our Galaxy VM, we need to install and configure Pulsar on our remote compute VM. To do this we need to create a new ansible playbook to install Pulsar.
Configuring Pulsar
From the galaxyproject.pulsar ansible role documentation, we need to specify some variables.
There is one required variable:
pulsar_server_dir - The location in which to install pulsar
Then there are a lot of optional variables. They are listed here for information. We will set some for this tutorial but not all.
| Variable Name | Description | Default |
|---|---|---|
pulsar_yaml_config |
a YAML dictionary whose contents will be used to create Pulsar’s app.yml |
|
pulsar_venv_dir |
The role will create a virtualenv from which Pulsar will run | <pulsar_server_dir>/venv if installing via pip, <pulsar_server_dir>/.venv if not. |
pulsar_config_dir |
Directory that will be used for Pulsar configuration files. | <pulsar_server_dir>/config if installing via pip, <pulsar_server_dir> if not |
pulsar_optional_dependencies |
List of optional dependency modules to install, depending on which features you are enabling. | None |
pulsar_install_environments |
Installing dependencies may require setting certain environment variables to compile successfully. | |
pulsar_create_user |
Should a user be created for running pulsar? | |
pulsar_user |
Define the user details |
Some of the other options we will be using are:
-
We will set the tool dependencies to rely on conda for tool installs.
-
You will need to know the FQDN or IP address of the Galaxy server VM that you installed RabbitMQ on.
Hands On: Configure pulsar group variables
Create a new file in
group_varscalledpulsarservers.ymland set some of the above variables as well as some others.--- /dev/null +++ b/group_vars/pulsarservers.yml @@ -0,0 +1,50 @@ +galaxy_server_hostname: "{{ groups['galaxyservers'][0] }}" # Important!!! +# Put your Galaxy server's fully qualified domain name (FQDN) (or the FQDN of the RabbitMQ server) above. + +pulsar_root: /mnt/pulsar + +pulsar_pip_install: true +pulsar_pycurl_ssl_library: openssl +pulsar_systemd: true +pulsar_systemd_runner: webless + +pulsar_create_user: true +pulsar_user: {name: pulsar, shell: /bin/bash} + +pulsar_optional_dependencies: + - pyOpenSSL + # For remote transfers initiated on the Pulsar end rather than the Galaxy end + - pycurl + # drmaa required if connecting to an external DRM using it. + - drmaa + # kombu needed if using a message queue + - kombu + # psutil allows pulsar's local job runner to kill processes effictively. + - psutil + # temporary patch until setuptools is eliminated + - setuptools + +pulsar_yaml_config: + staging_directory: "{{ pulsar_staging_dir }}" + persistence_directory: "{{ pulsar_persistence_dir }}" + tool_dependency_dir: "{{ pulsar_dependencies_dir }}" + # The following are the settings for the pulsar server to contact the message queue with related timeouts etc. + message_queue_url: "pyamqp://pulsar_au:{{ vault_rabbitmq_password_vhost }}@{{ galaxy_server_hostname }}:5671//pulsar/pulsar_au?ssl=1" + min_polling_interval: 0.5 + amqp_publish_retry: True + amqp_publish_retry_max_retries: 5 + amqp_publish_retry_interval_start: 10 + amqp_publish_retry_interval_step: 10 + amqp_publish_retry_interval_max: 60 + # We also need to create the dependency resolvers configuration so pulsar knows how to find and install dependencies + # for the tools we ask it to run. The simplest method which covers 99% of the use cases is to use conda auto installs + # similar to how Galaxy works. + dependency_resolution: + resolvers: + - type: conda + auto_init: true + auto_install: true + +# Pulsar should use the same job metrics plugins as Galaxy. This will automatically set `job_metrics_config_file` in +# `pulsar_yaml_config` and create `{{ pulsar_config_dir }}/job_metrics_conf.yml`. +pulsar_job_metrics_plugins: "{{ galaxy_job_metrics_plugins }}"If the tool you want to run on Pulsar doesn’t have a conda package, you will need to make alternative arrangements! This is complex and beyond our scope here. See the Pulsar documentation for details.
Add the following lines to your
hostsfile:--- a/hosts +++ b/hosts @@ -2,3 +2,5 @@ gat-0.eu.galaxy.training ansible_connection=local ansible_user=ubuntu [dbservers:children] galaxyservers +[pulsarservers] +gat-0.oz.galaxy.training ansible_user=ubuntu
We will now write a new playbook for the pulsar installation as we are going to install it on a separate VM. We will also install the CVMFS client and the Galaxy CVMFS repos on this machine so Pulsar has the same access to reference data that Galaxy does.
We need to include a couple of pre-tasks to install virtualenv, git, etc.
Hands On: Creating the playbook
Create a
pulsar.ymlfile with the following contents:--- /dev/null +++ b/pulsar.yml @@ -0,0 +1,21 @@ +- hosts: pulsarservers + vars_files: + - group_vars/secret.yml + pre_tasks: + - name: Install some packages + package: + name: + - build-essential + - git + - python3-dev + - libcurl4-openssl-dev + - libssl-dev + - virtualenv + - python3-venv + state: present + update_cache: yes + become: yes + roles: + - role: galaxyproject.cvmfs + become: yes + - galaxyproject.pulsarThere are a couple of pre-tasks here. This is because we need to install some base packages on these very vanilla ubuntu instances as well as give ourselves ownership of the directory we are installing into.
Hands On: Run the Playbook
Run the playbook.
Code In: Bashansible-playbook pulsar.ymlAfter the script has run, pulsar will be installed on the remote machines!
If your remote pulsar machine uses a different key, you may need to supply the
ansible-playbookcommand with the private key for the connection using the--private-key key.pemoption.Log in to the machines and have a look in the
/mnt/pulsardirectory. You will see the venv and config directories. All the config files created by Ansible can be perused.Run
journalctl -f -u pulsarA log will now start scrolling, showing the startup of pulsar. You’ll notice that it will be initializing and installing conda. Once this is completed, Pulsar will be listening on the assigned port.
Configuring Galaxy to use Pulsar as a job destination
Now we have a Pulsar server up and running, we need to tell our Galaxy about it.
Galaxy talks to the Pulsar server via it’s job configuration file. We need to let Galaxy know about Pulsar there and make sure Galaxy has loaded the requisite job runner, and has a destination set up.
There are three things we need to do here:
- Create a job runner which uses the
galaxy.jobs.runners.pulsar:PulsarMQJobRunnercode. - Create a job destination referencing the above job runner.
- Tell Galaxy which tools to send to this job destination.
For this tutorial, we will configure Galaxy to run the BWA and BWA-MEM tools on Pulsar.
Hands On: Configure Galaxy
In your
group_vars/galaxyservers.ymlfile add the following job runner to the<plugins>section:--- a/group_vars/galaxyservers.yml +++ b/group_vars/galaxyservers.yml @@ -24,6 +24,16 @@ galaxy_job_config: slurm: load: galaxy.jobs.runners.slurm:SlurmJobRunner drmaa_library_path: /usr/lib/slurm-drmaa/lib/libdrmaa.so.1 + pulsar_runner: + load: galaxy.jobs.runners.pulsar:PulsarMQJobRunner + amqp_url: "pyamqp://pulsar_au:{{ vault_rabbitmq_password_vhost }}@localhost:5671/{{ rabbitmq_vhosts[0] }}?ssl=1" + amqp_acknowledge: true + amqp_ack_republish_time: 1200 + amqp_consumer_timeout: 2 + amqp_publish_retry: true + amqp_publish_retry_max_retries: 60 + galaxy_url: "https://{{ inventory_hostname }}" + manager: _default_ handling: assign: ['db-skip-locked'] execution:Add the following to the
destinations:section of yourtpv_rules_localfile:--- a/files/galaxy/config/tpv_rules_local.yml +++ b/files/galaxy/config/tpv_rules_local.yml @@ -56,3 +56,18 @@ destinations: max_mem: 8 params: native_specification: --nodes=1 --ntasks=1 --cpus-per-task={cores} --mem={round(mem*1024)} --time={entity.params['walltime']}:00:00 + + pulsar: + runner: pulsar_runner + params: + default_file_action: remote_transfer + dependency_resolution: remote + jobs_directory: /mnt/pulsar/files/staging + persistence_directory: /mnt/pulsar/files/persisted_data + remote_metadata: false + rewrite_parameters: true + transport: curl + outputs_to_working_directory: false + scheduling: + require: + - pulsarYou’ll notice we need to know a lot about the configuration of the remote end, this is an unfortunate requirement with pulsar. Changes to e.g. the staging directory need to be coordinated between Pulsar and Galaxy. That’s fine if both are under your administration, but for a completely remote Pulsar it can be difficult.
Notably we also override
outputs_to_working_directory, as this option is incompatible with running Pulsar, and, unnecessary. Pulsar already provides the same job isolation and safety that we request when we set that option by default in Galaxy’s configuration.Install the BWA and BWA-MEM tools, if needed.
- Open Galaxy in your browser and type
bwain the tool search box on the left. If “Map with BWA-MEM” is among the search results, you can skip the following steps.- Access the Admin menu from the top bar (you need to be logged-in with an email specified in the
admin_userssetting)- Click “Install and Uninstall”, which can be found on the left, under “Tool Management”
- Enter
bwain the search interface- Click on the first hit, having
devteamas owner- Click the “Install” button for the latest revision
- Enter “Mapping” as the target section and click “OK”.
We now need to tell Galaxy to send BWA and BWA-MEM jobs to the
pulsardestination. We specify this in the<tools>section of your job conf.Add the following to the end of the TPV rules file (inside the
tools:section if it exists or create it if it doesn’t.)--- a/files/galaxy/config/tpv_rules_local.yml +++ b/files/galaxy/config/tpv_rules_local.yml @@ -26,6 +26,14 @@ tools: cores: int(job.get_param_values(app)['__job_resource']['cores']) params: walltime: "{int(job.get_param_values(app)['__job_resource']['time'])}" + .*/bwa/.*: + scheduling: + require: + - pulsar + .*/bwa_mem/.*: + scheduling: + require: + - pulsar destinations: local_env:Note that here we are using the short tool IDs. If you want to run only a specific version of a tool in Pulsar, you have to use the full tool ID (e.g.
toolshed.g2.bx.psu.edu/repos/devteam/bwa/bwa/0.7.17.4) instead. The full tool ID can be found inside theintegrated_tool_panel.xmlfile in themutable-configdirectory.Finally run the Galaxy playbook in order to deploy the updated job configuration, and to restart Galaxy.
Code In: Bashansible-playbook galaxy.yml
1-pulsar.sh
Testing Pulsar
Now we will upload a small set of data to run bwa-mem with.
Hands On: Testing the Pulsar destination
Upload the following files from zenodo.
https://zenodo.org/record/582600/files/mutant_R1.fastq
https://zenodo.org/record/582600/files/mutant_R2.fastq
Map with BWA-MEM tool with the following parameters
- “Will you select a reference genome from your history or use a built-in index”:
Use a built-in genome index- “Using reference genome”:
Escherichia coli (str. K-12 substr MG1655): eschColi_K12- “Single or Paired-end reads”:
Paired end- param-file “Select first set of reads”:
mutant_R1.fastq- param-file “Select second set of reads”:
mutant_R2.fastqAs soon as you press execute Galaxy will send the job to the pulsar server. You can watch the log in Galaxy using:
journalctl -fu galaxy-*You can watch the log in Pulsar by ssh’ing to it and tailing the log file with:
journalctl -fu pulsar
2-run-job.sh
You’ll notice that the Pulsar server has received the job (all the way in Australia!) and now should be installing bwa-mem via conda. Once this is complete (which may take a while - first time only) the job will run. When it starts running it will realise it needs the E. coli genome from CVMFS and fetch that, and then results will be returned to Galaxy!
How awesome is that? Pulsar in another continent with reference data automatically from CVMFS :)
Hands On: Time to git commitIt’s time to commit your work! Check the status with
git statusAdd your changed files with
git add ... # any files you see that are changedAnd then commit it!
git commit -m 'Finished Running Jobs on Remote Resources with Pulsar'
Comment: Got lost along the way?If you missed any steps, you can compare against the reference files, or see what changed since the previous tutorial.
If you’re using
gitto track your progress, remember to add your changes and commit with a good commit message!
Retries of the staging actions
When the staging actions are carried out by the Pulsar server itself (like in the case when driving Pulsar by message queue), there are some parameters that can be tweaked to ensure reliable communication between the Galaxy server and the remote Pulsar server. The aim of these parameters is to control the retrying of staging actions in the event of a failure.
For each action (preprocess/input or postprocess/output), you can specify:
 - *_action_max_retries    - the maximum number of retries before giving up
 - *_action_interval_start - how long start sleeping between retries (in seconds)
 - *_action_interval_step  - by how much the interval is increased for each retry (in seconds)
 - *_action_interval_max   - the maximum number of seconds to sleep between retries
substitute the * with preprocess or postprocess
In the following box, as an example, we have collected the values adopted in a Pulsar site with an unreliable network connection:
preprocess_action_max_retries: 30
preprocess_action_interval_start: 2
preprocess_action_interval_step: 10
preprocess_action_interval_max: 300
postprocess_action_max_retries: 30
postprocess_action_interval_start: 2
postprocess_action_interval_step: 10
postprocess_action_interval_max: 300
In this case, for both actions, Pulsar will try to carry out the staging action 30 times, sleeping 2 secs after the first retry and adding 10 secs more to each next retries, until a maximum of 300 seconds between retries.
We hope you never have to experience a situation like this one, but if needed just adapt the numbers to your case and add the parameters in the pulsar_yaml_config section of your pulsarservers.yml file.
Pulsar in Production
If you want to make use of Pulsar on a Supercomputer, you only need access to a submit node, and you will need to run Pulsar there. We recommend that if you need to run a setup with Pulsar, that you deploy an AMQP server (e.g. RabbitMQ) alongside your Galaxy. That way, you can run Pulsar on any submit nodes, and it can connect directly to the AMQP and Galaxy. Other Pulsar deployment options require exposing ports wherever Pulsar is running, and this requires significant more coordination effort.
For each new Pulsar server, you will need to add:
- In the RabbitMQ config:
- A vhost
- A user - configured with a password and the new vhost
- In the Galaxy job configuration
- A new job runner with the new connection string
- A new destination or multiple destinations for the new runner.
Pulsar servers can be the head node of a cluster. You can create a cluster and use your favourite job scheduler such as Slurm or PBS to schedule jobs. You can have many destinations in your Galaxy job conf file that change the number of cpus, amount of RAM etc. It can get quite complex and flexible if you like.
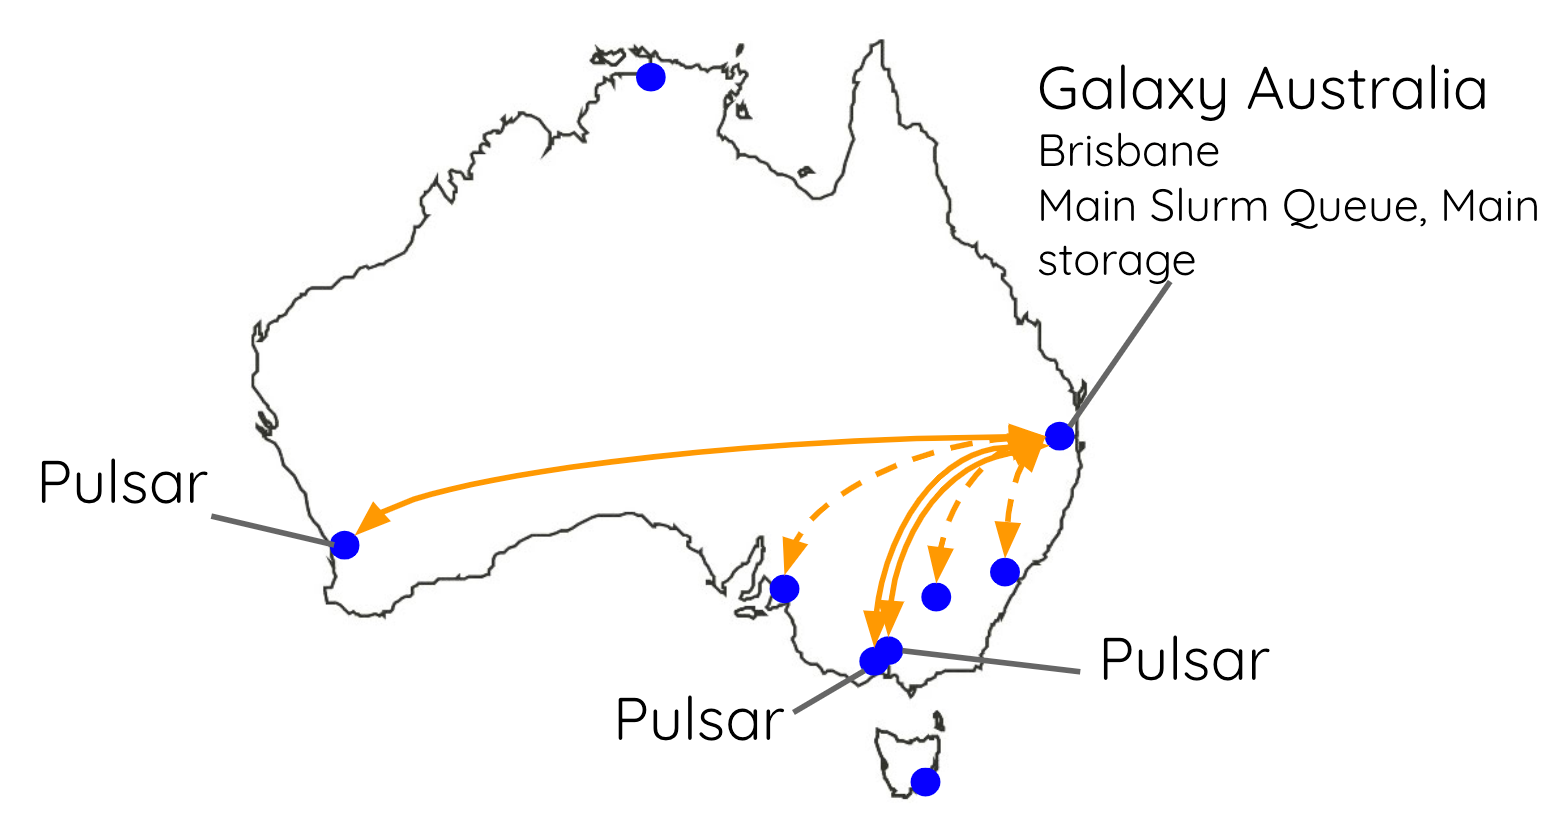
Australia
You can also create multiple queues on your RabbitMQ server for multiple Pulsar servers. On Galaxy Australia, we run 5 different Pulsar servers spread out all around the country. They all communicate with Galaxy via the one RabbitMQ server.
Europe
Galaxy Europe has taken Pulsar and built The Pulsar Network. This provides a framework for easily deploying Pulsar clusters in the cloud, something needed to support compute centers which might not have as much experience. This way they get an easy package they can deploy and the European Galaxy team can manage.

The main purpose of this network is to support the workload of the UseGalaxy.eu instance by distributing it across several European data centers and clusters. If you’re interested in setting up something similar, they provide documentation on how to install and configure a Pulsar network endpoint on a cloud infrastructure and how to connect it to your server.
Conclusion
You’re ready to ship your Galaxy jobs around the world! Now wherever you have compute space, you know how to setup a Pulsar node and connect it to Galaxy. Let us know if you come up with creative places to run your Galaxy jobs (coworker’s laptops, your IoT fridge, the sky is the limit if it’s x86 and has python)
Comment: Galaxy Admin Training PathThe yearly Galaxy Admin Training follows a specific ordering of tutorials. Use this timeline to help keep track of where you are in Galaxy Admin Training.
You've Finished the Tutorial
Key points
Pulsar allows you to easily add geographically distributed compute resources into your Galaxy instance
It also works well in situations where the compute resources cannot share storage pools.
Frequently Asked Questions
Have questions about this tutorial? Have a look at the available FAQ pages and support channelsFeedback
Did you use this material as an instructor? Feel free to give us feedback on how it went.
Did you use this material as a learner or student? Click the form below to leave feedback.

Citing this Tutorial
- Nate Coraor, Simon Gladman, Marius van den Beek, Helena Rasche, Gianmauro Cuccuru, Mira Kuntz, Running Jobs on Remote Resources with Pulsar (Galaxy Training Materials). https://training.galaxyproject.org/training-material/topics/admin/tutorials/pulsar/tutorial.html Online; accessed TODAY
- Hiltemann, Saskia, Rasche, Helena et al., 2023 Galaxy Training: A Powerful Framework for Teaching! PLOS Computational Biology 10.1371/journal.pcbi.1010752
- Batut et al., 2018 Community-Driven Data Analysis Training for Biology Cell Systems 10.1016/j.cels.2018.05.012
@misc{admin-pulsar,
author = "Nate Coraor and Simon Gladman and Marius van den Beek and Helena Rasche and Gianmauro Cuccuru and Mira Kuntz",
	title = "Running Jobs on Remote Resources with Pulsar (Galaxy Training Materials)",
	year = "",
	month = "",
	day = "",
	url = "\url{https://training.galaxyproject.org/training-material/topics/admin/tutorials/pulsar/tutorial.html}",
	note = "[Online; accessed TODAY]"
}
@article{Hiltemann_2023,
	doi = {10.1371/journal.pcbi.1010752},
	url = {https://doi.org/10.1371%2Fjournal.pcbi.1010752},
	year = 2023,
	month = {jan},
	publisher = {Public Library of Science ({PLoS})},
	volume = {19},
	number = {1},
	pages = {e1010752},
	author = {Saskia Hiltemann and Helena Rasche and Simon Gladman and Hans-Rudolf Hotz and Delphine Larivi{\`{e}}re and Daniel Blankenberg and Pratik D. Jagtap and Thomas Wollmann and Anthony Bretaudeau and Nadia Gou{\'{e}} and Timothy J. Griffin and Coline Royaux and Yvan Le Bras and Subina Mehta and Anna Syme and Frederik Coppens and Bert Droesbeke and Nicola Soranzo and Wendi Bacon and Fotis Psomopoulos and Crist{\'{o}}bal Gallardo-Alba and John Davis and Melanie Christine Föll and Matthias Fahrner and Maria A. Doyle and Beatriz Serrano-Solano and Anne Claire Fouilloux and Peter van Heusden and Wolfgang Maier and Dave Clements and Florian Heyl and Björn Grüning and B{\'{e}}r{\'{e}}nice Batut and},
	editor = {Francis Ouellette},
	title = {Galaxy Training: A powerful framework for teaching!},
	journal = {PLoS Comput Biol}
}
Funding
These individuals or organisations provided funding support for the development of this resource