Reference Data with Data Managers
| Author(s) |
|
| Editor(s) |
|
| Reviewers |
|
OverviewQuestions:
Objectives:
Requirements:
Have an understanding of the way in which Galaxy stores and uses reference data
Be able to download and use data managers to add a reference genome and its pre-calculated indices into the Galaxy reference data system
Use an Ansible playbook for all of the above
- slides Slides: Ansible
- tutorial Hands-on: Ansible
- slides Slides: Galaxy Installation with Ansible
- tutorial Hands-on: Galaxy Installation with Ansible
Time estimation: 1 hourSupporting Materials:Published: Mar 17, 2023Last modification: Jan 23, 2026License: Tutorial Content is licensed under Creative Commons Attribution 4.0 International License. The GTN Framework is licensed under MITpurl PURL: https://gxy.io/GTN:T00329rating Rating: 2.0 (1 recent ratings, 4 all time)version Revision: 4
Overview
The problem
The Galaxy server administrator needed to know how to update each type of reference data, how to run the indexers, where to get the data from, and how to update Galaxy’s Tool Data Table and location configuration files.
Data managers to the rescue
Data Managers are a special class of Galaxy tool which allows for the download and/or creation of data that is stored within Tool Data Tables and their underlying flat location (e.g. .loc) files. These tools handle the creation of indices and the addition of entries/lines to the data table / .loc file via the Galaxy admin interface.
Data Managers can be defined locally in the data manager and tool data table configuration files or installed through the Tool Shed. When Data Managers are installed from the Tool Shed, their configuration is added to the shed versions of the data manager configuration and tool data table configuration files.
They are a flexible framework for adding reference data to Galaxy (not just genomic data). They are workflow compatible and can run via the Galaxy API. Data managers automatically update the appropriate location files when new data are installed.
For more background details on data managers, check out:
- The data managers documentation on the hub
- How to define a data manager for a tool
- There is also discussion of this topic in the Reference Genomes in Galaxy slides
Comment: Pre-built data are availableThe usegalaxy.* servers and Galaxy Community have a large amount of reference data online and available for use by your Galaxy server. For instructions on how to access and use these data, see the Reference Data with CVMFS tutorial.
If your data are not available as part of the CVMFS repository, Galaxy Data Managers can be used to locally install and build reference data.
Agenda
Comment: Galaxy Admin Training PathThe yearly Galaxy Admin Training follows a specific ordering of tutorials. Use this timeline to help keep track of where you are in Galaxy Admin Training.
Galaxy Reference Data Components
As discussed in the overview, Galaxy Data Managers handle the population of numerous Galaxy components. From the highest level to the lowest:
- Addition of tool data table entries into the shed version of the tool data table configuration file,
shed_tool_data_table_conf.xml. Multiple data tables with the samenameattribute are automatically merged by Galaxy. - Population of the corresponding location (
.loc) file when new reference data are installed. The.locfile used corresponds to the Data Manager and its specific version that was executed to install the data. The path to the location file can be found in the Data Manager’s entry in the tool data table configuration file (above). - Generation of the reference data on disk, underneath the directory specified by
tool_data_pathingalaxy.yml.
Installing and Using Data Managers with the Galaxy UI
Install a the Fetch Genome Data Manager from the Tool Shed
Comment: Galaxy ConfigurationNo special configuration for Galaxy beyond creating an admin user is necessary in order to use Data Managers. However, you may want to be aware of the
enable_data_manager_user_viewoption, which enables unprivileged user to browse data installed via Data Managers. This option is not required, and users will be able to use data installed via Data Managers regardless.Data are installed in the path specified by
tool_data_pathingalaxy.yml. If you prefer to keep hand-managed reference data separate from DM-managed reference data, you can setgalaxy_data_manager_data_pathinstead.
This hands-on exercise installs data managers and reference data through the Galaxy UI, but you are encouraged to install tools in a deterministic, recordable way through the use of Ephemeris, which is described in the Installing and Using Data Managers from the command line with Ephemeris section below.
We will install a data manager that can fetch the various genome sequences from multiple sources.
Hands On: Install the Fetch Genome Data Manager
- Access the Admin menu from the top bar (you need to be logged-in with an email specified in the
admin_userssetting)- Click Install and Uninstall, which can be found on the left, under Tool Management
- Enter
fetch_genomein the search interface- Click on the first hit, having
devteamas owner- Click the Install button for the latest revision
View in the file system where the various elements land. Have a look in the configuration files located in config directory.
QuestionWhat did this tool installation change?
- The data manager and its data tables are added to the Galaxy-managed “shed” versions of the data manager config (
/srv/galaxy/var/config/shed_data_manager_conf.xml) and data table config (/srv/galaxy/var/config/shed_tool_data_table_conf.xml)- The data manager tool is installed along side other Galaxy tools in the shed tools directory
Code In: BashLet’s investigate the data manager config file.
cat /srv/galaxy/var/config/shed_data_manager_conf.xmlCode Out: Bash<data_managers><data_manager id="fetch_genome_all_fasta_dbkeys" guid="toolshed.g2.bx.psu.edu/repos/devteam/data_manager_fetch_genome_dbkeys_all_fasta/data_manager/fetch_genome_all_fasta_dbkeys/0.0.1" shed_conf_file="/srv/galaxy/var/config/shed_tool_conf.xml"> <tool file="toolshed.g2.bx.psu.edu/repos/devteam/data_manager_fetch_genome_dbkeys_all_fasta/4d3eff1bc421/data_manager_fetch_genome_dbkeys_all_fasta/data_manager/data_manager_fetch_genome_all_fasta_dbkeys.xml" guid="toolshed.g2.bx.psu.edu/repos/devteam/data_manager_fetch_genome_dbkeys_all_fasta/data_manager_fetch_genome_all_fasta_dbkey/0.0.4"><tool_shed>toolshed.g2.bx.psu.edu</tool_shed><repository_name>data_manager_fetch_genome_dbkeys_all_fasta</repository_name><repository_owner>devteam</repository_owner><installed_changeset_revision>4d3eff1bc421</installed_changeset_revision><id>toolshed.g2.bx.psu.edu/repos/devteam/data_manager_fetch_genome_dbkeys_all_fasta/data_manager_fetch_genome_all_fasta_dbkey/0.0.4</id><version>0.0.4</version></tool><data_table name="all_fasta"> <output> <column name="value"/> <column name="dbkey"/> <column name="name"/> <column name="path" output_ref="out_file"> <move type="file"> <source>${path}</source> <target base="${GALAXY_DATA_MANAGER_DATA_PATH}">${dbkey}/seq/${path}</target> </move> <value_translation>${GALAXY_DATA_MANAGER_DATA_PATH}/${dbkey}/seq/${path}</value_translation> <value_translation type="function">abspath</value_translation> </column> </output> </data_table> <data_table name="__dbkeys__"> <output> <column name="value"/> <column name="name"/> <column name="len_path" output_ref="out_file"> <move type="file"> <source>${len_path}</source> <target base="${GALAXY_DATA_MANAGER_DATA_PATH}">${value}/len/${len_path}</target> </move> <value_translation>${GALAXY_DATA_MANAGER_DATA_PATH}/${value}/len/${len_path}</value_translation> <value_translation type="function">abspath</value_translation> </column> </output> </data_table> </data_manager>Code In: BashLet’s also investigate the tool data table config file.
cat /srv/galaxy/var/config/shed_tool_data_table_conf.xmlCode Out: Bash<?xml version="1.0" ?> <tables> <table name="all_fasta" comment_char="#"> <columns>value, dbkey, name, path</columns> <file path="/srv/galaxy/var/tool-data/toolshed.g2.bx.psu.edu/repos/devteam/data_manager_fetch_genome_dbkeys_all_fasta/4d3eff1bc421/all_fasta.loc"/> <tool_shed_repository> <tool_shed>toolshed.g2.bx.psu.edu</tool_shed> <repository_name>data_manager_fetch_genome_dbkeys_all_fasta</repository_name> <repository_owner>devteam</repository_owner> <installed_changeset_revision>4d3eff1bc421</installed_changeset_revision> </tool_shed_repository> </table> <table name="__dbkeys__" comment_char="#"> <columns>value, name, len_path</columns> <file path="/srv/galaxy/var/tool-data/toolshed.g2.bx.psu.edu/repos/devteam/data_manager_fetch_genome_dbkeys_all_fasta/4d3eff1bc421/dbkeys.loc"/> <tool_shed_repository> <tool_shed>toolshed.g2.bx.psu.edu</tool_shed> <repository_name>data_manager_fetch_genome_dbkeys_all_fasta</repository_name> <repository_owner>devteam</repository_owner> <installed_changeset_revision>4d3eff1bc421</installed_changeset_revision> </tool_shed_repository> </table> </tables>
Download and install a reference genome sequence
Next, we will install some reference data. Specifically, we will grab sacCer2 (version 2 of the Saccharomyces cerevisiae genome).
Hands On: Download and install sacCer2
- Access the Admin menu from the top bar
Click Local Data, which can be found on the left, under Server
You should see something like this:
If you instead see the message “You do not currently have any Data Managers installed,” you may need to restart your Galaxy server.
Click all_fasta under View Tool Data Table Entries
You should see the current contents of
tool-data/all_fasta.loc, which will be empty.Click Local Data to return to the previous page
- Click Create DBKey and Reference Genome - fetching ( Galaxy version 0.0.4) under Installed Data Managers.
- param-select “Use existing dbkey or create a new one”:
Existing- param-select “DBKEY to assign to data”:
sacCer2- param-text “Name of sequence”:
S. cerevisiae June 2008 (SGD/sacCer2)- param-select “Choose the source for the reference genome”:
UCSCThe data manager tool form fields correspond to the columns in the tool data table, as referenced in
shed_tool_data_table_conf.xml.
Tool Field Tool Data Table Entry Purpose ID for sequence valuecolumn inall_fastaIdentifier of specific build of the genome, if it differs from the DBKEY. Used for variant builds such as the hg19femalebuild ofhg19.DBKEY to assign to data dbkeycolumn inall_fastaIdentifier of the genome, the UCSC build ID for UCSC builds like hg19.Name of sequence namecolumn inall_fastaDisplay name of the genome, displayed in Galaxy tool dropdowns. - Click Execute. In your history, you will see a new dataset for the data manager run. When the job has finished, go back to the Data Manager view on the Galaxy Admin page (Click Local Data).
Click all_fasta under View Tool Data Table Entries
You should see that sacCer2 has been added to all_fasta.

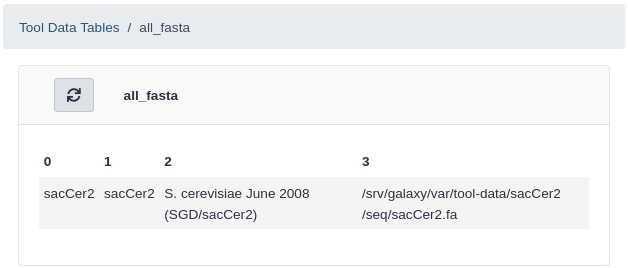
View in the file system where the changes to the location file and the reference genome fasta file.
QuestionWhat did this data manager execution change?
- An entry for the sacCer2 genome has been added to the
all_fasta.locfile for thedata_manager_fetch_genome_all_fasta_dbkeydata manager. The path to the location file can be found in “shed” versions of the data manager config (/srv/galaxy/var/config/shed_data_manager_conf.xml) and data table config (/srv/galaxy/var/config/shed_tool_data_table_conf.xml)- The data manager tool is installed along side other Galaxy tools in the shed tools directory
Code In: BashGet the path to the
all_fasta.locfile:grep 'data_manager_fetch_genome_dbkeys_all_fasta.*all_fasta.loc' /srv/galaxy/var/config/shed_tool_data_table_conf.xmlCode Out: Bash<file path="/srv/galaxy/var/tool-data/toolshed.g2.bx.psu.edu/repos/devteam/data_manager_fetch_genome_dbkeys_all_fasta/4d3eff1bc421/all_fasta.loc"/>Code In: BashLet’s investigate the contents of the location file identified above (the path to yours may be different if you installed a different version of the data manager):
cat /srv/galaxy/var/tool-data/toolshed.g2.bx.psu.edu/repos/devteam/data_manager_fetch_genome_dbkeys_all_fasta/4d3eff1bc421/all_fasta.locCode Out: Bash#This file lists the locations and dbkeys of all the fasta files #under the "genome" directory (a directory that contains a directory #for each build). The script extract_fasta.py will generate the file #all_fasta.loc. This file has the format (white space characters are #TAB characters): # #<unique_build_id> <dbkey> <display_name> <file_path> # #So, all_fasta.loc could look something like this: # #apiMel3 apiMel3 Honeybee (Apis mellifera): apiMel3 /path/to/genome/apiMel3/apiMel3.fa #hg19canon hg19 Human (Homo sapiens): hg19 Canonical /path/to/genome/hg19/hg19canon.fa #hg19full hg19 Human (Homo sapiens): hg19 Full /path/to/genome/hg19/hg19full.fa # #Your all_fasta.loc file should contain an entry for each individual #fasta file. So there will be multiple fasta files for each build, #such as with hg19 above. # sacCer2 sacCer2 S. cerevisiae June 2008 (SGD/sacCer2) /srv/galaxy/var/tool-data/sacCer2/seq/sacCer2.faCode In: BashFinally, verify that we have some sequences in the genome fasta file:
grep '^>' /srv/galaxy/var/tool-data/sacCer2/seq/sacCer2.faCode Out: Bash>2micron >chrI >chrII >chrIII >chrIV >chrIX >chrM >chrV >chrVI >chrVII >chrVIII >chrX >chrXI >chrXII >chrXIII >chrXIV >chrXV >chrXVI
Download and install the BWA data manager
Having the genome is a prerequisite for our ultimate goal, which is to use the sacCer2 genome as a reference genome for the BWA tool. BWA, like many tools, needs an index of the reference genome, and has its own format for that index. Thankfully, the BWA/BWA-MEM data manager will build that index for us.
In this part we will repeat the same process as when we installed the Fetch Genome data manager, except that we will install the BWA/BWA-MEM data manager this time.
Hands On: Install the BWA/BWA-MEM Data Manager
- Access the Admin menu from the top bar
- Click Install and Uninstall, which can be found on the left, under Tool Management
- Enter
bwa_mem_indexin the search interface- Click on the first hit, having
devteamas owner- Click the Install button for the latest revision
Build the BWA index for a reference genome
In this part we will actually build the BWA index for sacCer2. It will automatically be added to our list of available reference genomes in the BWA tool.
Hands On: Build the sacCer2 BWA index
- Access the Admin menu from the top bar
- Click Local Data, which can be found on the left, under Server
- Click BWA-MEM index - builder ( Galaxy version 0.0.5) under Installed Data Managers.
- param-select “Source Fasta Sequence”:
S. cerevisiae June 2008 (SGD/sacCer2)- Click Execute.
Verify that the new BWA index for sacCer2 has been built and the .loc file has been filled in. From the Local Data page in the Admin section, click on bwa_mem_indexes under View Tool Data Table Entries
S. cerevisiae sacCer2 should now appear in the list!
QuestionWhat changes were made by the BWA-MEM index builder?
- An entry for the sacCer2 BWA/BWA-MEM index has been added to the
bwa_mem_index.locfile for thedata_manager_bwa_mem_index_builderdata manager.- A symlink to the sacCer2 genome fasta file installed by the Fetch Genome data manager above was created in the sacCer2 BWA index directory,
/srv/galaxy/var/tool-data/sacCer2/bwa_mem_index/sacCer2/.- The BWA/BWA-MEM index for the sacCer2 genome has been built.
Code In: Bashls -l /srv/galaxy/var/tool-data/sacCer2/bwa_mem_index/sacCer2Code Out: Bashtotal 20800 lrwxrwxrwx 1 galaxy galaxy 20 Dec 9 18:29 sacCer2.fa -> ../../seq/sacCer2.fa -rw-r--r-- 1 galaxy galaxy 14 Dec 9 18:29 sacCer2.fa.amb -rw-r--r-- 1 galaxy galaxy 591 Dec 9 18:29 sacCer2.fa.ann -rw-r--r-- 1 galaxy galaxy 12163076 Dec 9 18:29 sacCer2.fa.bwt -rw-r--r-- 1 galaxy galaxy 3040750 Dec 9 18:29 sacCer2.fa.pac -rw-r--r-- 1 galaxy galaxy 6081552 Dec 9 18:29 sacCer2.fa.sa
Installing and Using Data Managers from the command line with Ephemeris
The same process described in the previous section can also be performed from the command line, e.g. in a CI/CD pipeline, using Ephemeris. For a more in-depth look at Ephemeris, especially in the tool installation context, please see the Galaxy Tool Management with Ephemeris tutorial.
In order to accomplish this, you will need:
- The URL of your Galaxy server
- The API key for your account, which must be an admin
Galaxy admin accounts are specified as a comma-separated email list in the
admin_usersdirective ofgalaxy.yml. If you have set up your Galaxy server using the Galaxy Installation with Ansible tutorial, this is set toadmin@example.org.
- In your browser, open your Galaxy homepage
- Log in, or register a new account, if it’s the first time you’re logging in
- Go to
User -> Preferencesin the top menu bar, then click onManage API key- If there is no current API key available, click on
Create a new keyto generate it- Copy your API key to somewhere convenient, you will need it throughout this tutorial
Install a the Fetch Genome Data Manager from the Tool Shed
Hands On: Install the Fetch Genome Data Manager with Ephemeris
Re-activate the virtualenv you created for the ephemeris tool management tutorial.
Code In: Bash. ~/ephemeris_venv/bin/activatethen you might need to re-run the steps:
python3 -m venv ~/ephemeris_venv
. ~/ephemeris_venv/bin/activate
pip install ephemeris
Install the
data_manager_fetch_genome_dbkeys_all_fastadata manager tool owned bydevteam.Code In: BashBe sure to adjust the value of
-gappropriately for your Galaxy server, and replace the value of-awith your API key.shed-tools install -g https://galaxy.example.org -a <api-key> --name data_manager_fetch_genome_dbkeys_all_fasta --owner devteamCode OutStoring log file in: /tmp/ephemeris_x9xeu8ro (1/1) Installing repository data_manager_fetch_genome_dbkeys_all_fasta from devteam to section "None" at revision 4d3eff1bc421 (TRT: 0:00:00.401143) repository data_manager_fetch_genome_dbkeys_all_fasta installed successfully (in 0:00:25.530604) at revision 4d3eff1bc421 Installed repositories (1): [('data_manager_fetch_genome_dbkeys_all_fasta', '4d3eff1bc421')] Skipped repositories (0): [] Errored repositories (0): [] All repositories have been installed. Total run time: 0:00:25.932659
Download and install a reference genome sequence
Hands On: Download and install sacCer3 with Ephemeris
Create a config file for
run-data-managersnamedfetch-sacCer3.yml:data_managers: - id: toolshed.g2.bx.psu.edu/repos/devteam/data_manager_fetch_genome_dbkeys_all_fasta/data_manager_fetch_genome_all_fasta_dbkey/0.0.4 params: - 'dbkey_source|dbkey': '{{ item.dbkey }}' - 'sequence_name': '{{ item.name }}' - 'reference_source|reference_source_selector': 'ucsc' - 'reference_source|requested_dbkey': '{{ item.dbkey }}' items: - dbkey: sacCer3 name: 'S. cerevisiae Apr. 2011 (SacCer_Apr2011/sacCer3)' data_table_reload: - all_fasta - __dbkeys__The
run-data-managersconfig file options correspond to the options in the data manager tool XML file. To locate the tool XML file for the Fetch Genomes data manager, you can search for it in the Tool Shed the same way you did when installing it via the UI. You can also open the data manager’s tool form in the UI as if to run it, and, using the drop-down menu at the top right of the tool form, click “See in Tool Shed”. From the Tool Shed, you can click the Development repository link and browse to the tool XML file,data_manager/data_manager_fetch_genome_all_fasta_dbkeys.xml.
run-data-managersconfig file componentPurpose idData manager full (shed) tool ID, this can be found in shed_data_manager_conf.xmlparamsData manager tool params, these correspond to <param>tags in the tool XML file. Nested paramaters are specified using a pipe character (|).param dbkey_source|dbkeyValue of <param name="dbkey" ...>in<conditional name="dbkey_source">.param sequence_nameValue of <param name="sequence_name" ...>.param reference_source|reference_source_selectorValue of <param name="reference_source_selector" ...>in<conditional name="reference_source">.param reference_source|requested_dbkeyValue of <param name="requested_dbkey" ...>in<conditional name="reference_source">.itemsA list of variables to template in to params, referenced in param fields with{{ item }}. In the case of genomes, for example, you can run this DM with multiple genomes, or you could give multiple URLs.data_table_reloadNames of the data tables you want to reload after your DMs are finished running. This can be important for subsequent data managers. Run the Genome Fetch DM with
run-data-managers:Code In: Bashrun-data-managers -g https://galaxy.example.org -a <api-key> --config fetch-sacCer3.ymlCode OutStoring log file in: /tmp/ephemeris_f6klyy7v Running data managers that populate the following source data tables: ['all_fasta'] Dispatched job 1. Running DM: "toolshed.g2.bx.psu.edu/repos/devteam/data_manager_fetch_genome_dbkeys_all_fasta/data_manager_fetch_genome_all_fasta_dbkey/0.0.4" with parameters: {'dbkey_source|dbkey': 'sacCer3', 'dbkey_source|dbkey_name': 'S. cerevisiae Apr. 2011 (SacCer_Apr2011/sacCer3)', 'reference_source|reference_source_selector': 'ucsc', 'reference_source|requested_dbkey': 'sacCer3'} Job 1 finished with state ok. Running data managers that index sequences. Finished running data managers. Results: Successful jobs: 1 Skipped jobs: 0 Failed jobs: 0- In the Galaxy UI, access the Admin menu from the top bar
- Click Local Data, which can be found on the left, under Server
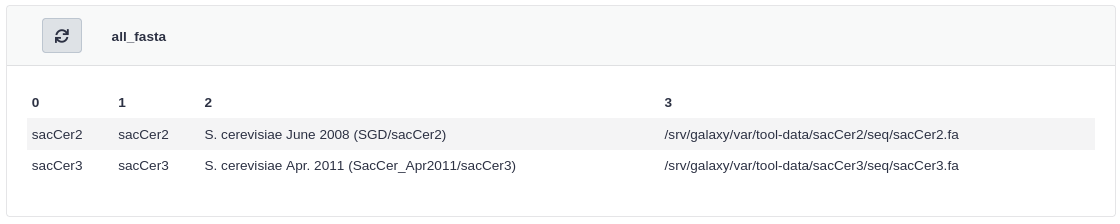
Click all_fasta under View Tool Data Table Entries
You should see that sacCer3 has been added to all_fasta.
QuestionCan we view the changes from the command line? Where are they located?
The
all_fasta.locfile contains the entry for our new genome. If you need a reminder on how to locate it, see the What did this data manager execution change? question in the UI section above.Code In: Bashcat /srv/galaxy/var/tool-data/toolshed.g2.bx.psu.edu/repos/devteam/data_manager_fetch_genome_dbkeys_all_fasta/4d3eff1bc421/all_fasta.locCode Out: Bash#This file lists the locations and dbkeys of all the fasta files #under the "genome" directory (a directory that contains a directory #for each build). The script extract_fasta.py will generate the file #all_fasta.loc. This file has the format (white space characters are #TAB characters): # #<unique_build_id> <dbkey> <display_name> <file_path> # #So, all_fasta.loc could look something like this: # #apiMel3 apiMel3 Honeybee (Apis mellifera): apiMel3 /path/to/genome/apiMel3/apiMel3.fa #hg19canon hg19 Human (Homo sapiens): hg19 Canonical /path/to/genome/hg19/hg19canon.fa #hg19full hg19 Human (Homo sapiens): hg19 Full /path/to/genome/hg19/hg19full.fa # #Your all_fasta.loc file should contain an entry for each individual #fasta file. So there will be multiple fasta files for each build, #such as with hg19 above. # sacCer2 sacCer2 S. cerevisiae June 2008 (SGD/sacCer2) /srv/galaxy/var/tool-data/sacCer2/seq/sacCer2.fa sacCer3 sacCer3 S. cerevisiae Apr. 2011 (SacCer_Apr2011/sacCer3) /srv/galaxy/var/tool-data/sacCer3/seq/sacCer3.fa
Warning: run-data-managers is not idempotent!Unlike
shed-tools install, the Ephemerisrun-data-managersutility is not idempotent. If run a second time on the same set of inputs, you will end up with two entries in yourall_fastadata table, with the data from the second run overwriting the data from the first run.Please see Galaxy issue #15188 for details.
Download and install the BWA data manager
Hands On: Install the BWA/BWA-MEM Data Manager
Install the
bwa_mem_index_builder_data_managerdata manager tool owned bydevteam.Code In: Bashshed-tools install -g https://galaxy.example.org -a <api-key> --name data_manager_bwa_mem_index_builder --owner devteamCode OutStoring log file in: /tmp/ephemeris_2dyujjvi (1/1) Installing repository data_manager_bwa_mem_index_builder from devteam to section "None" at revision 63d5652be07a (TRT: 0:00:00.204350) repository data_manager_bwa_mem_index_builder installed successfully (in 0:00:05.599382) at revision 63d5652be07a Installed repositories (1): [('data_manager_bwa_mem_index_builder', '63d5652be07a')] Skipped repositories (0): [] Errored repositories (0): [] All repositories have been installed. Total run time: 0:00:05.804217
Build the BWA index for a reference genome
Hands On: Build the sacCer3 BWA index
Create a config file for
run-data-managersnamedbuild-sacCer3-bwa.yml:data_managers: - id: toolshed.g2.bx.psu.edu/repos/devteam/data_manager_bwa_mem_index_builder/bwa_mem_index_builder_data_manager/0.0.5 params: - 'all_fasta_source': '{{ item.dbkey }}' - 'sequence_name': '{{ item.name }}' items: - dbkey: sacCer3 name: 'S. cerevisiae Apr. 2011 (SacCer_Apr2011/sacCer3)' data_table_reload: - bwa_mem_indexesRun the BWA-MEM index builder DM with
run-data-managers:Code In: Bashrun-data-managers -g https://galaxy.example.org -a <api-key> --config build-sacCer3-bwa.ymlCode OutStoring log file in: /tmp/ephemeris_esecdef4 Running data managers that populate the following source data tables: ['all_fasta'] Running data managers that index sequences. Dispatched job 2. Running DM: "toolshed.g2.bx.psu.edu/repos/devteam/data_manager_bwa_mem_index_builder/bwa_mem_index_builder_data_manager/0.0.5" with parameters: {'all_fasta_source': 'sacCer3', 'sequence_name': 'S. cerevisiae Apr. 2011 (SacCer_Apr2011/sacCer3)'} Job 2 finished with state ok. Finished running data managers. Results: Successful jobs: 1 Skipped jobs: 0 Failed jobs: 0- In the Galaxy UI, access the Admin menu from the top bar
- Click Local Data, which can be found on the left, under Server
Click bwa_mem_indexes under View Tool Data Table Entries
You should see that sacCer3 has been added to bwa_mem_indexes. You can also verify this via the command line using the methods you’ve learned above.
Verify that BWA can access the new reference data
Finally, we will verify that the BWA tool can see the new genome indexes.
Hands On: Configure Galaxy
Install the BWA and BWA-MEM tools, if needed. If installing with Ephemeris, the repo name for the
--nameparameter isbwaand the owner isdevteam.
- Open Galaxy in your browser and type
bwain the tool search box on the left. If “Map with BWA” is among the search results, you can skip the following steps.- Access the Admin menu from the top bar (you need to be logged-in with an email specified in the
admin_userssetting)- Click “Install and Uninstall”, which can be found on the left, under “Tool Management”
- Enter
bwain the search interface- Click on the first hit, having
devteamas owner- Click the “Install” button for the latest revision
- Enter “Mapping” as the target section and click “OK”.
Click the “Home” icon at the top to return to the Galaxy analysis interface
Load the Map with BWA ( Galaxy version 0.7.17.5) tool and verify that the sacCer2 genome (if you completed the “Galaxy UI” section) and/or sacCer3 genome (if you completed the “command line with Ephemeris” section) appears in the param-select “Using reference genome” option.
How cool is that? No editing .loc files, no making sure you’ve got TABs instead of spaces. Fully auto!
Comment: Galaxy Admin Training PathThe yearly Galaxy Admin Training follows a specific ordering of tutorials. Use this timeline to help keep track of where you are in Galaxy Admin Training.
You've Finished the Tutorial
Key points
Understand how Galaxy stores and uses its reference data
Understand how to manually add a reference genome and tool indices if required
Understand and how to use data managers to make all of this much much easier
Frequently Asked Questions
Have questions about this tutorial? Have a look at the available FAQ pages and support channelsFeedback
Did you use this material as an instructor? Feel free to give us feedback on how it went.
Did you use this material as a learner or student? Click the form below to leave feedback.

Citing this Tutorial
- Simon Gladman, Enis Afgan, Reference Data with Data Managers (Galaxy Training Materials). https://training.galaxyproject.org/training-material/topics/admin/tutorials/reference-genomes/tutorial.html Online; accessed TODAY
- Hiltemann, Saskia, Rasche, Helena et al., 2023 Galaxy Training: A Powerful Framework for Teaching! PLOS Computational Biology 10.1371/journal.pcbi.1010752
- Batut et al., 2018 Community-Driven Data Analysis Training for Biology Cell Systems 10.1016/j.cels.2018.05.012
@misc{admin-reference-genomes,
author = "Simon Gladman and Enis Afgan",
	title = "Reference Data with Data Managers (Galaxy Training Materials)",
	year = "",
	month = "",
	day = "",
	url = "\url{https://training.galaxyproject.org/training-material/topics/admin/tutorials/reference-genomes/tutorial.html}",
	note = "[Online; accessed TODAY]"
}
@article{Hiltemann_2023,
	doi = {10.1371/journal.pcbi.1010752},
	url = {https://doi.org/10.1371%2Fjournal.pcbi.1010752},
	year = 2023,
	month = {jan},
	publisher = {Public Library of Science ({PLoS})},
	volume = {19},
	number = {1},
	pages = {e1010752},
	author = {Saskia Hiltemann and Helena Rasche and Simon Gladman and Hans-Rudolf Hotz and Delphine Larivi{\`{e}}re and Daniel Blankenberg and Pratik D. Jagtap and Thomas Wollmann and Anthony Bretaudeau and Nadia Gou{\'{e}} and Timothy J. Griffin and Coline Royaux and Yvan Le Bras and Subina Mehta and Anna Syme and Frederik Coppens and Bert Droesbeke and Nicola Soranzo and Wendi Bacon and Fotis Psomopoulos and Crist{\'{o}}bal Gallardo-Alba and John Davis and Melanie Christine Föll and Matthias Fahrner and Maria A. Doyle and Beatriz Serrano-Solano and Anne Claire Fouilloux and Peter van Heusden and Wolfgang Maier and Dave Clements and Florian Heyl and Björn Grüning and B{\'{e}}r{\'{e}}nice Batut and},
	editor = {Francis Ouellette},
	title = {Galaxy Training: A powerful framework for teaching!},
	journal = {PLoS Comput Biol}
}
Funding
These individuals or organisations provided funding support for the development of this resource
Congratulations on successfully completing this tutorial!
You can use Ephemeris's
shed-tools installcommand to install the tools used in this tutorial.shed-tools install [-g GALAXY] [-a API_KEY] -t <(curl https://training.galaxyproject.org/training-material/api/topics/admin/tutorials/reference-genomes/tutorial.json | jq .admin_install_yaml -r)Alternatively you can copy and paste the following YAML
---
install_tool_dependencies: true
install_repository_dependencies: true
install_resolver_dependencies: true
tools:
- name: bwa
  owner: devteam
  revisions: e188dc7a68e6
  tool_panel_section_label: Mapping
  tool_shed_url: https://toolshed.g2.bx.psu.edu/
- name: data_manager_bwa_mem_index_builder
  owner: devteam
  revisions: 9e993022c762
  tool_panel_section_label: Data Managers
  tool_shed_url: https://toolshed.g2.bx.psu.edu/
- name: data_manager_fetch_genome_dbkeys_all_fasta
  owner: devteam
  revisions: 4d3eff1bc421
  tool_panel_section_label: Data Managers
  tool_shed_url: https://toolshed.g2.bx.psu.edu/