Reference Data with CVMFS
| Author(s) |
|
| Reviewers |
|
OverviewQuestions:
Objectives:
Requirements:
Have an understanding of what CVMFS is and how it works
Install and configure the CVMFS client on a linux machine and mount the Galaxy reference data repository
Configure your Galaxy to use these reference genomes and indices
Use an Ansible playbook for all of the above.
- slides Slides: Ansible
- tutorial Hands-on: Ansible
- slides Slides: Galaxy Installation with Ansible
- tutorial Hands-on: Galaxy Installation with Ansible
Time estimation: 1 hourSupporting Materials:Published: Jan 27, 2019Last modification: Jul 12, 2026License: Tutorial Content is licensed under Creative Commons Attribution 4.0 International License. The GTN Framework is licensed under MITpurl PURL: https://gxy.io/GTN:T00003rating Rating: 4.7 (0 recent ratings, 19 all time)version Revision: 56
These words come from a transcript of Simon Gladman teaching this course. He is a bioinformatician at the University of Melbourne in Australia and also one of the administrators of Galaxy Australia.
Hello everybody and welcome back to the Galaxy administrators course. in this session we’re going to be talking about reference data in Galaxy using CVMFS.
Hopefully by now you’ve all seen the video of the slides - if not I suggest you go and do look at those first as that explains how reference data works in Galaxy and also what CVMFS does to help us with that reference data.
Some of the requirements from that we hope you’ve already completed: Galaxy server installation with Ansible and hopefully you understand what Ansible is and how it’s used.
Overview
The CernVM-FS Blomer et al. 2011 is a distributed filesystem perfectly designed for sharing readonly data across the globe. We use it in the Galaxy Project for sharing things that a lot of Galaxy servers need. Namely:
- Reference Data
- Genome sequences for hundreds of useful species.
- Indices for the genome sequences
- Various bioinformatic tool indices for the available genomes
- Tool containers
- Singularity containers of everything stored in Biocontainers (A bioinformatic tool container repository.) You get these for free every time you build a Bioconda recipe/package for a tool.
- Others too..
From the Cern website:
The CernVM File System provides a scalable, reliable and low-maintenance software distribution service. It was developed to assist High Energy Physics (HEP) collaborations to deploy software on the worldwide-distributed computing infrastructure used to run data processing applications. CernVM-FS is implemented as a POSIX read-only file system in user space (a FUSE module). Files and directories are hosted on standard web servers and mounted in the universal namespace /cvmfs.”
All right, just a quick recap. CVMFS or Cern-VMFS is a distributed file system perfectly designed for sharing read-only data across the globe and we use it extensively in the Galaxy project for sharing things that a lot of Galaxy servers need. Namely all the reference data; so the genome sequences for all the different genomes that we need to think about in in Galaxy and bioinformatics. Things like a human genome, mouse genome, etc., etc. And we need a lot of indices for the genome sequences and lots of tool indices for all those genomes. And we also have a repository that contains tool containers. So singularity containers for all of the bioinformatics tools that we might want to use. There’s a tutorial idea already done this week or coming up soon this week that explains how to use those singularity containers within Galaxy as well. So we’re just going to get on with things.
A slideshow presentation on this subject is available. More details are available on usegalaxy.org (Galaxy Main’s) reference data setup and CVMFS system.
This exercise uses Ansible to install and configure CVMFS and Galaxy’s access to CVMFS. For a tutorial that does not use Ansible and gives a closer look at how reference data is configured in Galaxy, see the Reference Data with CVMFS without Ansible tutorial.
Agenda
Comment: Galaxy Admin Training PathThe yearly Galaxy Admin Training follows a specific ordering of tutorials. Use this timeline to help keep track of where you are in Galaxy Admin Training.
The agenda we’re going to follow today is: We’re going to install and configure Galaxy CVMFS reference data using ansible. We’re going to explore the CVMFS installation and then we’re going to configure Galaxy to use it.
Ansible-CVMFS and Galaxy
There are a few different repositories that um Galaxy project has created and shared with everybody. The first one is the reference data and indices and this is in data.galaxyproject.org. And then we have another one called singularity.galaxyproject.org.
If you want to have a look at what’s in there you can click on the “data cache”, and this link here will show you all the things that are inside this data.galaxyproject.org
The Galaxy project supports a few CVMFS repositories.
| Repository | Repository Address | Contents |
|---|---|---|
| Reference Data and Indices | data.galaxyproject.org |
Genome sequences and their tool indices, Galaxy .loc files for them as well |
| BRC Analytics Data | brc.galaxyproject.org |
Pathogen sequences and indexes available in Galaxy for BRC Analytics |
| Vertebrate Genomes Project | vgp.galaxyproject.org |
Assemblies and indexes from the Vertebrate Genomes Project |
| Singularity Containers | singularity.galaxyproject.org |
Singularity containers for everything in Biocontainers for use in Galaxy systems |
| Galaxy Main Configuration | main.galaxyproject.org |
The configuration files etc for Galaxy Main (usegalaxy.org) |
You can browse the contents of data.galaxyproject.org at the datacache.
Installing and Configuring
Luckily for us, the Galaxy Project has a lot of experience with using and configuring CVMFS and we are going to leverage off that. To get CVMFS working on our Galaxy server, we will use the Ansible role for CVMFS written by the Galaxy Project. Firstly, we need to install the role and then write a playbook for using it.
If the terms “Ansible”, “role” and “playbook” mean nothing to you, please checkout the Ansible introduction slides and the Ansible introduction tutorial
It is possible to have ansible installed on the remote machine and run it there, not just from your local machine connecting to the remote machine.
Your hosts file will need to use
localhost, and whenever you run playbooks withansible-playbook -i hosts playbook.yml, you will need to add-c localto your command.Be certain that the playbook that you’re writing on the remote machine is stored somewhere safe, like your user home directory, or backed up on your local machine. The cloud can be unreliable and things can disappear at any time.
Okay, so now we’re going to move on to installing and configuring Galaxy’s CVMFS reference data with Ansible. We are going to do some Ansible here and we’re going to install CVMFS onto our Galaxy server. Hopefully you all have access to a Galaxy server.
Here is mine. And on it I am an admin user and I have access to the admin page. This was done as part of the installation of Galaxy um and hopefully you’ve installed a tool.
I have bwa and bwa-mem installed under Mapping.
So if I click on that you can see here that I have bwa-mem but there are no options available for reference genomes, so we want to fix that. We want to connect to all of Galaxy’s pre-built references and so we’re going to use Galaxy’s CVMFS system to let our own Galaxies connect and get access to all the pre-built caches and everything we already have.
Okay, so let’s get started. If we go back to our tutorial here, it says that we need to install a CVMFS role into our requirements.yml and then add it to our Ansible.
Hands On: Installing CVMFS with Ansible
In your working directory, add the CVMFS role to your
requirements.ymlWell the first thing I need to do is log into my Galaxy machine in the terminal.
Have a look at he contents of this directory and I’ll go into galaxy and here we have all of the Ansible scripts that hopefully everybody already has.
--- a/requirements.yml +++ b/requirements.yml @@ -16,3 +16,6 @@ version: 0.0.14 - name: galaxyproject.tusd version: 0.0.1 +# CVMFS Support +- src: galaxyproject.cvmfs + version: 0.3.3If you haven’t worked with diffs before, this can be something quite new or different.
If we have two files, let’s say a grocery list, in two files. We’ll call them ‘a’ and ‘b’.
Code In: Old$ cat old
🍎
🍐
🍊
🍋
🍒
🥑Code Out: New$ cat new
🍎
🍐
🍊
🍋
🍍
🥑We can see that they have some different entries. We’ve removed 🍒 because they’re awful, and replaced them with an 🍍
Diff lets us compare these files
$ diff old new
5c5
< 🍒
---
> 🍍
Here we see that 🍒 is only in a, and 🍍 is only in b. But otherwise the files are identical.
There are a couple different formats to diffs, one is the ‘unified diff’
$ diff -U2 old new
--- old	2022-02-16 14:06:19.697132568 +0100
+++ new	2022-02-16 14:06:36.340962616 +0100
@@ -3,4 +3,4 @@
 🍊
 🍋
-🍒
+🍍
 🥑
This is basically what you see in the training materials which gives you a lot of context about the changes:
--- oldis the ‘old’ file in our view+++ newis the ‘new’ file- @@ these lines tell us where the change occurs and how many lines are added or removed.
- Lines starting with a - are removed from our ‘new’ file
- Lines with a + have been added.
So when you go to apply these diffs to your files in the training:
- Ignore the header
- Remove lines starting with - from your file
- Add lines starting with + to your file
The other lines (🍊/🍋 and 🥑) above just provide “context”, they help you know where a change belongs in a file, but should not be edited when you’re making the above change. Given the above diff, you would find a line with a 🍒, and replace it with a 🍍
Added & Removed Lines
Removals are very easy to spot, we just have removed lines
--- old	2022-02-16 14:06:19.697132568 +0100
+++ new	2022-02-16 14:10:14.370722802 +0100
@@ -4,3 +4,2 @@
 🍋
 🍒
-🥑
And additions likewise are very easy, just add a new line, between the other lines in your file.
--- old	2022-02-16 14:06:19.697132568 +0100
+++ new	2022-02-16 14:11:11.422135393 +0100
@@ -1,3 +1,4 @@
 🍎
+🍍
 🍐
 🍊
Completely new files
Completely new files look a bit different, there the “old” file is
/dev/null, the empty file in a Linux machine.$ diff -U2 /dev/null old
--- /dev/null 2022-02-15 11:47:16.100000270 +0100
+++ old 2022-02-16 14:06:19.697132568 +0100
@@ -0,0 +1,6 @@
+🍎
+🍐
+🍊
+🍋
+🍒
+🥑And removed files are similar, except with the new file being /dev/null
--- old	2022-02-16 14:06:19.697132568 +0100
+++ /dev/null	2022-02-15 11:47:16.100000270 +0100
@@ -1,6 +0,0 @@
-🍎
-🍐
-🍊
-🍋
-🍒
-🥑
Okay, so the first thing I’m going to do is I’m going to add the CVMFS role to the requirements.yml. Edit requirements.yml and we need to add this to the bottom of that file. Copy. Paste. And save it.
Install the role with:
Code In: Bashansible-galaxy install -p roles -r requirements.ymlAnd now install the role into our local Ansible scripts using the ansible-galaxy command. And as you can see, it’s downloading the CVMFS role.
And if we look into roles now you can see that we have galaxyproject.cmfs
Right, clear the screen.
The variables available in this role are:
Okay, now what we need to do is we need to run this role and that will install the CVMFS client onto our Galaxy server. So the first thing we need to do is edit our group files galaxyservers file. There are a bunch of different variables that we can set. We can set the cvmfs role to be a client or stratum zero, stratum one server. URLs - so where we’re getting all this data from, and if you remember in the slideshow, the data can come from Europe or America or Australia. Which repositories we want to have installed. And this is an important one - the quota limit. This is basically saying that CVMFS will cache some data on your local machine and the quota limit is the maximum size of that cache.
Variable Type Description cvmfs_rolestring Type of CVMFS host: client,stratum0,stratum1, orlocalproxy. Controls what packages are installed and what configuration is performed.cvmfs_keyslist of dicts Keys to install on hosts of all types. cvmfs_server_urlslist of dicts CVMFS server URLs, the value of CVMFS_SERVER_URLin/etc/cvmfs/domain.d/<domain>.conf.cvmfs_repositorieslist of dicts CVMFS repository configurations, CVMFS_REPOSITORIESin/etc/cvmfs/default.localplus additional settings in/etc/cvmfs/repositories.d/<repository>/{client,server}.conf.cvmfs_quota_limitinteger in MB Size of CVMFS client cache. Default is 4000.But, luckily for us, the Galaxy Project CVMFS role has a lot of defaults for these variables which we can use by just setting
galaxy_cvmfs_repos_enabledtoconfig-repo. We will also set thecvmfs_quota_limitto something sensible (500MB) as we have relatively small disks on our instances. In a production setup, you should size this appropriately for the client.In production UseGalaxy.org.au uses 100GB, different sites have different needs and you can make your cache smaller depending on your usage. E.g. if your users only use one dataset from the reference data (e.g. just hg38) then perhaps you don’t need such a large cache.
Okay but instead of just modifying galaxyservers.yml and adding in some of these variables - instead what we’re going to do here is - we’re going to create a new group file called all.yml.
Because one of the things that we may want to do in the future - is we may want to create other machines. We might want to have worker nodes for our Galaxy cluster; or we may want to have other machines that we want to be able to create using these Ansible scripts that also have the CVMFS role installed. And instead of reproducing these variables in each of the group var files for those particular machines, we can create a special group vars file called all.yml. And whatever we put in there will be automatically available to all machines that we create with Ansible from this directory. Hopefully that makes a bit of sense and we’re going to use that a bit later on if you come along to the pulsar tutorial where we will also be installing CVMFS on another machine - on a remote machine to run Pulsar.
Add the following lines to your
group_vars/all.ymlfile, creating it if it doesn’t exist:--- a/group_vars/all.yml +++ b/group_vars/all.yml @@ -5,3 +5,8 @@ pip_virtualenv_command: /usr/bin/python3 -m venv # usegalaxy_eu.certbot, usegal # Common variables needed by all hosts galaxy_user_name: galaxy galaxy_db_name: galaxy + +# CVMFS vars +cvmfs_role: client +galaxy_cvmfs_repos_enabled: config-repo +cvmfs_quota_limit: 500So what we’re going to do, is we’re going to create a new file called groupvars/all.yml and we’re going to put some of these CVMFS variables inside it. So i’ll just copy that. Okay, groupvars all dot yaml. And I’ll paste this in. So basically the CVMFS role we want this machine to have is client. Which means that we just want it to be able to access all of our CVMFS reference data. And then we want we’re going to set this one here to say that, “yes we want to set this up for Galaxy.” And the config repo is the one that tells CVMFS how to set everything else up. And then this is the other important one - the CVMFS quota limit. We’re setting to 500 megabytes and that’s just so we don’t fill the root disk of these machines. So I’ll save that.
We’ve integrated the cvmfs and pulsar tutorials better, such that CVMFS will be used for Pulsar as well, this configuration will be needed on all of our machines. This mirrors real life where you want CVMFS on every node that does computation.
Add the new role to the list of roles under the
roleskey in your playbook,galaxy.yml:--- a/galaxy.yml +++ b/galaxy.yml @@ -37,6 +37,7 @@ become_user: "{{ galaxy_user_name }}" - galaxyproject.nginx - galaxyproject.gxadmin + - galaxyproject.cvmfs post_tasks: - name: Setup gxadmin cleanup task ansible.builtin.cron:And now we need to add the role - we need to add the role to our Galaxy playbook. So we edit galaxy.yml which is our playbook and we just need to add the galaxyproject.cvmfs to the bottom of this. galaxyproject.cvmfs. And that’s pretty much it.
Run the playbook
Code In: Bashansible-playbook galaxy.yml
Okay now we just run the playbook. ansible-playbook. We want to run the Galaxy one. So. All right, we’re about to get to the CVMFS repo here. We are now it’s installing the um the apt package of CVMFS. It’s going to get that out of this special um Cern apt repository. Okay, it’s installing it. Hopefully it won’t take too long. Okay, now setting up the repositories. And it’s done.
Congratulations, you’ve set up CVMFS.
Exploring the CVMFS Installation
Okay, that was completed. We’ve now installed CVMFS client onto our machine and we’ve told it to go looking for certain repositories. Now to get access to them. We’ll see what’s in them. uh They’ll be located at slash cvmfs. So under the cvmfs directory in your root directory. So, we can go to that. cd /
Do an ll. You can see here there’s a directory here called cvmfs.
So we’ll go in there and have a look and see what’s in there.
So let’s have a look. Oh there’s nothing in there! Well actually, what what’s going to happen is; as soon as we go looking for something in this directory, so autofs will automatically mount the particular thing we’re looking for. And so what we’re going to do here is I’m going to go: cd data.galaxyproject.org, because I know that’s one of the one of the repositories that should have been installed.
And when I do that, autofs is automatically going to mount it for me on the fly. Like that.
And now I’ve cd’d into it and if I do an ll, you can see here I’ve got some things in here now. I’ve got byhand and managed.
If I go into byhand you can see here that I have quite a lot of different genomes and their tool indices.
So if I’m going to, say, sacCer2, I can see in here there are bowtie index, the bwa index, the uh the picard index, the sam index; a whole bunch of other different things - including the original sequences etc. So yeah, quite a lot of data and we just have access to that on the fly. And then as soon as we try and look at any of these files, what will happen is CVMFS will automatically cache it to the local disk within within that 500 megabyte cache that we uh we set up earlier. This is really cool. And we can tell Galaxy to look at all of this data and use it as its reference data.
Hands On: Exploring CVMFS
SSH into your machine
Change directory into
/cvmfs/and list the files in that folderQuestionWhat do you see?
You should see nothing, as CVMFS uses
autofsin order to mount paths only upon request.Change directory into
/cvmfs/data.galaxyproject.org/.Code In: Bashcd /cvmfs/data.galaxyproject.org/ ls ls byhand ls managedQuestionWhat do you see now?
You’ll see
.locfiles, genomes and indices. AutoFS only mounts the files when they’re accessed, so it appears like there is no folder there.And just like that we all have access to all the reference genomes and associated tool indices thanks to the Galaxy Project, IDC, and Nate’s hard work!
Configuring Galaxy to use the CVMFS references.
Now that we have mounted the CVMFS repository we need to tell Galaxy how to find it and use it.
There are two primary directories in the reference data repository:
| Directory | Contents |
|---|---|
/managed |
Data generated with Galaxy Data Managers, organized by data table (index format), then by genome build. |
/byhand |
Data generated prior to the existence/use of Data Managers, manually curated. (For legacy reasons, this directory is shared as /indexes on the HTTP and rsync servers.) |
These directories have somewhat different structures:
/managedis organized by index type, then by genome build (Galaxy dbkey)/byhandis organzied by genome build, then by index type
Both directories contain a location subdirectory, and each of these contain a tool_data_table_conf.xml file:
/managed/location/tool_data_table_conf.xml/byhand/location/tool_data_table_conf.xml
Galaxy consumes these tool_data_table_conf.xml files and the .loc “location” files they reference. The paths contained in these files are valid if the data is mounted via CVMFS.
Examples of data include:
- twoBit (
.2bit) and FASTA (.fa) sequence files - Bowtie 2 and BWA indexes
- Multiple Alignment Format (
.maf) files - SAMTools FASTA indexes (
.fai)
Now all we need to do is tell Galaxy how to find it! This tutorial assumes that you have run the tutorial in the requirements, Galaxy Installation with Ansible. The hands-on below will use the Galaxy Project Ansible role to configure everything.
So that’s what we’re going to do now. Okay. So now we’re going to try and configure Galaxy to use this CVMFS data. And and to have it so that we can run things like bwa and bwa mem and run them against the human genome or the bee genome or the mouse genome and take advantage of the fact that a lot of other people in the Galaxy community have done a lot of work for reference data for us already.
So the way to do this is we’re going to edit the groupvars galaxyservers file and we’re going to add a variable called tool_data_table_config_path. And then we’re going to point it to the two files that are in - there’s one in byhand and one in managed.
If we go into byhand you can see here. And then we’re going to location. As you can see in here, are all the lock files, but you’ll also see there’s an xml file here called tool_data_table_conf xml and we’re going to point Galaxy at this file and there’s another one in the same position in managed.
And you can see here there’s another one in managed there. And so we’re going to add both of these files to our Galaxy configuration and then Galaxy will be able to use all of the data contained within this repository.
Okay, so we’ll go back to our Ansible directory.
Hands On: Configuring Galaxy to use CVMFS
Edit the
group_vars/galaxyservers.ymlfile and add atool_data_table_config_pathentry under thegalaxykey of thegalaxy_configsection in thegroup_vars/galaxyservers.ymlfile. This new entry should be a list containing the paths to bothtool_data_table_conf.xmlfiles referenced above.--- a/group_vars/galaxyservers.yml +++ b/group_vars/galaxyservers.yml @@ -76,6 +76,10 @@ galaxy_config: # TUS galaxy_infrastructure_url: "https://{{ inventory_hostname }}" tus_upload_store: "{{ galaxy_tus_upload_store }}" + # CVMFS + tool_data_table_config_path: + - /cvmfs/data.galaxyproject.org/byhand/location/tool_data_table_conf.xml + - /cvmfs/data.galaxyproject.org/managed/location/tool_data_table_conf.xml gravity: process_manager: systemd galaxy_root: "{{ galaxy_root }}/server"If you have also enabled the BRC Analytics or VGP CVMFS repositories, add their data table configuration files to the same list:
tool_data_table_config_path:
  - /cvmfs/data.galaxyproject.org/byhand/location/tool_data_table_conf.xml
  - /cvmfs/data.galaxyproject.org/managed/location/tool_data_table_conf.xml
  - /cvmfs/brc.galaxyproject.org/config/tool_data_table_conf.xml
  - /cvmfs/vgp.galaxyproject.org/config/tool_data_table_conf.xml
This time I’m going to edit the groupvars galaxyservers.yml file. And in our Galaxy section. Which is here. Which is here. At the bottom of that I’m going to add a variable called tool_data_table_config_path. And I’m going to point it to the locations that we um I showed you before. um I can’t remember what they are off the top of my head but luckily they’re inside this solution box and so I will just copy them. And paste. And as you can see pointing to /cvmfs/data.galaxyproject.org/byhand/location and then that tool data table conf xml file. And then we have a YAML list here and we point it to the second one. Right, so we save this file.
Re-run the playbook
Code In: Bashansible-playbook galaxy.ymlSo this time what we’re going to do, all we’re doing is making a minor change to the Galaxy yaml file in the Galaxy config to add that one line and then we’re going to restart Galaxy. And yeah, Galaxy will suddenly automatically have access to all of that data. So you can see here we’ve changed the Galaxy configuration file. And then Galaxy is now restarting and it’s done.
Install the BWA-MEM tool, if needed.
- Open Galaxy in your browser and type
bwain the tool search box on the left. If “Map with BWA-MEM” is among the search results, you can skip the following steps.- Access the Admin menu from the top bar (you need to be logged-in with an email specified in the
admin_userssetting)- Click “Install and Uninstall”, which can be found on the left, under “Tool Management”
- Enter
bwain the search interface- Click on the first hit, having
devteamas owner- Click the “Install” button for the latest revision
- Enter “Mapping” as the target section and click “OK”.
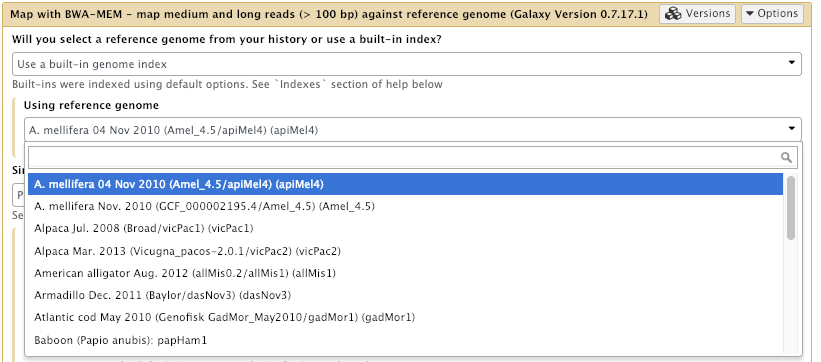
In your Galaxy server, open the Map with BWA-MEM tool tool. Now check that there are a lot more reference genomes available for use!
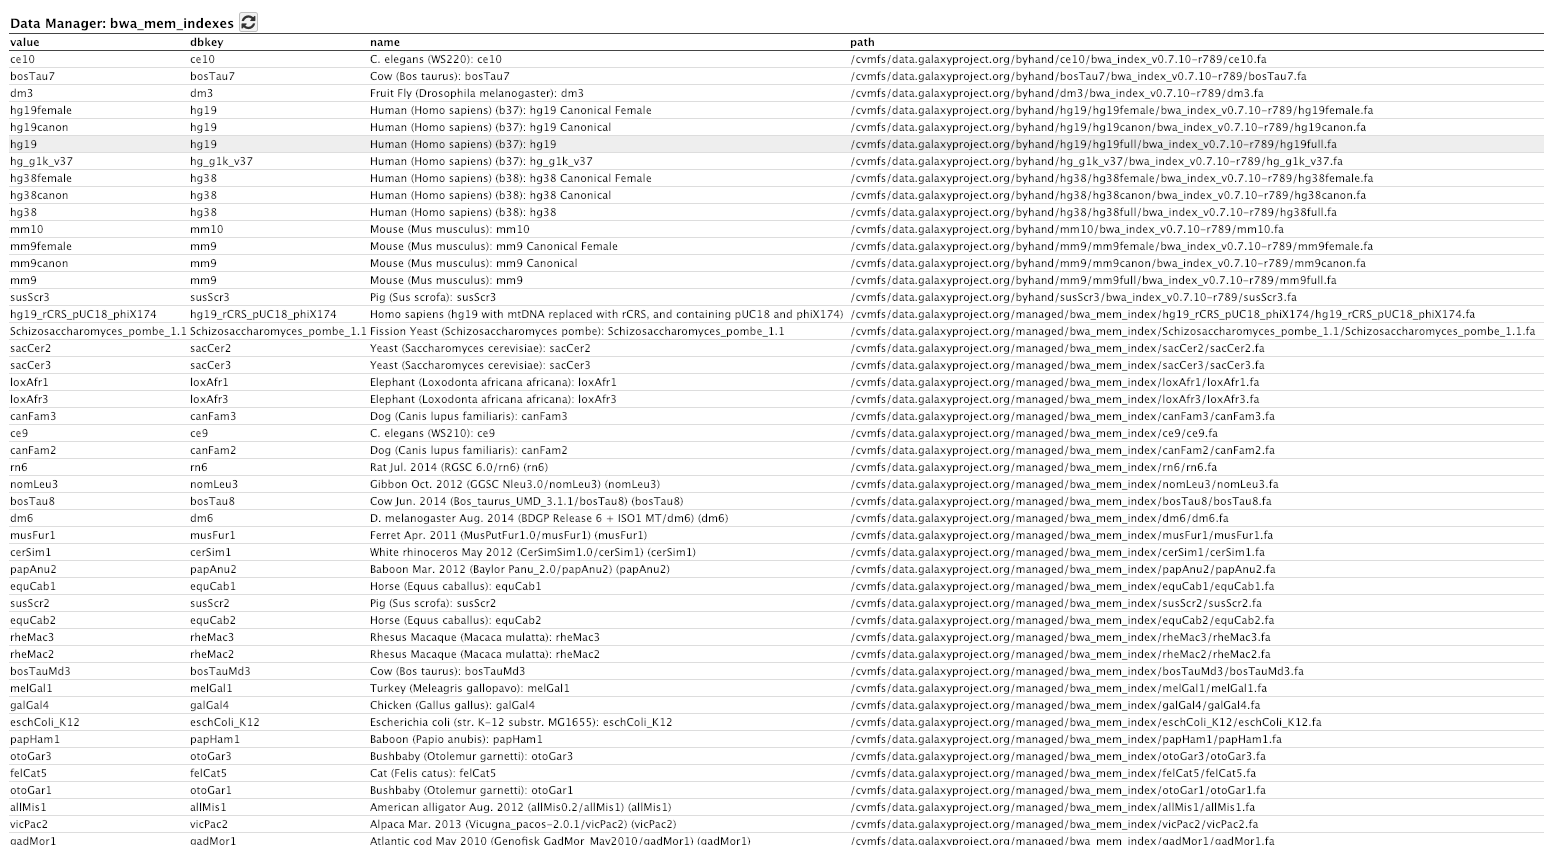
Login to Galaxy as the admin user, and go to Admin → Data Tables → bwa_mem indexes
Okay let’s go and have a look at our Galaxy server and see if bwa can suddenly see all of those - that stuff. All right so we’re back on our Galaxy server. I’ll click on Analyze Data to just to reload the page.
I’ll go back to Mapping
and load bwa-mem.
And then suddenly, instead of having no options available, you can see here we’ve got the Bee genome.
Now click on that. Oh look at that, there are lots and lots and lots of available genomes now including: lots of human, mouse, rat, yeast, all sorts of things. And in fact if you want to see the list of all the different available genomes now, that we have available to us.
If you go to admin. We go to data tables over here. You can see here that we have um a couple of data tables for managed and for all fasta. So if we click on that one, you can see that we have a lot of genomes available now in the all fasta data table that Galaxy can get access to. If we go back to the data tables again, and go down to bwa indexes or bwa mem indexes here. You can see we have access to a lot of pre-built indexes for bwa for all of these different genomes. That is pretty powerful.
So what did that take us? Maybe 30 minutes? And uh suddenly our Galaxy server has access to all the uh the data the reference data and the tool indices that the community have built over a number of years and it’s super simple.
1.sh
Hands On: Time to git commitIt’s time to commit your work! Check the status with
git statusAdd your changed files with
git add ... # any files you see that are changedAnd then commit it!
git commit -m 'Finished Reference Data with CVMFS'
Comment: Got lost along the way?If you missed any steps, you can compare against the reference files, or see what changed since the previous tutorial.
If you’re using
gitto track your progress, remember to add your changes and commit with a good commit message!
Common Production Questions
Question: For the most used datasets (for ex. hg38) could we have a local copy, or would that be irrelevant?This would be irrelevant, the most used datasets will stay in the cache. CVMFS uses a Least Recently Used (LRU) cache (see their docs), so whenever it runs out of space, it will remove the least recently used file. If you have a file that is very commonly used, it will remain in the cache.
Question: Could you explain how to calculate a good cache space?Here are two approaches, there are others:
- Allocate some cache, see how it is, make it larger if it is fully used + users complain of speed.
- Enable reference data, and collect a week or two of data, analyse which reference datasets are being used, and allocate enough space for all of them.
Essentially you just need data on how your users will behave and what reference data they want, combined with “when will they accept a wait period” to determine how much space you must allocate.
Question: If I use a cluster, will I need to configure this FS in each node (given that the folder is at / directly)?Yes. Often admins with a cluster keep a smaller cache local to each compute node, and then setup a Squid proxy to hold the most commonly accessed data on a machine with more storage. E.g. each compute node could have 10-50GB of CVMFS storage while you might setup a Squid proxy with 200-300 GB of storage that will store everything your site uses.
Are you having issues mounting your CVMFS mount? Is it giving strange errors like “Endpoint not connected” Try running this command as root:
Code In: Bash/usr/bin/cvmfs2 -d -o rw,system_mount,fsname=cvmfs2,allow_other,grab_mountpoint singularity.galaxyproject.org /mntCode Out: ConsolueDebug: using library /usr/lib/libcvmfs_fuse3_stub.so CernVM-FS: running in debug mode CernVM-FS: loading Fuse module... (cvmfs) Parsing config file /etc/cvmfs/default.conf [07-21-2022 11:11:20 UTC] (cvmfs) execve'd /bin/sh (PID: 280373) [07-21-2022 11:11:20 UTC] (cvmfs) Parsing config file /etc/cvmfs/default.d/50-cern-debian.conf [07-21-2022 11:11:20 UTC] (cvmfs) execve'd /bin/sh (PID: 280375) [07-21-2022 11:11:20 UTC] (cvmfs) Parsing config file /etc/cvmfs/default.d/80-ansible-galaxyproject-cvmfs.conf [07-21-2022 11:11:20 UTC] (cvmfs) execve'd /bin/sh (PID: 280378) [07-21-2022 11:11:20 UTC] [...] (dns) empty hostname [07-21-2022 11:11:20 UTC] (download) installed 1 proxies in 1 load-balance groups [07-21-2022 11:11:20 UTC] (cvmfs) DNS roaming is disabled for this repository. [07-21-2022 11:11:20 UTC] (catalog) constructing client catalog manager [07-21-2022 11:11:20 UTC] (catalog) Initialize catalog [07-21-2022 11:11:20 UTC] (cache) unable to read local checksum [07-21-2022 11:11:20 UTC] (download) escaped http://cvmfs1-psu0.galaxyproject.org/cvmfs/singularity.galaxyproject.org/.cvmfspublished to http://cvmfs1-psu0.galaxyproject.org/cvmfs/singularity.galaxyproject.org/.cvmfspublished [07-21-2022 11:11:20 UTC] (download) Verify downloaded url /.cvmfspublished, proxy DIRECT (curl error 0) [07-21-2022 11:11:20 UTC] (cache) miss ./e2/ab48b0984729d99951cb62c4312f501b3ddc6b (-2) [07-21-2022 11:11:20 UTC] (download) escaped http://cvmfs1-psu0.galaxyproject.org/cvmfs/singularity.galaxyproject.org/data/e2/ab48b0984729d99951cb62c4312f501b3ddc6bX to http://cvmfs1-psu0.galaxyproject.org/cvmfs/singularity.galaxyproject.org/data/e2/ab48b0984729d99951cb62c4312f501b3ddc6bX [07-21-2022 11:11:20 UTC] (download) Verify downloaded url /data/e2/ab48b0984729d99951cb62c4312f501b3ddc6bX, proxy DIRECT (curl error 0) [07-21-2022 11:11:20 UTC] (download) escaped http://cvmfs1-psu0.galaxyproject.org/cvmfs/singularity.galaxyproject.org/.cvmfswhitelist to http://cvmfs1-psu0.galaxyproject.org/cvmfs/singularity.galaxyproject.org/.cvmfswhitelist [07-21-2022 11:11:20 UTC] [...] (download) escaped http://cvmfs1-psu0.galaxyproject.org/cvmfs/singularity.galaxyproject.org/data/c7/f1555f421b1868b979291dc23f34a83132eadbC to http://cvmfs1-psu0.galaxyproject.org/cvmfs/singularity.galaxyproject.org/data/c7/f1555f421b1868b979291dc23f34a83132eadbC [07-21-2022 11:11:20 UTC] (download) Verify downloaded url /data/c7/f1555f421b1868b979291dc23f34a83132eadbC, proxy DIRECT (curl error 0) [07-21-2022 11:11:25 UTC] (cache) finished downloading of /data/c7/f1555f421b1868b979291dc23f34a83132eadbC [07-21-2022 11:11:25 UTC] (cache) commit ./c7/f1555f421b1868b979291dc23f34a83132eadb ./txn/fetchJWcwtt [07-21-2022 11:11:25 UTC] (quota) pin into lru c7f1555f421b1868b979291dc23f34a83132eadb, path file catalog at singularity.galaxyproject.org:/ (c7f1555f421b1868b979291dc23f34a83132eadb) [07-21-2022 11:11:25 UTC] (cache) commit failed: cannot pin c7f1555f421b1868b979291dc23f34a83132eadb [07-21-2022 11:11:25 UTC] (catalog) failed to load catalog '' (2 - not enough space to load catalog) [07-21-2022 11:11:25 UTC] (catalog) failed to initialize root catalog [07-21-2022 11:11:25 UTC] Failed to initialize root file catalog (16 - file catalog failure) (cache) unpinning / unloading all catalogs [07-21-2022 11:11:25 UTC]
Other Aspects
Right, we’ll go back to our tutorial. um Yeah. Just finally, just before we finish up. um If we are developing a new tool and you want to add a reference genome or a different index just give us - drop us a line on Gitter and we’ll be able to add it into our - into the reference data for the community. um We’re looking at automating the process of building all of this material using data managers and ephemeris. And we’re working with a group of people called the IDC, which is the Intergalactic Data Commission, which is a funny name for everyone in Galaxy - in the Galaxy community who likes reference data. And we’re looking at making a community controlled resource that will be semi-automatic. One of the other things that you can do is have automatic fallbacks. So, if say, you’re in Australia and you’re hooked up to the Australian mirror of the CVMFS repository and the Australian mirror dies, the CVMFS client is smart enough to automatically go to the next closest one and so you won’t lose anything. If you’re interested in looking at plant data there’s a link here for that.
Development
If you are developing a new tool, and want to add a reference genome, we recommend you talk to us on Gitter. You can also look at one of the tools that uses reference data, and try and copy from that. If you’re developing the location files completely new, you need to write the data manager.
Automation
You can automate the process of installing and setting up data managers and data with ephemeris. We’re working in the IDC to democratise this CVMFS repository, and make this a community-controlled resource. You can also look here for ideas on automating your data management.
Access Control
It is not easily possible to filter access to reference data depending on the user’s role or group.
You could set up a tool per user/group, secure access to running this tool, and then allow this private tool to access a private tool data table. But you will not get tool updates, you will have to copy and edit this tool every time it gets updated. Or write more advanced job control rules to reject specific jobs which use specific datasets.
Proxying Recap
The client talks directly to the stratum 1 (or to a proxy), and manages the data, and exposes it to the user. The proxy stores an opaque cache, that can’t really be used, except as a proxy to a stratum 1.
Plant Data
If you are working with plants, you can find separate reference data here: frederikcoppens/galaxy_data_management
And finally if you could please click on this link here and give us some feedback on how you think the tutorial went, whether it was useful, if you enjoyed it or um if you have any criticisms, could you please put them in here as well. And if you end up using this to build a Galaxy server and you publish that Galaxy server um could you cite the tutorial for us please. That would be make a big difference to us. All right, thank you very much and I hope you enjoyed it and hopefully I’ll get to meet some of you in person one day soon at a Galaxy conference. Thank you and goodbye.
Comment: Galaxy Admin Training PathThe yearly Galaxy Admin Training follows a specific ordering of tutorials. Use this timeline to help keep track of where you are in Galaxy Admin Training.
You've Finished the Tutorial
Frequently Asked Questions
Have questions about this tutorial? Have a look at the available FAQ pages and support channelsReferences
- Blomer, J., P. Buncic, and T. Fuhrmann, 2011 CernVM-FS, in Proceedings of the first international workshop on Network-aware data management, ACM. 10.1145/2110217.2110225
Feedback
Did you use this material as an instructor? Feel free to give us feedback on how it went.
Did you use this material as a learner or student? Click the form below to leave feedback.

Citing this Tutorial
- Simon Gladman, Helena Rasche, Reference Data with CVMFS (Galaxy Training Materials). https://training.galaxyproject.org/training-material/topics/admin/tutorials/cvmfs/tutorial.html Online; accessed TODAY
- Hiltemann, Saskia, Rasche, Helena et al., 2023 Galaxy Training: A Powerful Framework for Teaching! PLOS Computational Biology 10.1371/journal.pcbi.1010752
- Batut et al., 2018 Community-Driven Data Analysis Training for Biology Cell Systems 10.1016/j.cels.2018.05.012
@misc{admin-cvmfs,
author = "Simon Gladman and Helena Rasche",
	title = "Reference Data with CVMFS (Galaxy Training Materials)",
	year = "",
	month = "",
	day = "",
	url = "\url{https://training.galaxyproject.org/training-material/topics/admin/tutorials/cvmfs/tutorial.html}",
	note = "[Online; accessed TODAY]"
}
@article{Hiltemann_2023,
	doi = {10.1371/journal.pcbi.1010752},
	url = {https://doi.org/10.1371%2Fjournal.pcbi.1010752},
	year = 2023,
	month = {jan},
	publisher = {Public Library of Science ({PLoS})},
	volume = {19},
	number = {1},
	pages = {e1010752},
	author = {Saskia Hiltemann and Helena Rasche and Simon Gladman and Hans-Rudolf Hotz and Delphine Larivi{\`{e}}re and Daniel Blankenberg and Pratik D. Jagtap and Thomas Wollmann and Anthony Bretaudeau and Nadia Gou{\'{e}} and Timothy J. Griffin and Coline Royaux and Yvan Le Bras and Subina Mehta and Anna Syme and Frederik Coppens and Bert Droesbeke and Nicola Soranzo and Wendi Bacon and Fotis Psomopoulos and Crist{\'{o}}bal Gallardo-Alba and John Davis and Melanie Christine Föll and Matthias Fahrner and Maria A. Doyle and Beatriz Serrano-Solano and Anne Claire Fouilloux and Peter van Heusden and Wolfgang Maier and Dave Clements and Florian Heyl and Björn Grüning and B{\'{e}}r{\'{e}}nice Batut and},
	editor = {Francis Ouellette},
	title = {Galaxy Training: A powerful framework for teaching!},
	journal = {PLoS Comput Biol}
}
Funding
These individuals or organisations provided funding support for the development of this resource
Congratulations on successfully completing this tutorial!