Best practices for workflows in GitHub repositories
| Author(s) |
|
| Reviewers |
|
OverviewQuestions:Objectives:
What are Workflow Best Practices
How does RO-Crate help?
Generate a workflow test using Planemo
Understand how testing can be automated with GitHub Actions
Time estimation: 30 minutesSupporting Materials:Published: May 11, 2023Last modification: Apr 8, 2025License: Tutorial Content is licensed under Apache-2.0. The GTN Framework is licensed under MITpurl PURL: https://gxy.io/GTN:T00339rating Rating: 5.0 (0 recent ratings, 3 all time)version Revision: 6
Best viewed in a Jupyter NotebookThis tutorial is best viewed in a Jupyter notebook! You can load this notebook one of the following ways
Launching the notebook in Jupyter in Galaxy
- Instructions to Launch JupyterLab
- Open a Terminal in JupyterLab with File -> New -> Terminal
- Run
wget https://training.galaxyproject.org/training-material/topics/fair/tutorials/ro-crate-galaxy-best-practices/fair-ro-crate-galaxy-best-practices.ipynb- Select the notebook that appears in the list of files on the left.
Downloading the notebook
- Right click one of these links: Jupyter Notebook (With Solutions), Jupyter Notebook (Without Solutions)
- Save Link As..
A workflow, just like any other piece of software, can be formally correct and runnable but still lack a number of additional features that might help its reusability, interoperability, understandability, etc.
One of the most useful additions to a workflow is a suite of tests, which help check that the workflow is operating as intended. A test case consists of a set of inputs and corresponding expected outputs, together with a procedure for comparing the workflow’s actual outputs with the expected ones. It might be the case, in fact, that a test may be considered successful even if the actual outputs do not match the expected ones exactly, for instance because the computation involves a certain degree of randomness, or the output includes timestamps or randomly generated identifiers.
Providing documentation is also important to help understand the workflow’s purpose and mode of operation, its requirements, the effect of its parameters, etc. Even a single, well structured README file can go a long way towards getting users started with your workflow, especially if complemented by examples that include sample inputs and running instructions.
AgendaIn this tutorial, you will learn about the best practices that the Galaxy community has created for workflows.
This tutorial assumes that you already have a Galaxy workflow that you want to apply best practices to. You can follow along using any workflow you have created or imported during a previous tutorial (such as A short introduction to Galaxy).
Community best practices
Though the practices listed in the introduction can be considered general enough to be applicable to any kind of software, individual communities usually add their own specific sets of rules and conventions that help users quickly find their way around software projects, understand them more easily and reuse them more effectively. The Galaxy community, for instance, has a guide on best practices for maintaining workflows and a built-in Best Practices panel in the workflow editor (see the tip below).
When you are editing a workflow, there are a number of additional steps you can take to ensure that it is a Best Practice workflow and will be more reusable.
- Open a workflow for editing
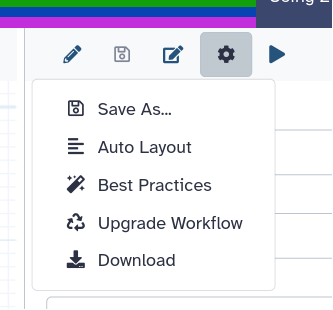
- In the workflow menu bar, you’ll find the galaxy-wf-options Workflow Options dropdown menu.
Click on it and select galaxy-wf-best-practices Best Practices from the dropdown menu.
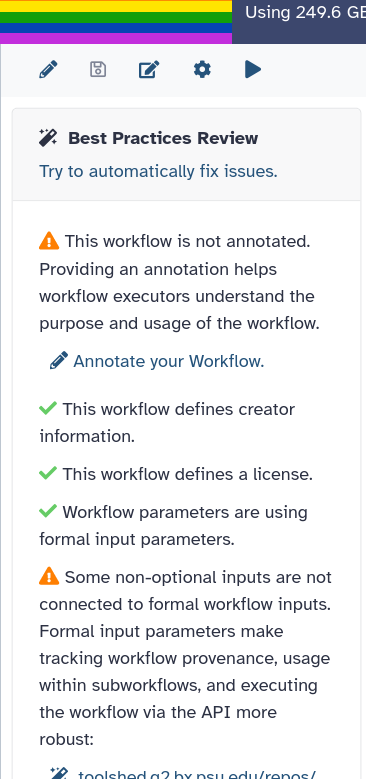
This will take you to a new side panel, which allows you to investigate and correct any issues with your workflow.
The Galaxy community also has a guide on best practices for maintaining workflows. This guide includes the best practices from the Galaxy workflow panel, plus:
- adding tests to the workflow
- publishing the workflow on GitHub, a public GitLab server, or another public version-controlled repository
- registering the workflow with a workflow registry such as WorkflowHub or Dockstore
Hands On: Apply best practices for workflow structure
- Open your workflow for editing and find the Best Practices panel (see the tip above).
- Resolve the warnings that appear until every item has a green tick.
The Intergalactic Workflow Commission (IWC) is a collection of highly curated Galaxy workflows that follow best practices and conform to a specific GitHub directory layout, as specified in the guide on adding workflows. In particular, the workflow file must be accompanied by a Planemo test file with the same name but a -test.yml extension, and a test-data directory that contains the datasets used by the tests described in the test file. The guide also specifies how to fulfill other requirements such as setting a license, a creator and a version tag. A new workflow can be proposed for inclusion in the collection by opening a pull request to the IWC repository: if it passes the review and is merged, it will be published to iwc-workflows. The publication process also generates a metadata file that turns the repository into a Workflow Testing RO-Crate, which can be registered to WorkflowHub and LifeMonitor.
Best practice repositories and RO-Crate
The repo2rocrate software package allows to generate a Workflow Testing RO-Crate for a workflow repository that follows community best practices. It currently supports Galaxy (based on IWC guidelines), Nextflow and Snakemake. The tool assumes that the workflow repository is structured according to the community guidelines and generates the appropriate RO-Crate metadata for the various entities. Several command line options allow to specify additional information that cannot be automatically detected or needs to be overridden.
To try the software, we’ll clone one of the iwc-workflows repositories, whose layout is known to respect the IWC guidelines. Since it already contains an RO-Crate metadata file, we’ll delete it before running the tool.
pip install repo2rocrate
git clone https://github.com/iwc-workflows/parallel-accession-download
cd parallel-accession-download/
rm -fv ro-crate-metadata.json
repo2rocrate --repo-url https://github.com/iwc-workflows/parallel-accession-download
This adds an ro-crate-metadata.json file at the top level with metadata generated based on the tool’s knowledge of the expected repository layout. By specifying a zip file as an output with the -o option, we can directly generate an RO-Crate in the format accepted by WorkflowHub and LifeMonitor:
repo2rocrate --repo-url https://github.com/iwc-workflows/parallel-accession-download -o ../parallel-accession-download.crate.zip
Generating tests for your workflow
What if you only have a workflow, but you don’t have the test layout yet? You can use Planemo to generate it.
pip install planemo
As an example we will use this simple workflow, which has only two steps: it sorts the input lines and changes them to upper case. Follow these steps to generate a test layout for it:
Hands On: Generate Workflow Tests With Planemo
- Download the workflow to a
sort-and-change-case.gafile.- Download this input dataset to an
input.bedfile.- Upload the workflow to Galaxy (e.g., Galaxy Europe): from the upper menu, click on “Workflow” > “Import” > “Browse”, choose
sort-and-change-case.gaand then click “Import workflow”.- Rename the uploaded workflow from
sort-and-change-case (imported from uploaded file)tosort-and-change-caseby clicking the pencil icon next to the workflow name.- Start a new history: click on the “+” button on the History panel to the right.
- Upload the input dataset to the new history: on the left panel, go to “Upload Data” > “Choose local files” and select
input.bed, then click “Start” > “Close”.- Wait for the file to finish uploading (i.e., for the loading circle on the dataset’s line in the history to disappear).
- Run the workflow on the input dataset: click on “Workflow” in the upper menu, locate
sort-and-change-case, and click on the play button to the right.
This should take you to the workflow running page. The input slot should be already filled with
input.bedsince there is nothing else in the history. Click on “Run Workflow” on the upper right of the center panel.- Wait for the workflow execution to finish.
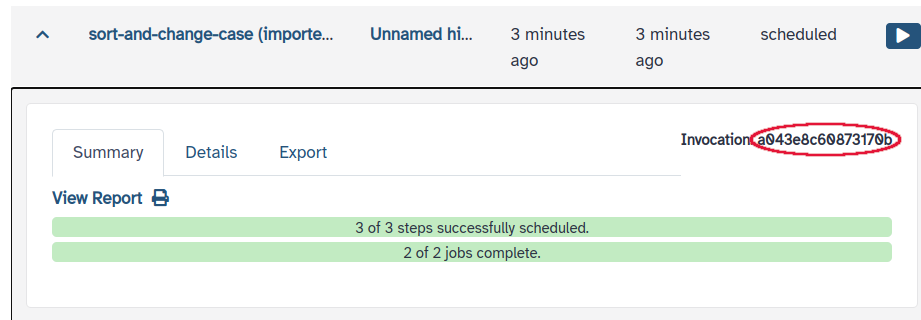
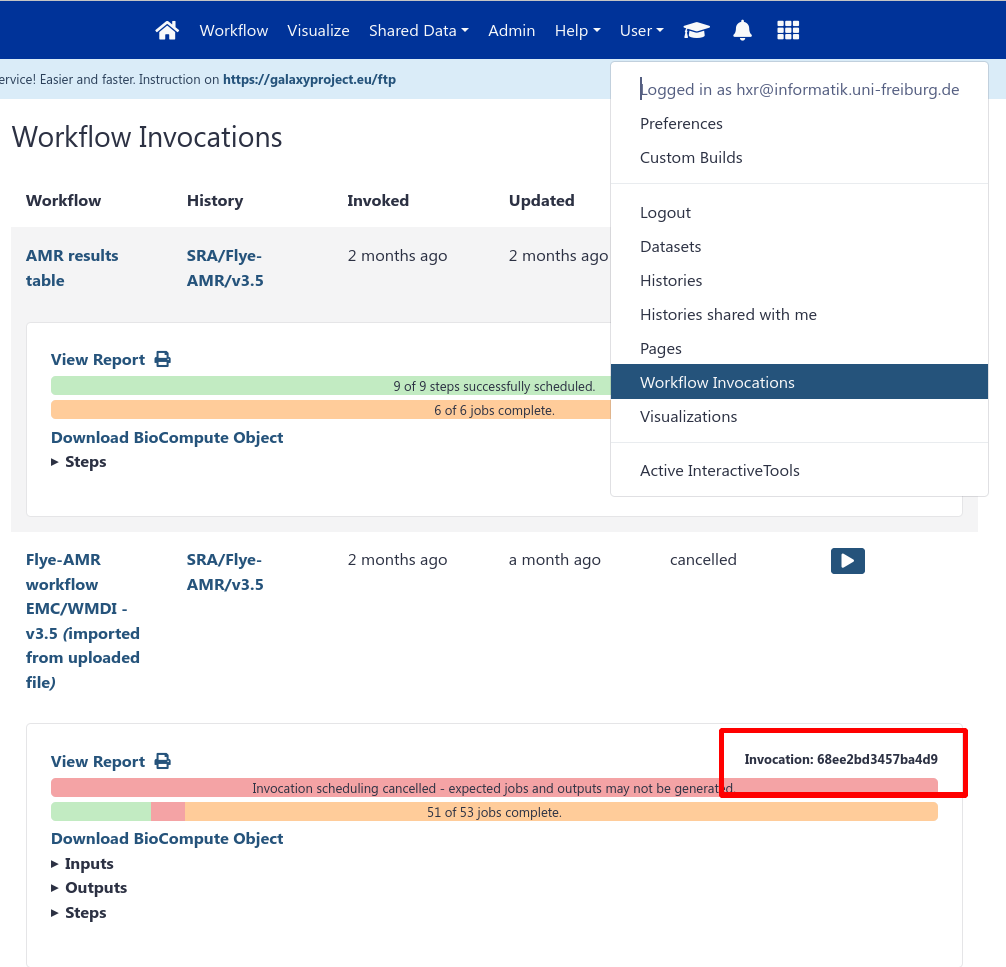
On the upper menu, go to “Data” > “Workflow Invocations”, expand the invocation corresponding to the workflow just run and copy the invocation’s ID. In my case it says “Invocation ID: 86ecc02a9dd77649” on the right, where
86ecc02a9dd77649is the ID.On the upper menu, go to “User” > “Preferences” > “Manage API Key”. If you don’t have an API key yet, click the button to create a new one. Under “Current API key”, click the button to copy the API Key on the right.
- Run
planemo workflow_test_init --galaxy_url https://usegalaxy.eu --from_invocation INVOCATION_ID --galaxy_user_key API_KEY, replacingINVOCATION_IDwith the actual invocation ID andAPI_KEYwith the actual API key. If you’re not using the Galaxy Europe instance, also replacehttps://usegalaxy.euwith the URL of the instance you’re using.- Browse the files that have been created -
sort-and-change-case-tests.ymlandtest_data/Optionally see this tip for more details:
Ensuring a Tutorial has a Workflow
Find a tutorial that you’re interested in, that doesn’t currently have tests.
This tutorial has a workflow (
.ga) and a test, notice the-tests.ymlthat has the same name as the workflow.gafile.machinelearning/workflows/machine_learning.ga
machinelearning/workflows/machine_learning-tests.ymlYou want to find tutorials without the
-tests.ymlfile. The workflow file might also be missing.- Check if it has a workflow (if it does, skip to step 5.)
- Follow the tutorial
- Extract a workflow from the history
- Run that workflow in a new history to test
Extract Tests (Online Version)
If you are on UseGalaxy.org or another server running 24.2 or later, you can use PWDK, a version of planemo running online to generate the workflow tests.
However if you are on an older version of Galaxy, or a private Galaxy server, then you’ll need to do the following:
Extract Tests (Manual Version)
Obtain the workflow invocation ID, and your API key (User → Preferences → Manage API Key)
Install the latest version of
planemo# In a virtualenv
pip install planemoRun the command to initialise a workflow test from the
workflows/subdirectory - if it doesn’t exist, you might need to create it first.planemo workflow_test_init --from_invocation <INVOCATION ID> --galaxy_url <GALAXY SERVER URL> --galaxy_user_key <GALAXY API KEY>This will produce a folder of files, for example from a testing workflow:
$ tree
.
├── test-data
│   ├── input dataset(s).shapefile.shp
│   └── shapefile.shp
├── testing-openlayer.ga
└── testing-openlayer-tests.yml
Adding Your Tests to the GTN
You will need to check the
-tests.ymlfile, it has some automatically generated comparisons. Namely it tests that output data matches the test-data exactly, however, you might want to replace that with assertions that check for e.g. correct file size, or specific text content you expect to see.If the files in test-data are already uploaded to Zenodo, to save disk space, you should delete them from the
test-datadir and use their URL in the-tests.ymlfile, as in this example:- doc: Test the M. Tuberculosis Variant Analysis workflow
job:
'Read 1':
location: https://zenodo.org/record/3960260/files/004-2_1.fastq.gz
class: File
filetype: fastqsanger.gzAdd tests on the outputs! Check the planemo reference if you need more detail.
- doc: Test the M. Tuberculosis Variant Analysis workflow
  job:
     # Simple explicit Inputs
     'Read 1':
        location: https://zenodo.org/record/3960260/files/004-2_1.fastq.gz
        class: File
        filetype: fastqsanger.gz
  outputs:
    jbrowse_html:
      asserts:
        has_text:
          text: "JBrowseDefaultMainPage"
    snippy_fasta:
      asserts:
        has_line:
          line: '>Wildtype Staphylococcus aureus strain WT.'
    snippy_tabular:
      asserts:
        has_n_columns:
          n: 2
Contribute all of those files to the GTN in a PR, adding them to the
workflows/folder of your tutorial.
Question
- How do the files in
test_data/relate to your Galaxy history?- Look at the contents of
sort-and-change-case-tests.yml. What are the expected outputs of the test?
- The files in
test_data/correspond to the output files in the history, though some of the names are different:bed_input.bedhas the same name in the history - this is the input file we uploadedsorted_bed.bedcorresponds to theSort on data 1step (you can confirm this by viewing the file contents)uppercase_bed.tabularcorresponds to theChange case on data 2step (you can confirm this by viewing the file contents)- The expected outputs are
test-data/sorted_bed.bedandtest-data/uppercase_bed.tabular. This means that when the workflow is run on the input (test-data/bed_input.bed), it is expected to produce two files that look exactly like those outputs.
To build up the test suite further, you can invoke the workflow multiple times with different inputs, and use each invocation to generate a test, using the same command as before:
planemo workflow_test_init --galaxy_url https://usegalaxy.eu --from_invocation INVOCATION_ID --galaxy_user_key API_KEY
Each invocation should test a different behavior of the workflow. This could mean using different datatypes for inputs, or changing the workflow settings to produce different results.
Hands On: Generate tests for your own workflow
- Create a new folder on your computer to store the workflow.
- Download the Galaxy workflow you updated to follow best practices earlier in this tutorial. You can do this by going to the Workflow page and clicking galaxy-download Download workflow in .ga format.
- Create a new Galaxy history, and run the workflow on some appropriate input data.
- Use
planemoto turn that workflow invocation into a test case.
Adding a GitHub workflow for running tests automatically
In the previous section, you learned how to generate a test layout for an example Galaxy workflow. This procedure also gives you the file structure you need to populate the GitHub repository in line with community best practices. One thing is still missing though: a GitHub workflow to test the Galaxy workflow automatically. Let’s create this now.
At the top level of the repository, create a .github/workflows directory and place a wftest.yml file inside it with the following content:
name: Periodic workflow test
on:
  schedule:
    - cron: '0 3 * * *'
  workflow_dispatch:
jobs:
  test:
    name: Test workflow
    runs-on: ubuntu-latest
    steps:
    - uses: actions/checkout@v2
      with:
        fetch-depth: 1
    - uses: actions/setup-python@v1
      with:
        python-version: '3.7'
    - name: install Planemo
      run: |
        pip install --upgrade pip
        pip install planemo
    - name: run planemo test
      run: |
        planemo test --biocontainers sort-and-change-case.ga
Replacing sort-and-change-case.ga with the name of your actual Galaxy workflow. You can find extensive documentation on GitHub workflows on the GitHub web site. Here we’ll give some highlights:
- the
onfield sets the GitHub workflow to run:- automatically every day at 3 AM
- when manually dispatched
- the steps do the following:
- check out the GitHub repository
- set up a Python environment
- install Planemo
- run
planemo teston the Galaxy workflow
An example of a repository built according to the guidelines given here is simleo/ccs-bam-to-fastq-qc-crate, which realizes the Workflow Testing RO-Crate setup for BAM-to-FASTQ-QC.
Your workflow is now ready to add to GitHub! If you’re not familiar with GitHub, follow these instructions to create a repository and upload your workflow files: Uploading a project to GitHub.


