Group tags for complex experimental designs
| Author(s) |
|
| Reviewers |
|
OverviewQuestions:
Objectives:
What are group tags?
How can I use group tags to perform multi-factor analyses with collections
Requirements:
Learn how to set group tags
Learn how to select group tags in tools
Time estimation: 10 minutesSupporting Materials:Published: Mar 6, 2019Last modification: Nov 9, 2023License: Tutorial Content is licensed under Creative Commons Attribution 4.0 International License. The GTN Framework is licensed under MITpurl PURL: https://gxy.io/GTN:T00149rating Rating: 1.7 (0 recent ratings, 6 all time)version Revision: 11
Advanced uses of Galaxy often require the use of dataset collections, which can contain between one and tens of thousands of datasets. Grouping datasets in this way has numerous advantages:
- It is easy to represent a single collection in the History
- Dataset names (“Element Identifiers”) are immutable and preserved
- Collections can be split and nested in arbitrary ways
While collections can be split in any way, doing so for multi-factor analysis
quickly becomes cumbersome and messy. An alternative is to label collection
elements with special group tags, i.e. tags prefixed by the string group:.
Note that group tags currently do not propagate, i.e. they are not inherited
to datasets resulting from analyses. These tags can be displayed in the Tool
form, allowing users to select subsets
of collections.
This tutorial outlines how to set and use group tags with the DESeq2 tool. For a more detailed description and background for differential expression testing see the Reference-based RNA-Seq data analysis.
AgendaIn this tutorial, we will cover:
Setting group tags using the apply rules tool
There are several ways to set group tags:
- Using the Rule Based Uploader
- Using the “Tag elements from file” tool
- Using the “Apply Rules” tool
- Manually adding dataset tags with the prefix
group:
We will use the first two methods in this tutorial. The second and third methods work at any step during the analysis. Note that the function of the “Apply Rules” tool is (nearly) identical to the Rule Based Uploader.
Set group tags during upload
Hands On: Set group tags during upload
Create a new history for this tutorial
To create a new history simply click the new-history icon at the top of the history panel:
- Open the Galaxy Upload Manager (galaxy-upload on the top-right of the tool panel)
Click on Rule-based on the top
As you can see in this dialog, data can be selected from a history dataset or pasted in directly
- Set Upload data as: to
Collection(s)Paste the following links into the text box
https://zenodo.org/record/1185122/files/GSM461176_untreat_single.counts https://zenodo.org/record/1185122/files/GSM461177_untreat_paired.counts https://zenodo.org/record/1185122/files/GSM461178_untreat_paired.counts https://zenodo.org/record/1185122/files/GSM461179_treat_single.counts https://zenodo.org/record/1185122/files/GSM461180_treat_paired.counts https://zenodo.org/record/1185122/files/GSM461181_treat_paired.counts https://zenodo.org/record/1185122/files/GSM461182_untreat_single.counts- Click Build
- We will add a regex that creates 3 new columns with accession, treatment and library type:
- Click on the Column button and then Using a Regular Expression
- Select Create columns matching expression groups
- Paste
.*(GSM.*)_(.*)_(.*).countsin “Regular Expression”- Set “Number of Groups” to 3
Click on Apply
We should have now a table with 4 columns: link, sample name, treatment, sequencing type
- Click on Rules and then Add / Modify Column Definitions
- Click on Add Definition and select:
- “URL”: Column A (Note that this option is absent when using the “Apply rules tool”)
- “List Identifiers”: Column B
- “Group Tags”: Columns C and D (Select Column C first and then add D by clicking on “… Add another column”)
- Click Apply
- Enter a name for the new collection
- Click Upload
Expand the generated collection and the files in it and check their names and tags


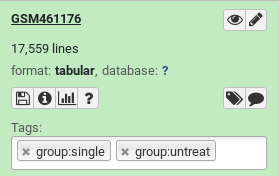
Set group tags using the “Tag elements from file” tool
We now want to add group tags using the “Tag elements from file” tool.
Hands On: Upload and create a collection
- Create a new history for this tutorial
Import the following files
https://zenodo.org/record/1185122/files/GSM461176_untreat_single.counts
https://zenodo.org/record/1185122/files/GSM461177_untreat_paired.counts
https://zenodo.org/record/1185122/files/GSM461178_untreat_paired.counts
https://zenodo.org/record/1185122/files/GSM461179_treat_single.counts
https://zenodo.org/record/1185122/files/GSM461180_treat_paired.counts
https://zenodo.org/record/1185122/files/GSM461181_treat_paired.counts
https://zenodo.org/record/1185122/files/GSM461182_untreat_single.counts
- Copy the link location
Click galaxy-upload Upload Data at the top of the tool panel
- Select galaxy-wf-edit Paste/Fetch Data
Paste the link(s) into the text field
Press Start
- Close the window
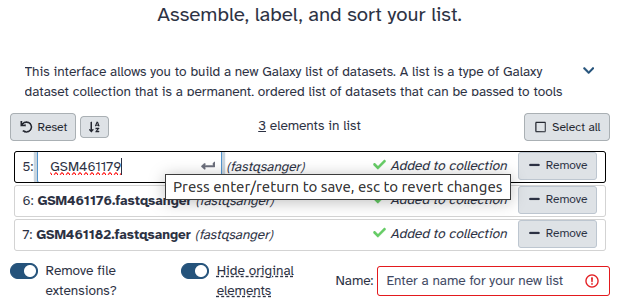
Create a Dataset List (Collection) with these 7 files
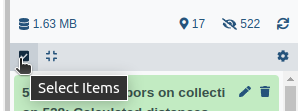
- Click on galaxy-selector Select Items at the top of the history panel
- Check The 7 datasets you’ve just imported
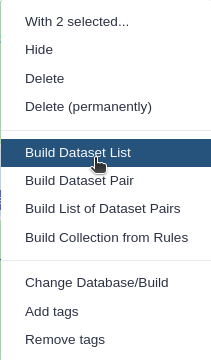
Click 7 of N selected and choose Advanced Build List
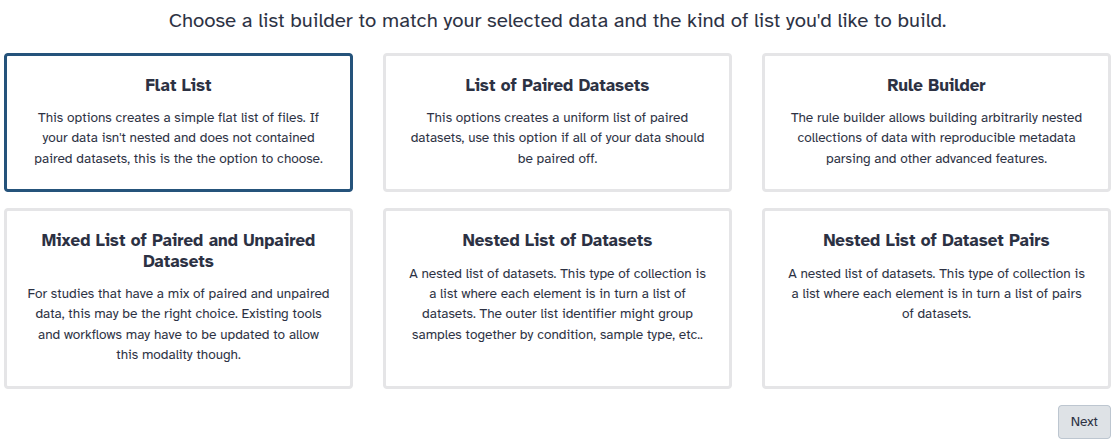
You are in collection building wizard. Choose Flat List and click ‘Next’ button at the right bottom corner.
Double clcik on the file names to edit. For example, remove file extensions or common prefix/suffixes to cleanup the names.
- Enter a name for your collection
- Click Build to build your collection
- Click on the checkmark icon at the top of your history again
We have now a collection with our files. We can now either upload a tabular file containing the element identifiers and the tags we want to apply, or we can extract the element identifiers and extract the tags using a Regular Expression. We will do the latter.
Hands On: Set group tags using the "Tag elements from file" tool
- Extract element identifiers tool
- param-collection “Dataset collection”: created collection
- Replace Text in entire line tool
- param-file “File to process”: output of Extract element identifiers tool
- In “Replacement”:
- In “1: Replacement”
- “Find pattern”:
(.*)_(.*)_(.*).counts- “Replace with”:
\1_\2_\3.counts\tgroup:\2\tgroup:\3This step adds an additional columns that can be used with the
Tag elements from filetoolChange the datatype to
tabular
- Click on the galaxy-pencil pencil icon for the dataset to edit its attributes
- In the central panel, click galaxy-chart-select-data Datatypes tab on the top
- In the galaxy-chart-select-data Assign Datatype, select
tabularfrom “New Type” dropdown
- Tip: you can start typing the datatype into the field to filter the dropdown menu
- Click the Save button
- Tag elements from file tool
- param-collection “Input Collection”: created collection
- param-collection “Tag collection elements according to this file”: output of Replace Text tool
You should now have a properly tagged collection of tabular files that can be used in DESeq2.
Using group tags in tool, e.g. DESeq2
DESeq2 has two modes for specifying factors. One can either select datasets corresponding to factors, or use group tags to specify factors. We will use the group tags present in our collection to specify factors.
The tool interface will prompt you with the group tags that are available for your inputs:
Hands On: Running DESeq2 with group tags
- DESeq2 tool with the following parameters:
- “how”:
Select group tags corresponding to levels
- param-collection “Count file(s) collection”: Generated collection
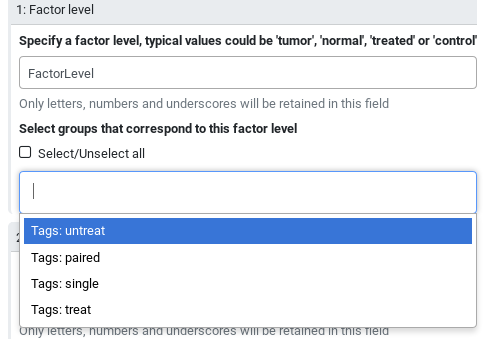
- In “Factor”:
- In “1: Factor”
- “Specify a factor name”:
Treatment- In “Factor level”:
- In “1: Factor level”:
- “Specify a factor level”:
treat- “Select groups that correspond to this factor level”:
Tags: treat- In “2: Factor level”:
- “Specify a factor level”:
untreat- “Select groups that correspond to this factor level”:
Tags: untreat- Click on param-repeat “Insert Factor” (not on “Insert Factor level”)
- In “2: Factor”
- “Specify a factor name” to
Sequencing- In “Factor level”:
- In “1: Factor level”:
- “Specify a factor level”:
paired- “Select groups that correspond to this factor level”:
Tags: paired- In “2: Factor level”:
- “Specify a factor level”:
single- “Select groups that correspond to this factor level”:
Tags: single- “Files have header?”:
No- “Output normalized counts table”:
Yes
Conclusion
We can select a subset of Collections using the special group tag.