The National Center for Biotechnology Information (NCBI) performs contamination screening of genome assemblies submitted to the archival GenBank. Advances in genome sequencing have accelerated the production of genome assemblies and their submission to public databases, necessitating high-performance screening tools. Since contaminants can lead to misleading conclusions about the biology of the organism in question (e.g. gene content, gene evolution, etc.), ideally contamination screening should be performed after the initial contig assembly and prior to downstream genome analyses.
NCBI has released a publicly-available Foreign Contamination Screen (FCS) tool suite to detect contaminants from various sources and produce a cleaned sequence set. This tutorial provides a quick example of two current FCS tools: FCS-adaptor identifies synthetic sequences used in library preparation, and FCS-GX (Astashyn et al. 2024) identifies sequences from foreign organisms assigned to discordant taxonomies compared to the user-declared source organism.
FCS operates on assembled genome sequences and is not intended for use on raw reads. The following tutorial uses an assembled genome from yeast (Saccharomyces cerevisiae) with contaminants artificially inserted into the genome. The first step is to retrieve the genome FASTA.
Upload the genome FASTA from Zenodo
The following steps provide instructions to upload the test dataset into your Galaxy instance.
Hands On: Data Upload
Create a new history for this tutorial
To create a new history simply click the new-history icon at the top of the history panel:
Copy the datasets URLs into clipboard.
Click on the copy button in the right upper corner of the box below.
Next we will import a Galaxy workflow - a chain of tools to perform a set of operations on a user-supplied input. Specificially in this workflow, we will:
Screen the genome for foreign organism sequences using FCS-GXscreen mode.
Produce a cleaned set of contigs using FCS-GXclean mode.
Screen the genome for synthetic sequences using FCS-adaptor and remove identified contaminants.
Produce a final set of cleaned contigs using a second iteration of FCS-GXclean mode.
Click on galaxy-workflows-activityWorkflows in the Galaxy activity bar (on the left side of the screen, or in the top menu bar of older Galaxy instances). You will see a list of all your workflows
Click on galaxy-uploadImport at the top-right of the screen
Paste the following URL into the box labelled “Archived Workflow URL”: https://training.galaxyproject.org/training-material/topics/sequence-analysis/tutorials/ncbi-fcs/workflows/NCBI-Foreign-Contamination-Screen.ga
Click the Import workflow button
Below is a short video demonstrating how to import a workflow from GitHub using this procedure:
Video: Importing a workflow from URL
Warning: Log in to Galaxy
If the workflow failed to import, it is usually because you are not logged in.
Once the workflow is loaded, your workflow page should look like this:
Select the appropriate taxonomic division for Taxonomy entry: galaxy-wf-editdiv (fung:budding yeasts in this example).
Set the Advanced Options: galaxy-wf-editDatabase location to /cvmfs/data.galaxyproject.org/byhand/ncbi_fcs_gx/all
In the 4: FCS-adaptor screen menu:
Select the appropriate taxonomy for galaxy-wf-editChoose the taxonomy (Eukaryotes in this example).
Run the workflow
Take a coffee break!
Interpreting FCS Output
Running NCBI FCS on Galaxy is dependent on loading a large reference database on an adequate host. Currently the database is not persistent, meaning run times may vary. Most runs should complete in around one hour.
After the workflow is completed, you will be able to visualize tables of identified contaminants and can access FASTA files of clean sequences separated from contaminants.
Hands On: Reviewing FCS Contamination Reports
Look at the FCS-GX contamination report
In your Galaxy history, click the galaxy-eye icon for 3: NCBI FCS GX on data 1: Action report
Confirm that the taxonomic division you specified for the workflow run appears in the metadata in the first row of the file. It should appear as the “asserted-div” and in the list of “inferred-primary-divs”.
Warning: My organism's division is not in inferred-primary-divs
If your target organism division is not in the set of inferred-primary-divs, it means that the assembly is likely heavily contaminated. FCS-GX will still call contaminants with respect to the taxonomy you define as the target organism (i.e. the primary division), but you should review the sequencing and assembly data for errors.
Review the contaminated sequence list, the suggested contamination cleanup actions, and the taxonomic divisions assigned to contaminants
Question
What are the major contaminants in this genome assembly?
When was this contamination likely introduced in the genome assembly process?
Homo sapiens (human) and Pseudomonas aeruginosa. Note that for various reasons the actual contaminating genus/species isn’t reported as the top_tax_name.
Contamination was likely introduced at the sample/library preparation stage. Pseudomonas aeruginosa can be found in multiple human tissues, including skin flora.
Look at the FCS-GX cleaned sequences
Click the box in your workflow history - 1: FCS.combo.test.fa. Note the total number of sequences.
Click the box in your workflow history - 4: NCBI FCS GX on data 3 and data 1: Fasta for EXCLUDE entries. Note the total number of sequences.
Click the box in your workflow history - 5: NCBI FCS GX on data 3 and data 1: Cleaned Fasta. Note the total number of sequences as well as Applied actions.
Confirm that Cleaned Fasta sequences (Step 5) = Total sequences (Step 1) - Contaminant sequences (Step 4)
Look at the FCS-adaptor contamination report
In your Galaxy history, click the galaxy-eye icon for 6: NCBI FCS Adaptor on data 5: Adaptor report
Review the contaminated sequence list, the suggested contamination cleanup actions, and the identity of adaptor/vector contaminants. Adaptor/vector sequences can be found on the NCBI UniVec FTP page.
Question
What are the adaptor/vector contaminants in this genome assembly?
When was this contamination likely introduced in the genome assembly process?
Illumina PCR Primer sequence.
Contamination was likely introduced during contig assembly or polishing. Often the initial contig assembly is generated using long reads alone, so the introduction of contamination via polishing with untrimmed reads is the more likely explanation.
Look at the FCS-adaptor cleaned sequences
Click the box in your workflow history - 5: NCBI FCS GX on data 3 and data 1: Cleaned Fasta. Note the total number of sequences.
Click the box in your workflow history - 8: NCBI FCS GX on data 6 and data 5: Fasta for EXCLUDE entries. Note the total number of sequences as well as Applied actions.
Click the box in your workflow history - 9: NCBI FCS GX on data 6 and data 5: Cleaned Fasta. Note the total number of sequences.
Warning: Two different cleaned FASTA files from FCS-adaptor step
FCS-adaptor only removes sequences that are completely/mostly adaptor (assigned ACTION_EXCLUDE) and adaptors near contig ends (assigned ACTION_TRIM). FCS-adaptor does not remove small internal trims in large sequences. In this example, the FASTA file in workflow history - 7: NCBI FCS Adaptor on data 5: Cleaned Fasta is the same as the uncleaned input FASTA. FCS-GX clean is required to handle these internal spans. The FASTA file in workflow history - 9: NCBI FCS GX on data 6 and data 5: Cleaned Fasta has the contigs seq_1 through seq_16 split into two separate contigs at the ACTION_TRIM sites. If you want to hardmask these regions instead, you must download the tabular adaptor report, convert ACTION_TRIM values to FIX, and run the FCS-GX clean tool separately.
Conclusion
In this example, we removed 200 contaminant sequences from non-target organisms using FCS-GX and removed 16 internal adaptor sequences using FCS-adaptor, producing a cleaned yeast genome. Following contamination detection, we can perform separate validation checks to support the removal of these sequences from our assembly. One example is to perform BLAST searches or NUCmer alignments against reference genomes of the same or closely related species.
You've Finished the Tutorial
Please also consider filling out the Feedback Form as well!
Key points
Contamination can arise from multiple sources and occur at multiple stages of a genome assembly project.
Contamination cleanup is essential for reliable comparative genomics analyses.
Frequently Asked Questions
Have questions about this tutorial? Have a look at the available FAQ pages and support channels
Further information, including links to documentation and original publications, regarding the tools, analysis techniques and the interpretation of results described in this tutorial can be found here.
References
Astashyn, A., E. S. Tvedte, D. Sweeney, V. Sapojnikov, N. Bouk et al., 2024 Rapid and sensitive detection of genome contamination at scale with FCS-GX. Genome Biology 25: 10.1186/s13059-024-03198-7
Feedback
Did you use this material as an instructor? Feel free to give us feedback on how it went.
Did you use this material as a learner or student? Click the form below to leave feedback.
Hiltemann, Saskia, Rasche, Helena et al., 2023 Galaxy Training: A Powerful Framework for Teaching! PLOS Computational Biology 10.1371/journal.pcbi.1010752
Batut et al., 2018 Community-Driven Data Analysis Training for Biology Cell Systems 10.1016/j.cels.2018.05.012
@misc{sequence-analysis-ncbi-fcs,
author = "Eric Tvedte",
	title = "Screening assembled genomes for contamination using NCBI FCS (Galaxy Training Materials)",
	year = "",
	month = "",
	day = "",
	url = "\url{https://training.galaxyproject.org/training-material/topics/sequence-analysis/tutorials/ncbi-fcs/tutorial.html}",
	note = "[Online; accessed TODAY]"
}
@article{Hiltemann_2023,
	doi = {10.1371/journal.pcbi.1010752},
	url = {https://doi.org/10.1371%2Fjournal.pcbi.1010752},
	year = 2023,
	month = {jan},
	publisher = {Public Library of Science ({PLoS})},
	volume = {19},
	number = {1},
	pages = {e1010752},
	author = {Saskia Hiltemann and Helena Rasche and Simon Gladman and Hans-Rudolf Hotz and Delphine Larivi{\`{e}}re and Daniel Blankenberg and Pratik D. Jagtap and Thomas Wollmann and Anthony Bretaudeau and Nadia Gou{\'{e}} and Timothy J. Griffin and Coline Royaux and Yvan Le Bras and Subina Mehta and Anna Syme and Frederik Coppens and Bert Droesbeke and Nicola Soranzo and Wendi Bacon and Fotis Psomopoulos and Crist{\'{o}}bal Gallardo-Alba and John Davis and Melanie Christine Föll and Matthias Fahrner and Maria A. Doyle and Beatriz Serrano-Solano and Anne Claire Fouilloux and Peter van Heusden and Wolfgang Maier and Dave Clements and Florian Heyl and Björn Grüning and B{\'{e}}r{\'{e}}nice Batut and},
	editor = {Francis Ouellette},
	title = {Galaxy Training: A powerful framework for teaching!},
	journal = {PLoS Comput Biol}
}
Funding
These individuals or organisations provided funding support for the development of this resource
5 stars:
Liked: the possibility to download and test a complete workflow
February 2025
4 stars:
Liked: The tutorial is easy to follow and 100% understandable.
Disliked: Dear Galaxy Team, First and foremost, thanks for this wonderful instrument in general and for the implementation of NCBI FCS pipeline, which turned out to be tricky to install locally for me for some reason. I have a suggestion for the NCBI FCS Adaptor tool. I've been getting this error and finally figured out what's wrong: I had to shorten the names to below 50 symbols, otherwise it crashed with a pretty vague error. I might have missed something, but in fact I could only guessed about 50 symbols because I gave up and tried to submit my assembly to NCBI as is, and there I read about this 50-symbol name length threshold. Some, my suggestion would be to mention this pre-requisite when talking about input file format (ideally both in the tutorial and in the tool dialog), so that people do not get this frustrating experience when everything works with example data and nothing works with real data. Thanks again!
Questions:


 Open image in new tab
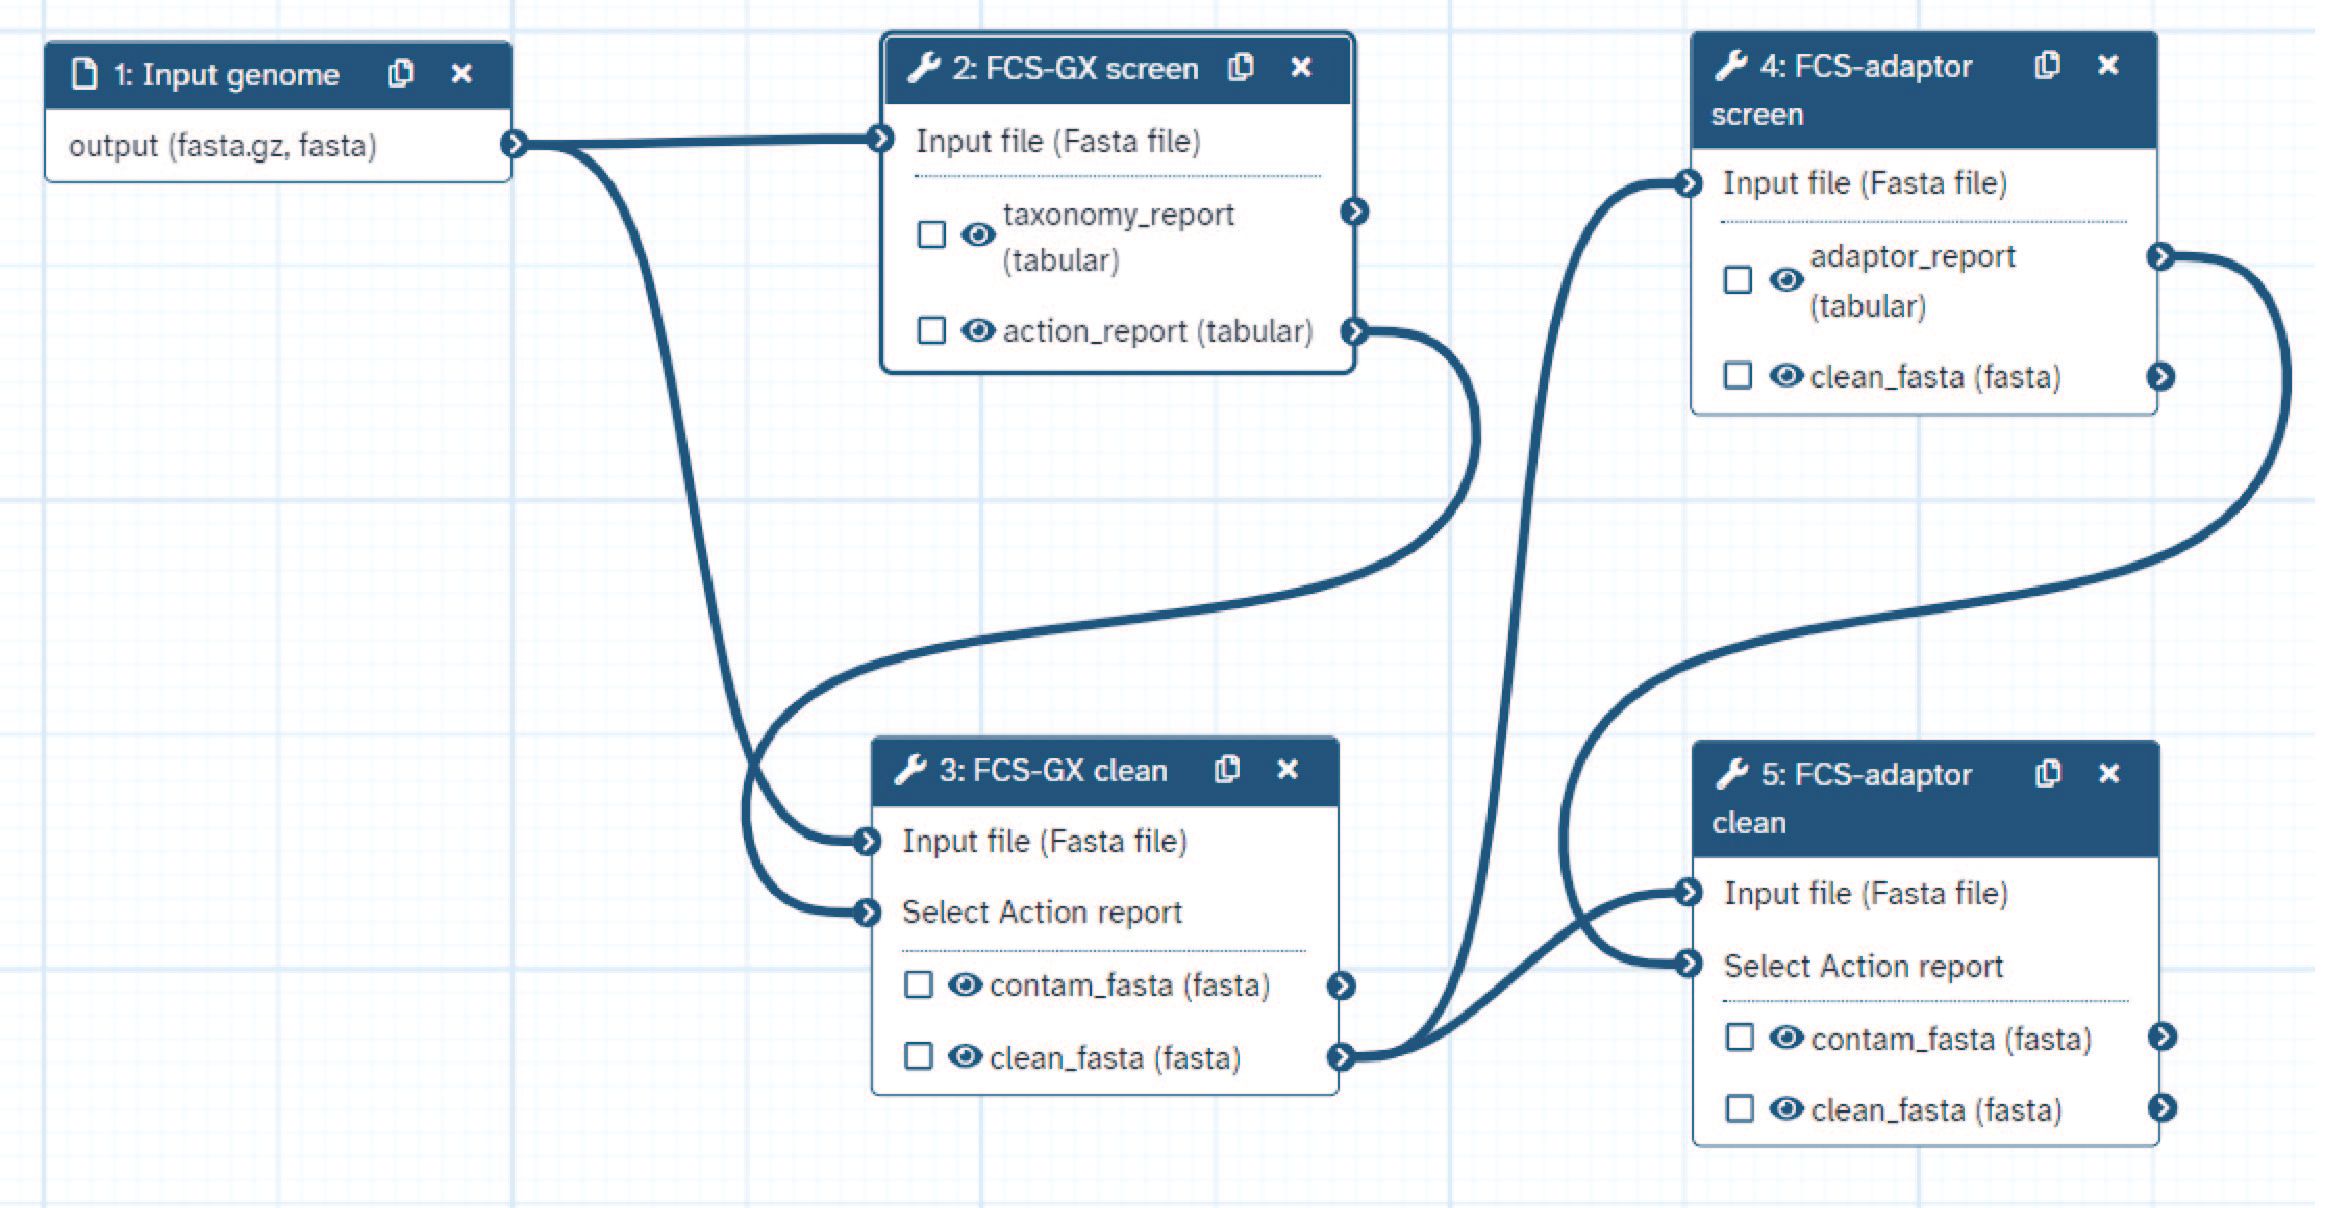 Open image in new tab
 Open image in new tab