Name tags for following complex histories
| Author(s) |
|
| Reviewers |
|
OverviewQuestions:
Objectives:
What are name tags or hash tags?
How can I use them to keep track of my data?
Requirements:
Learn how to set name tags
Learn how they are propagated
Time estimation: 20 minutesSupporting Materials:Published: Apr 8, 2019Last modification: Nov 9, 2023License: Tutorial Content is licensed under Creative Commons Attribution 4.0 International License. The GTN Framework is licensed under MITpurl PURL: https://gxy.io/GTN:T00154rating Rating: 4.2 (0 recent ratings, 9 all time)version Revision: 8
Long ad hoc data analysis sessions in Galaxy can leave you with a multitude of datasets named things like “1724: Summarize taxa on data 1628 and data 1629” or “1853: Pick OTUs Combined: OTUs”. While these names are useful in smaller analysis sessions with fewer datasets, as the size of your history grows, so does the amount of time it takes to figure out where your datasets came from.
You have two options to deal with this:
- Re-name datasets constantly with more useful titles
- Use name tags once, on the inputs to your analysis
Name tags “propagate”, they will follow your datasets throughout their analysis.
To more clearly see this, look at the simple workflow below. If the input datasets are tagged TB8_R1 and TB8_R2, these tags will propagate to the outputs of any tools run on these datasets. If a tool has multiple inputs with tags, the outputs will have all of the tags like in the bowtie2 tool.
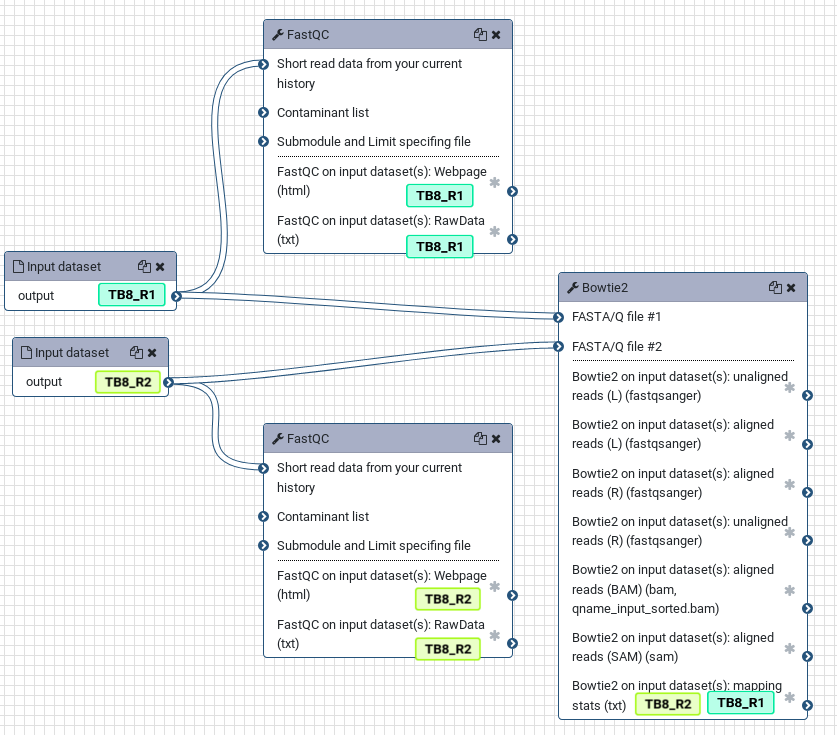
It can turn your histories from a complicated mess into an easier to follow analysis, as each step is clearly labelled with the original input sample corresponding to each analysis:
| Bad | Good |
|---|---|
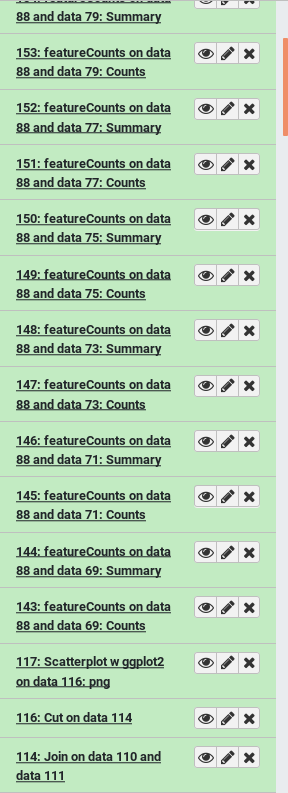 |
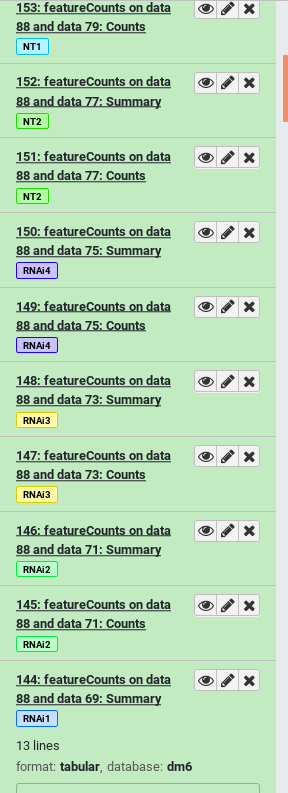 |
| How would you identify which input sample corresponds with which featureCounts output? | With name tags applied before the start of analysis, each output is also tagged with the appropriate sample name |
AgendaIn this tutorial, we will cover:
Setting name tags manually
Hands On: Set name tags manually
Create a new history
To create a new history simply click the new-history icon at the top of the history panel:
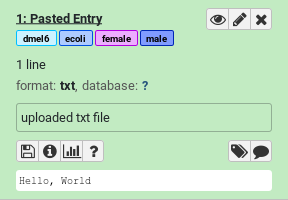
Using the Upload galaxy-upload tool select Paste/Fetch data and paste some data like “Hello, World”
When this is uploaded, click on the title of the dataset in your history panel to expand it
Add some name tags (hashtags) to your dataset:
#female#male#dmel6#ecoliDatasets can be tagged. This simplifies the tracking of datasets across the Galaxy interface. Tags can contain any combination of letters or numbers but cannot contain spaces.
To tag a dataset:
- Click on the dataset to expand it
- Click on Add Tags galaxy-tags
- Add tag text. Tags starting with
#will be automatically propagated to the outputs of tools using this dataset (see below).- Press Enter
- Check that the tag appears below the dataset name
Tags beginning with
#are special!They are called Name tags. The unique feature of these tags is that they propagate: if a dataset is labelled with a name tag, all derivatives (children) of this dataset will automatically inherit this tag (see below). The figure below explains why this is so useful. Consider the following analysis (numbers in parenthesis correspond to dataset numbers in the figure below):
- a set of forward and reverse reads (datasets 1 and 2) is mapped against a reference using Bowtie2 generating dataset 3;
- dataset 3 is used to calculate read coverage using BedTools Genome Coverage separately for
+and-strands. This generates two datasets (4 and 5 for plus and minus, respectively);- datasets 4 and 5 are used as inputs to Macs2 broadCall datasets generating datasets 6 and 8;
- datasets 6 and 8 are intersected with coordinates of genes (dataset 9) using BedTools Intersect generating datasets 10 and 11.
Now consider that this analysis is done without name tags. This is shown on the left side of the figure. It is hard to trace which datasets contain “plus” data versus “minus” data. For example, does dataset 10 contain “plus” data or “minus” data? Probably “minus” but are you sure? In the case of a small history like the one shown here, it is possible to trace this manually but as the size of a history grows it will become very challenging.
The right side of the figure shows exactly the same analysis, but using name tags. When the analysis was conducted datasets 4 and 5 were tagged with
#plusand#minus, respectively. When they were used as inputs to Macs2 resulting datasets 6 and 8 automatically inherited them and so on… As a result it is straightforward to trace both branches (plus and minus) of this analysis.More information is in a dedicated #nametag tutorial.


These are example tags, but it is recommended that you use name tags to reflect the identity of the input sample, in some way that’s important to you. If you’re doing an analysis comparing wildtype and treated samples, you might tag things based on the condition. If you’re processing NGS data you might want to tag based on the read set where each sample originated.
If you’re using a Galaxy server newer than 19.01, you will notice that the tags each have different colours:
The colours are generated from a checksum of the text of each tag. Every time the same tag is used, the same colour will be generated. Different words will usually result in different colours.
This allows tags with very similar lengths and word shapes (e.g.
peaksandgenes) which can be mistake at small font size if you aren’t careful. While current evidence (Jacobs 2017) doesn’t support the “word shape” model of word recognition, it has still been seen to be beneficial to provide more contrast between words when mistakes can be costly (Degani 1999). In the context of Galaxy, mistakes are usually not incredibly costly, but can be annoying. This gives an easy additional signal on which you can mentally filter your datasets.You can read some of the discussion that went into implementing the tags in the pull request to Galaxy.
Setting name tags with the Rule Builder
In this section we will demonstrate how you can add name tags to datasets automatically using the rule-based uploader. This is especially useful when you have a large number of datasets you want to tag all at once.
For more information about the rule-based uploader, please see this dedicated tutorial
Hands On: Set name tags during upload
- Open the Upload galaxy-upload interface
Click on Rule-based at the top
As you can see in this dialog, data can be selected from a history dataset or pasted in directly
- Set Upload data as: to
DatasetsPaste the following links into the text box
https://zenodo.org/record/1185122/files/GSM461176_untreat_single.counts
https://zenodo.org/record/1185122/files/GSM461177_untreat_paired.counts
https://zenodo.org/record/1185122/files/GSM461178_untreat_paired.counts
https://zenodo.org/record/1185122/files/GSM461179_treat_single.counts
https://zenodo.org/record/1185122/files/GSM461180_treat_paired.counts
https://zenodo.org/record/1185122/files/GSM461181_treat_paired.counts
https://zenodo.org/record/1185122/files/GSM461182_untreat_single.counts
Click Build
- We will add a regex that creates 3 new columns with accession, treatment and library type:
- Click on the Columnn button and then Using a Regular Expression
Select Create columns matching expression groups
- Paste
.*(GSM.*)_(.*)_(.*).countsin “Regular Expression”- Set “Number of Groups” to 3
- Click on Apply
We should have now a table with 4 columns: link, sample name, treatment, sequencing type
- Click on Rules and then Add / Modify Column Definitions
- Click on Add Definition and select:
- “URL”: Column A
- “Name”: Column B
- “Name Tag”: Column B
- “General Purpose Tags(s)”: Columns C and D
- Click Apply
- Click Upload

This will add 7 new datasets to your history, each one tagged and named appropriately.
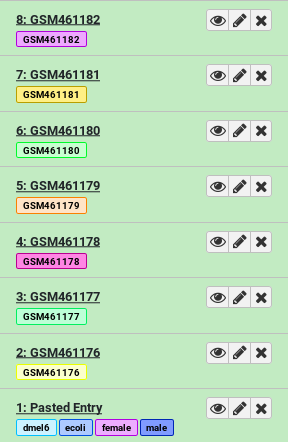
The datasets now have two types of tags: name tags and general purpose tags. General purpose tags, unlike name tags, will not propagate. They’re mainly useful for searching through your datasets (Try entering tag=paired in your History search box).
Question
- How many tags does the dataset named
GSM461177have? Which ones?- How many of those tags are propagating name tags?
- 3 tags. You can find all tags of a dataset by first clicking on it to expand it, and then clicking on the tags icon galaxy-tags. The tags are
#GSM461177,paired, anduntreat- 1 propagating name tag. Only hashtags (tags starting with a
#symbol) will propagate to downstream results derived from it. So in this example only#GSM461177is a propagating name tag.
Name tags in Action
Now that we have our name tags in place, let’s see them in action!
Hands On: Some analysis steps
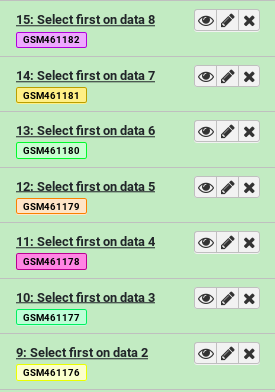
- Select first tool lines from a dataset (head)
- param-files “File to select”: Select everything starting with
GSM- Click Run Tool
We can already see the benefits of name tags. Even though our outputs are named things like “Select first on data 8”, they’re also visibly tagged with the name of the original input.
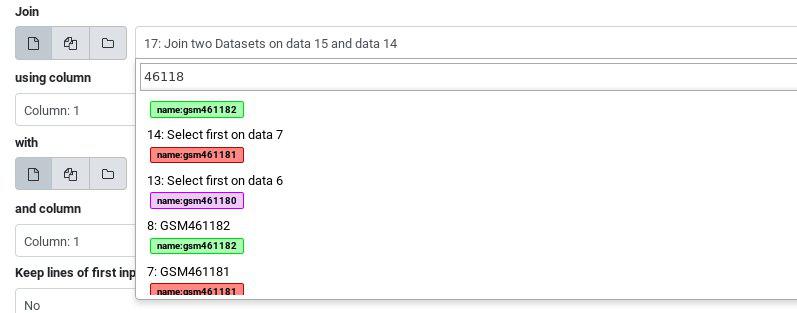
Next we’ll join two of these datasets together, to see the tagging behaviour on summaries of multiple datasets. In any box which allows selecting single files, you can also search on name tags.
Hands On: Multiple inputs
- Join two datasets tool side by side on a specified field
- param-file “Join”: Click the select box and type “461181” to filter the list and use the “Select first on data …” file
- param-file “With”: Click the select box and type “461182” to filter the list and use the “Select first on data …” file
- Click Run Tool
The output will include all of the name tags from all of the inputs:
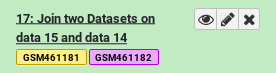
If you compare the tags of the last output joining the two tables, and the original inputs, you will notice that the “General Purpose” tags were lost along the way. Only name tags are propagated with each analysis step.
You've Finished the Tutorial
Key points
Naming your datasets clearly is good practice, but name tags provide an easier alternative to the amount of effort required to rename 100s of datasets.
Name tags allow you to follow the flow of data throughout your history
Frequently Asked Questions
Have questions about this tutorial? Have a look at the available FAQ pages and support channelsReferences
- Degani, A., 1999 On the typography of flight-deck documentation. Accessed 2019-03-29. https://ntrs.nasa.gov/search.jsp?R=19930010781
- Jacobs, M., 2017 The science of word recognition. Accessed 2019-03-29. https://docs.microsoft.com/en-us/typography/develop/word-recognition
Feedback
Did you use this material as an instructor? Feel free to give us feedback on how it went.
Did you use this material as a learner or student? Click the form below to leave feedback.

Citing this Tutorial
- Helena Rasche, Name tags for following complex histories (Galaxy Training Materials). https://training.galaxyproject.org/training-material/topics/galaxy-interface/tutorials/name-tags/tutorial.html Online; accessed TODAY
- Hiltemann, Saskia, Rasche, Helena et al., 2023 Galaxy Training: A Powerful Framework for Teaching! PLOS Computational Biology 10.1371/journal.pcbi.1010752
- Batut et al., 2018 Community-Driven Data Analysis Training for Biology Cell Systems 10.1016/j.cels.2018.05.012
Congratulations on successfully completing this tutorial!@misc{galaxy-interface-name-tags, author = "Helena Rasche", title = "Name tags for following complex histories (Galaxy Training Materials)", year = "", month = "", day = "", url = "\url{https://training.galaxyproject.org/training-material/topics/galaxy-interface/tutorials/name-tags/tutorial.html}", note = "[Online; accessed TODAY]" } @article{Hiltemann_2023, doi = {10.1371/journal.pcbi.1010752}, url = {https://doi.org/10.1371%2Fjournal.pcbi.1010752}, year = 2023, month = {jan}, publisher = {Public Library of Science ({PLoS})}, volume = {19}, number = {1}, pages = {e1010752}, author = {Saskia Hiltemann and Helena Rasche and Simon Gladman and Hans-Rudolf Hotz and Delphine Larivi{\`{e}}re and Daniel Blankenberg and Pratik D. Jagtap and Thomas Wollmann and Anthony Bretaudeau and Nadia Gou{\'{e}} and Timothy J. Griffin and Coline Royaux and Yvan Le Bras and Subina Mehta and Anna Syme and Frederik Coppens and Bert Droesbeke and Nicola Soranzo and Wendi Bacon and Fotis Psomopoulos and Crist{\'{o}}bal Gallardo-Alba and John Davis and Melanie Christine Föll and Matthias Fahrner and Maria A. Doyle and Beatriz Serrano-Solano and Anne Claire Fouilloux and Peter van Heusden and Wolfgang Maier and Dave Clements and Florian Heyl and Björn Grüning and B{\'{e}}r{\'{e}}nice Batut and}, editor = {Francis Ouellette}, title = {Galaxy Training: A powerful framework for teaching!}, journal = {PLoS Comput Biol} }