If you already have an account, skip to the next section!
In Galaxy, server and instance are often used interchangeably. These terms basically mean that different regions have different Galaxy servers/instances, with slightly different tool installations and appearances. If you don’t have a specific server/instance in mind, we recommend registering at one of the main public servers/instances, detailed below.
To create an account at any public Galaxy instance, choose your server from the available list of Galaxy Platforms.
Click on “Login or Register” in the masthead on the server.
On the login page, find the Register here link and click on it.
Fill in the the registration form, then click on Create.
Your account should now get created, but will remain inactive until you verify the email address you provided in the registration form.
Check for a Confirmation Email in the email you used for account creation.
Missing? Check your Trash and Spam folders.
Click on the Email confirmation link to fully activate your account.
galaxy-info Delivery of the confimation email is blocked by your email provider or you mistyped the email address in the registration form?
Please do not register again, but follow the instructions to change the email address registered with your account! The confirmation email will be resent to your new address once you have changed it.
Trouble logging in later? Account email addresses and public names are caSe-sensiTive. Check your activation email for formats.
What does Galaxy look like?
Hands On: Log in to Galaxy
Open your favorite browser (Chrome, Safari, Edge or Firefox as your browser, not Internet Explorer!)
Browse to your Galaxy instance
Log in or register
Comment: Different Galaxy servers
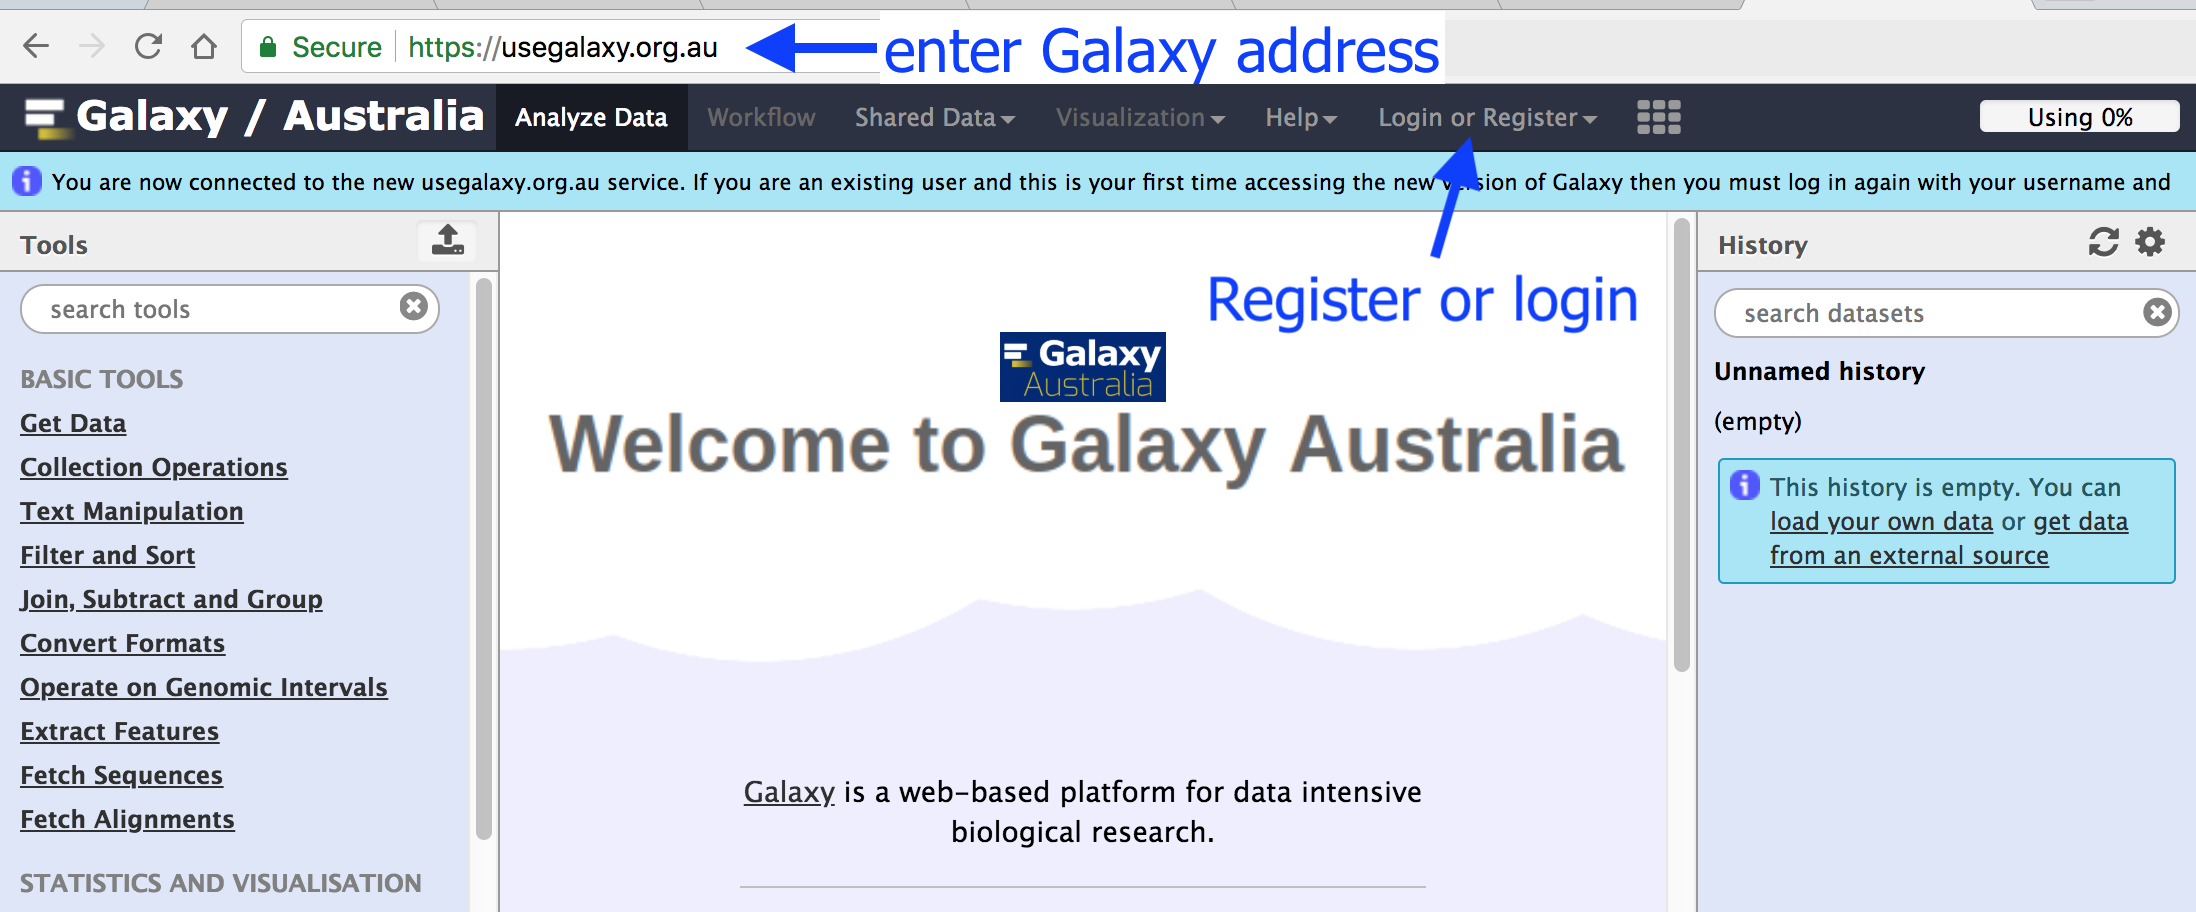
This is an image of Galaxy Australia, located at usegalaxy.org.au
The particular Galaxy server that you are using may look slightly different and have a different web address.
You can also find more possible Galaxy servers at the top of this tutorial in Available on these Galaxies
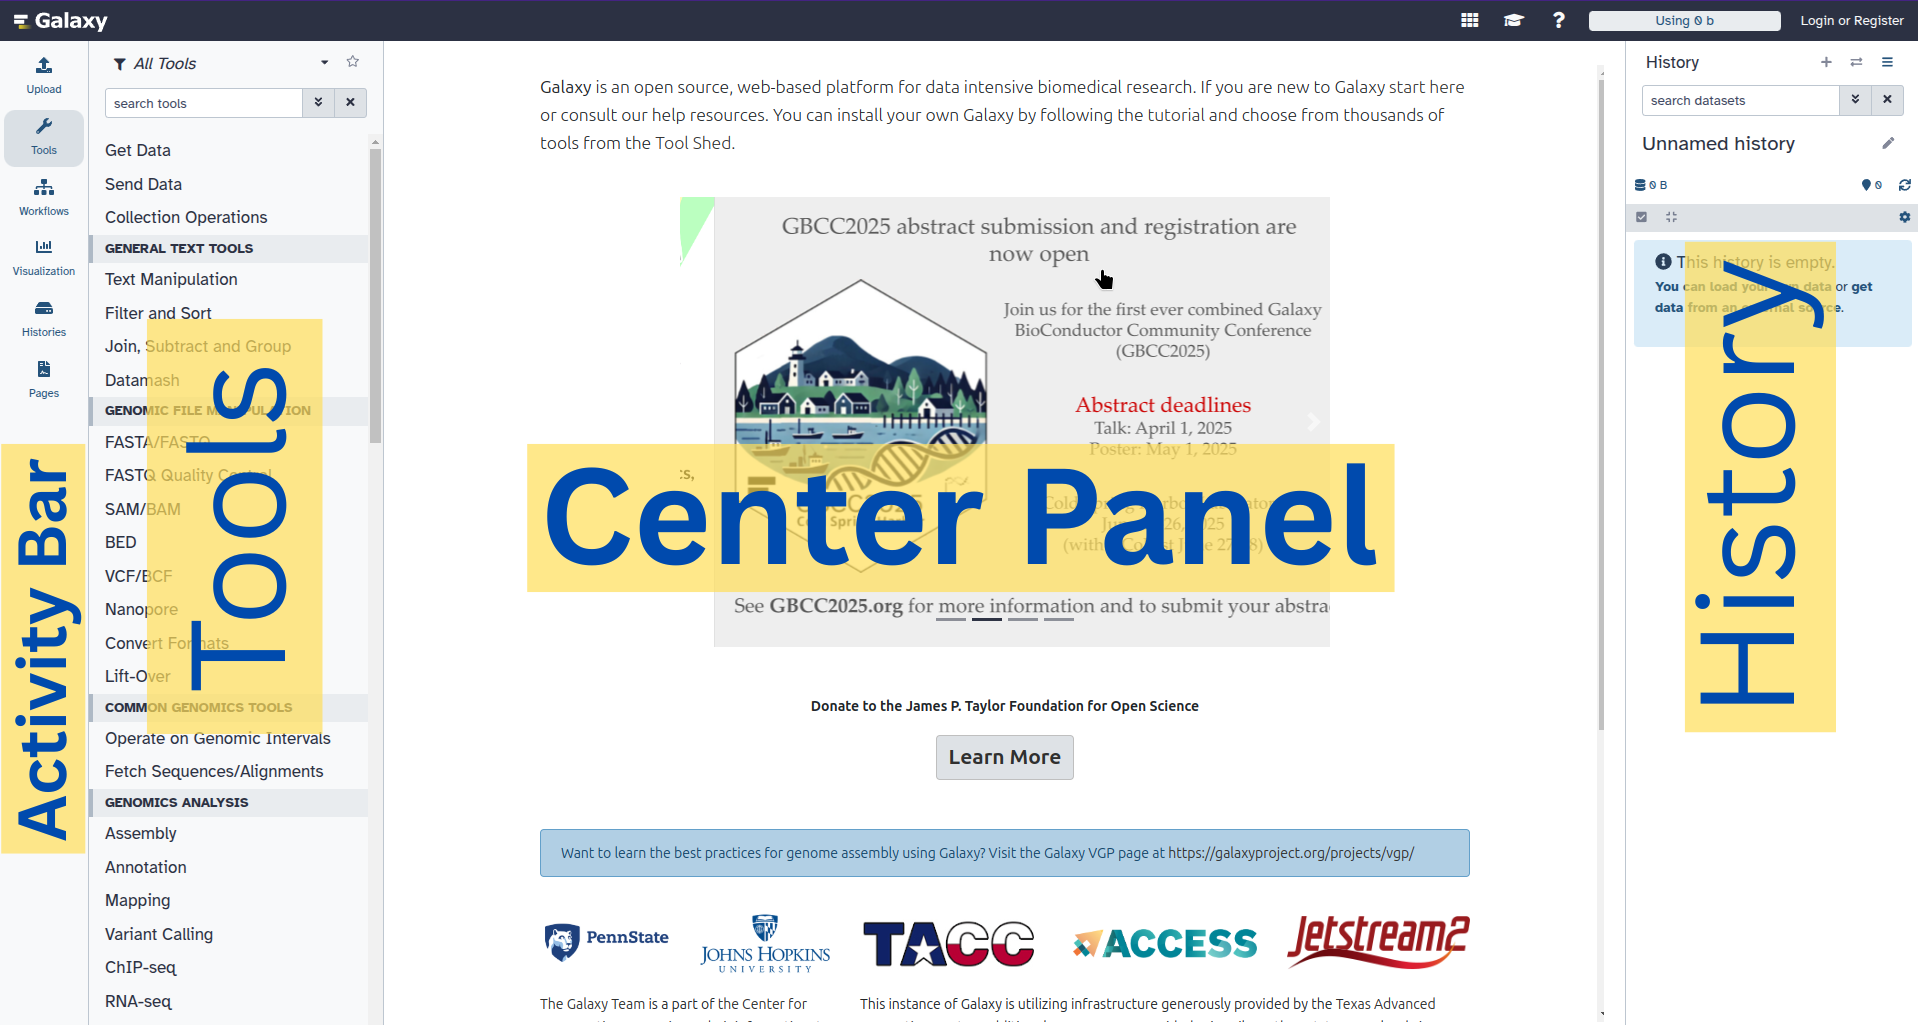
The Galaxy homepage is divided into four sections (panels):
The Activity Bar on the left: This is where you will navigate to the resources in Galaxy (Tools, Workflows, Histories etc.)
Currently active “Activity Panel” on the left: By default, the toolTools activity will be active and its panel will be expanded
Viewing panel in the middle: The main area for context for your analysis
History of analysis and files on the right: Shows your “current” history; i.e.: Where any new files for your analysis will be stored
The first time you use Galaxy, there will be no files in your history panel.
Key Galaxy actions
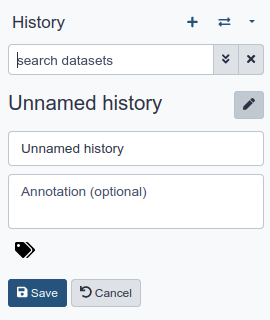
Name your current history
Your “History” is in the panel at the right. It is a record of the actions you have taken.
Hands On: Name history
Go to the History panel (on the right)
Click galaxy-pencil (Edit) next to the history name (which by default is “Unnamed history”)
Comment
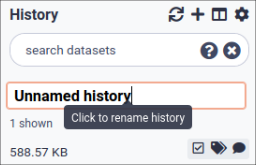
In some previous versions of Galaxy, you will need to click the history name to rename it as shown here:
Type in a new name, for example, “My Analysis”
Click Save
Comment: Renaming not an option?
If renaming does not work, it is possible you aren’t logged in, so try logging in to Galaxy first. Anonymous users are only permitted to have one history, and they cannot rename it.
Upload a file
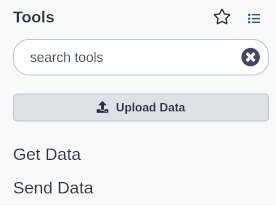
The “Activity Bar” can be seen on the left-most part of the interface.
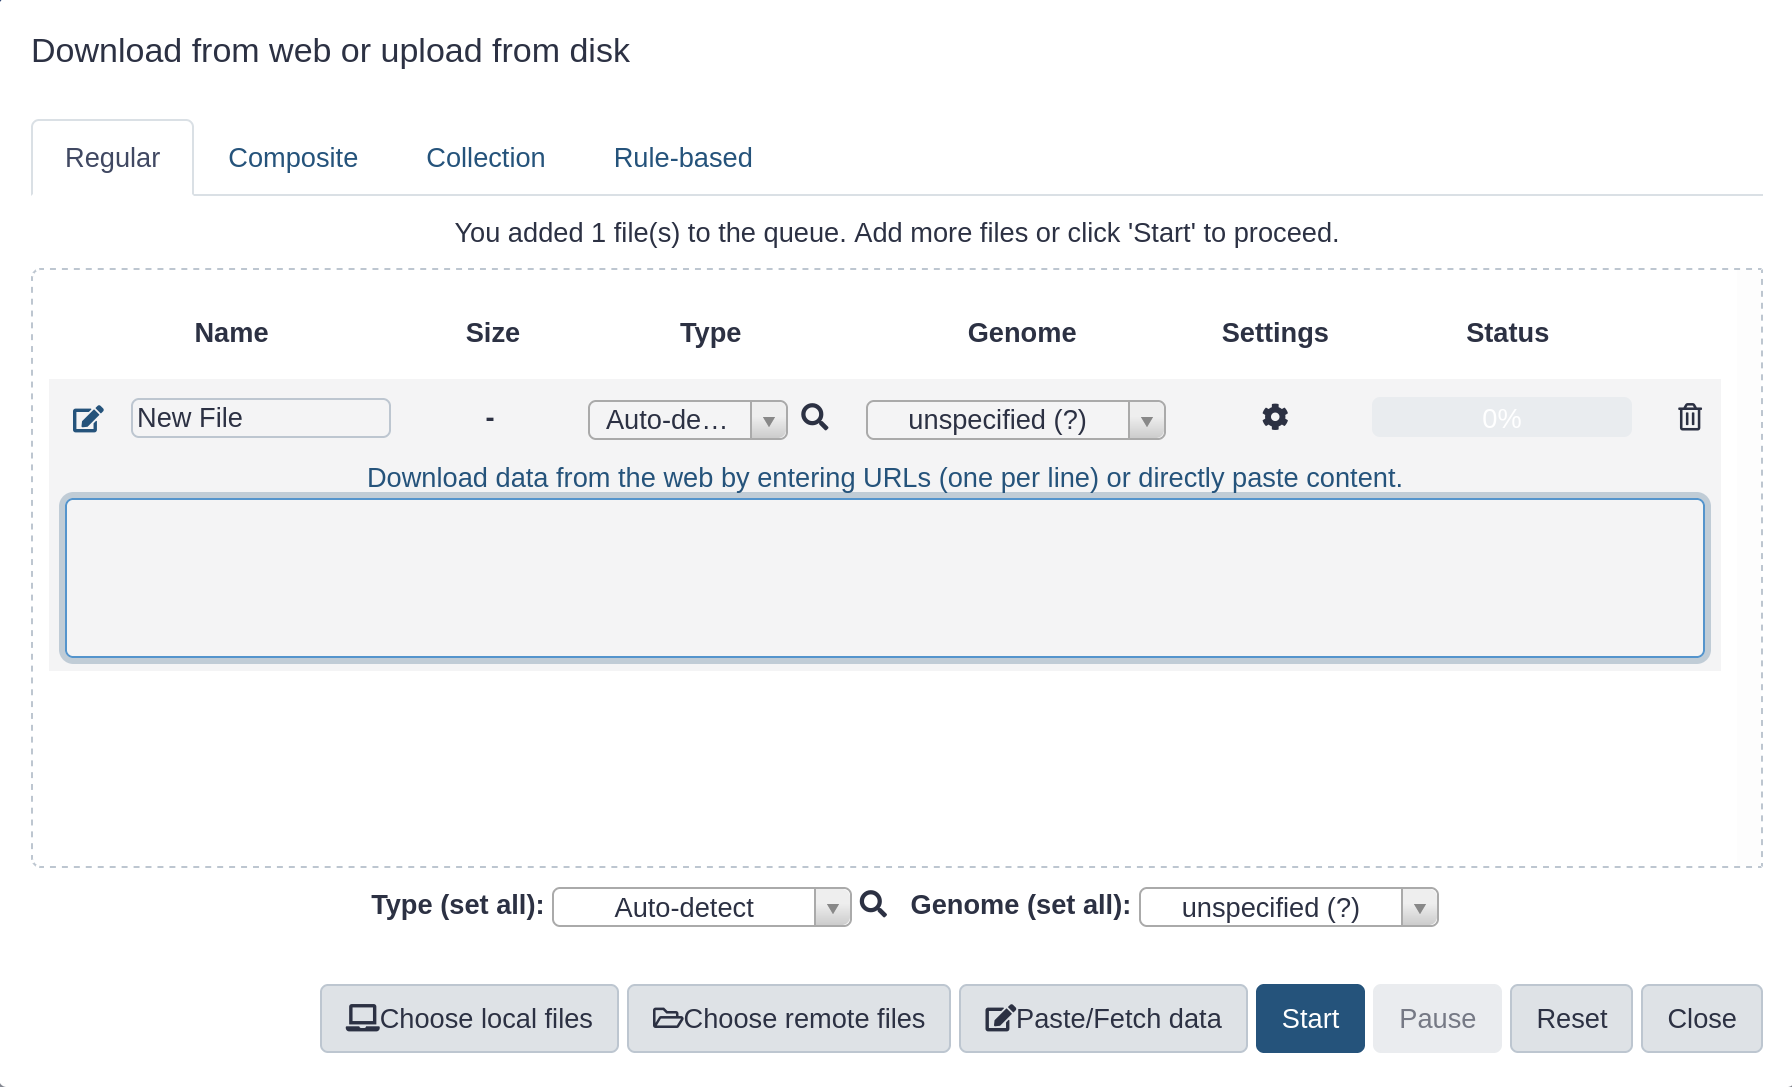
Hands On: Upload a file from URL
At the top of the Activity Bar, click the galaxy-uploadUpload activity
Your uploaded file is now in your current history.
When the file has uploaded to Galaxy, it will turn green.
Comment
After this you will see your first history item (called a “dataset”) in Galaxy’s right panel. It will go through
the gray (preparing/queued) and yellow (running) states to become green (success).
Sometimes during courses, data upload gets a little slow. You can also import data through a history link.
Click on the Import this history button on the top left
Enter a title for the new history
Click on Copy History
Renamegalaxy-pencil the the history to your name of choice.
What is this file?
Hands On: View the dataset content
Click the galaxy-eye (eye) icon next to the dataset name, to look at the file content
The contents of the file will be displayed in the central Galaxy panel. If the dataset is large, you will see a warning message which explains that only the first megabyte is shown.
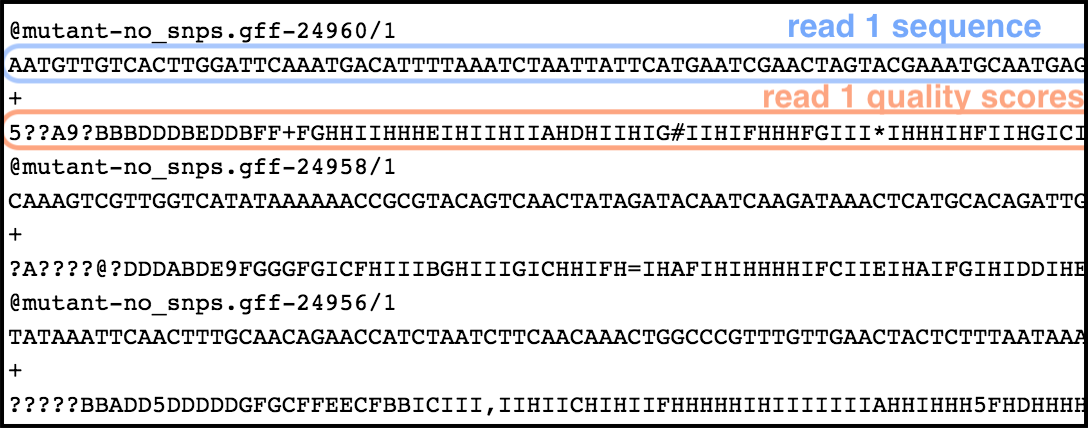
This file contains DNA sequencing reads from a bacteria, in FASTQ format:
Figure 1: A FastQ file has four lines per record: the record identifier (`@mutant-no_snps.gff-24960/`), the sequence (`AATG…`), the plus character (`+`), and then the quality scores for the sequence (`5??A…`).
Use a tool
Let’s look at the quality of the reads in this file.
Hands On: Use a tool
Type FastQC in the tools panel search box (top)
Click the FastQC ( Galaxy version 0.74+galaxy1) tool (it appears as FastQC Read Quality reports without the version number)
The tool will be displayed in the central Galaxy panel.
Select the following parameters:
param-file“Raw read data from your current history”: the FASTQ dataset that we uploaded (should be already selected)
No change in the other parameters
Click Run Tool
This tool will run and two new output datasets will appear at the top of your history panel.
Tools are frequently updated to new versions. Your Galaxy may have multiple versions of the same tool available. By default, you will be shown the latest version of the tool. This may NOT be the same tool used in the tutorial you are accessing. Furthermore, if you use a newer tool in one step, and try using an older tool in the next step… this may fail! To ensure you use the same tool versions of a given tutorial, use the Tutorial mode feature.
Open your Galaxy server
Click on the curriculum icon on the top menu, this will open the GTN inside Galaxy.
Navigate to your tutorial
Tool names in tutorials will be blue buttons that open the correct tool for you
Note: this does not work for all tutorials (yet)
You can click anywhere in the grey-ed out area outside of the tutorial box to return back to the Galaxy analytical interface
Warning: Not all browsers work!
We’ve had some issues with Tutorial mode on Safari for Mac users.
Try a different browser if you aren’t seeing the button.
View results
We will now look at the output dataset called FastQC on data 1: Webpage.
Comment
Note that Galaxy has given this dataset a name according to both the tool name (“FastQC”) and the input (“data 1”) that it used.
The name “data 1” means the dataset number 1 in Galaxy’s current history (our FASTQ file).
Hands On: View results
Once it’s green, click the galaxy-eye (eye) icon next to the “Webpage” output dataset.
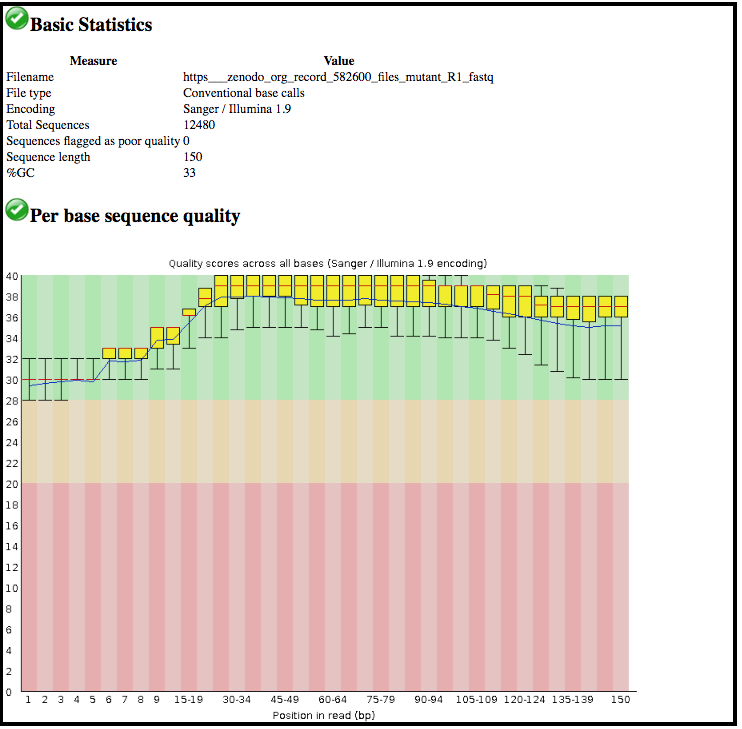
The information is displayed in the central panel
This tool has summarised information about all of the reads in our FASTQ file.
Question
What was the sequence length of reads in the input FASTQ file?
Do these reads have higher quality scores in the centre or at the ends?
150 bp
In the center
Run another tool
Let’s run a tool to filter out lower-quality reads from our FASTQ file.
Hands On: Run another tool
Type Filter by quality in the tools panel search box (top)
Click the tool Filter by quality ( Galaxy version 1.0.2+galaxy2)
“Percent of bases in sequence that must have quality equal to / higher than cut-off value”: 80
Click Run Tool
After the tool has run, its output dataset will appear at the top of your History panel.
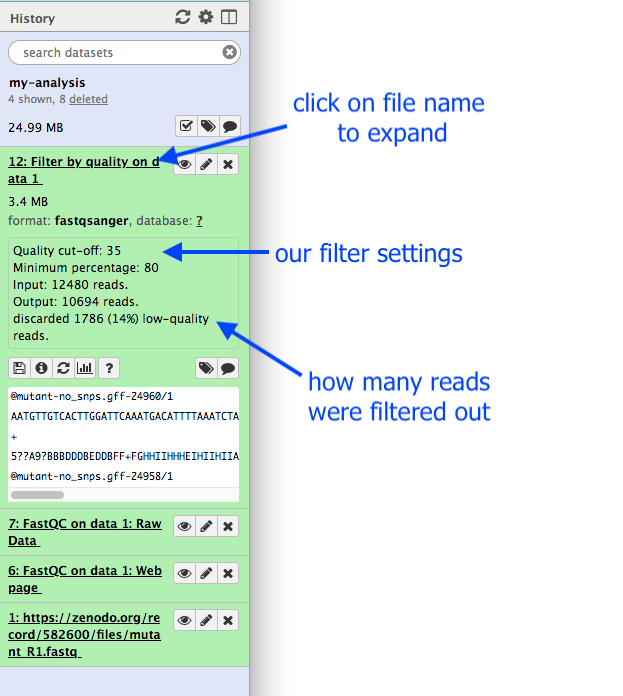
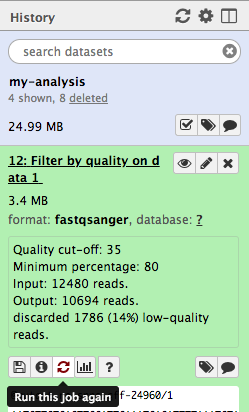
This dataset will be called “Filter by quality on data 1”.
Remember that Galaxy has named this file according to the tool it used (“Filter by quality”) and the input dataset (“data 1”).
The actual numbers in front of the datasets in the history are not important.
What are the results from this filtering tool?
We could click on the eye icon to view the contents of this output file, but it will not be very informative - we will just see a list of reads.
Hands On: Get metadata about a file
Click the dataset (around where its name is) in the History panel.
This expands the information about the file. (By default all datasets are collapsed)
Question
How many reads have been discarded?
1786 low-quality reads were discarded
Re-run that tool with changed settings
We can now try to filter our input reads to an even higher standard, and see how this changes the resulting output (an exploratory analysis). We will change the filter settings and re-run the tool.
Hands On: Re-run the tool
Click the galaxy-refresh icon (Run Job Again) for the output dataset of Filter by qualitytool
This brings up the tool interface in the central panel with the parameters set to the values used previously to generate this dataset.
Change the settings to something even stricter
For example, you might decide you want 80 percent of bases to have a quality of 36 or higher, instead of 35.
Click Run Tool
View the results: Click the output dataset name to expand the information
Comment
Take care not to click the galaxy-eye (eye) icon as this will display the contents of the file in the central Galaxy panel instead.
Question
How many reads were discarded under these new filtering conditions?
If you selected 80% of bases with 36 as quality cut-off, then 11517 reads (92%) should have been discarded, which indicates that we have gone too far with the filtering in this case.
You can re-run a tool many times with different settings. Each time you re-run the tool, its new output datasets will appear at the top of your current history.
Share your history
Let’s imagine that you had a problem in your analysis and you want to ask for help. The easiest way to ask for help is to share your history. Try and create a link for your history and share it with…yourself!
Sharing your history allows others to import and access the datasets, parameters, and steps of your history.
Access the history sharing menu via the History Options dropdown (galaxy-history-options), and clicking “history-share Share or Publish”
Share via link
Open the History Optionsgalaxy-history-options menu at the top of your history panel and select “history-share Share or Publish”
galaxy-toggleMake History accessible
A Share Link will appear that you give to others
Anybody who has this link can view and copy your history
Publish your history
galaxy-toggleMake History publicly available in Published Histories
Anybody on this Galaxy server will see your history listed under the Published Histories tab opened via the galaxy-histories-activityHistories activity
Share only with another user.
Enter an email address for the user you want to share with in the Please specify user email input below Share History with Individual Users
Your history will be shared only with this user.
Finding histories others have shared with me
Click on the galaxy-histories-activityHistories activity in the activity bar on the left
Click the Shared with me tab
Here you will see all the histories others have shared with you directly
Note: If you want to make changes to your history without affecting the shared version, make a copy by going to History Optionsgalaxy-history-options icon in your history and clicking Copy this History
Convert your analysis history into a workflow
When you look carefully at your history, you can see that it contains all the steps of our analysis, from the beginning (at the bottom) to the end (on top). The history in Galaxy records details of every tool you run and preserves all parameter settings applied at each step. But when you need to analyze new data, it would be tedious to do each step one-by-one again. Wouldn’t it be nice to just convert this history into a workflow that we will be able to execute again and again?
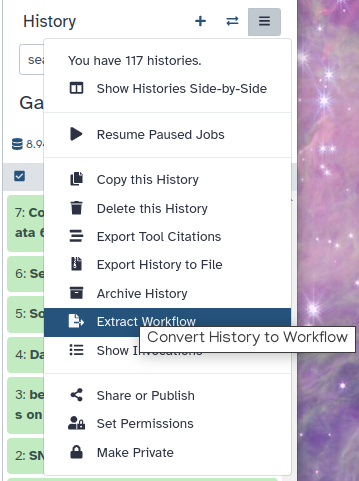
Galaxy makes this very easy with the Extract workflow option. This means any time you want to build a workflow, you can just perform the steps once manually, and then convert it to a workflow, so that next time it will be a lot less work to do the same analysis.
Hands On: Extract workflow
Clean up your history: remove any failed (red) jobs from your history by clicking the galaxy-delete button.
This will make the creation of the workflow easier.
Click galaxy-history-options (History options) at the top of your history panel and select Extract workflow.
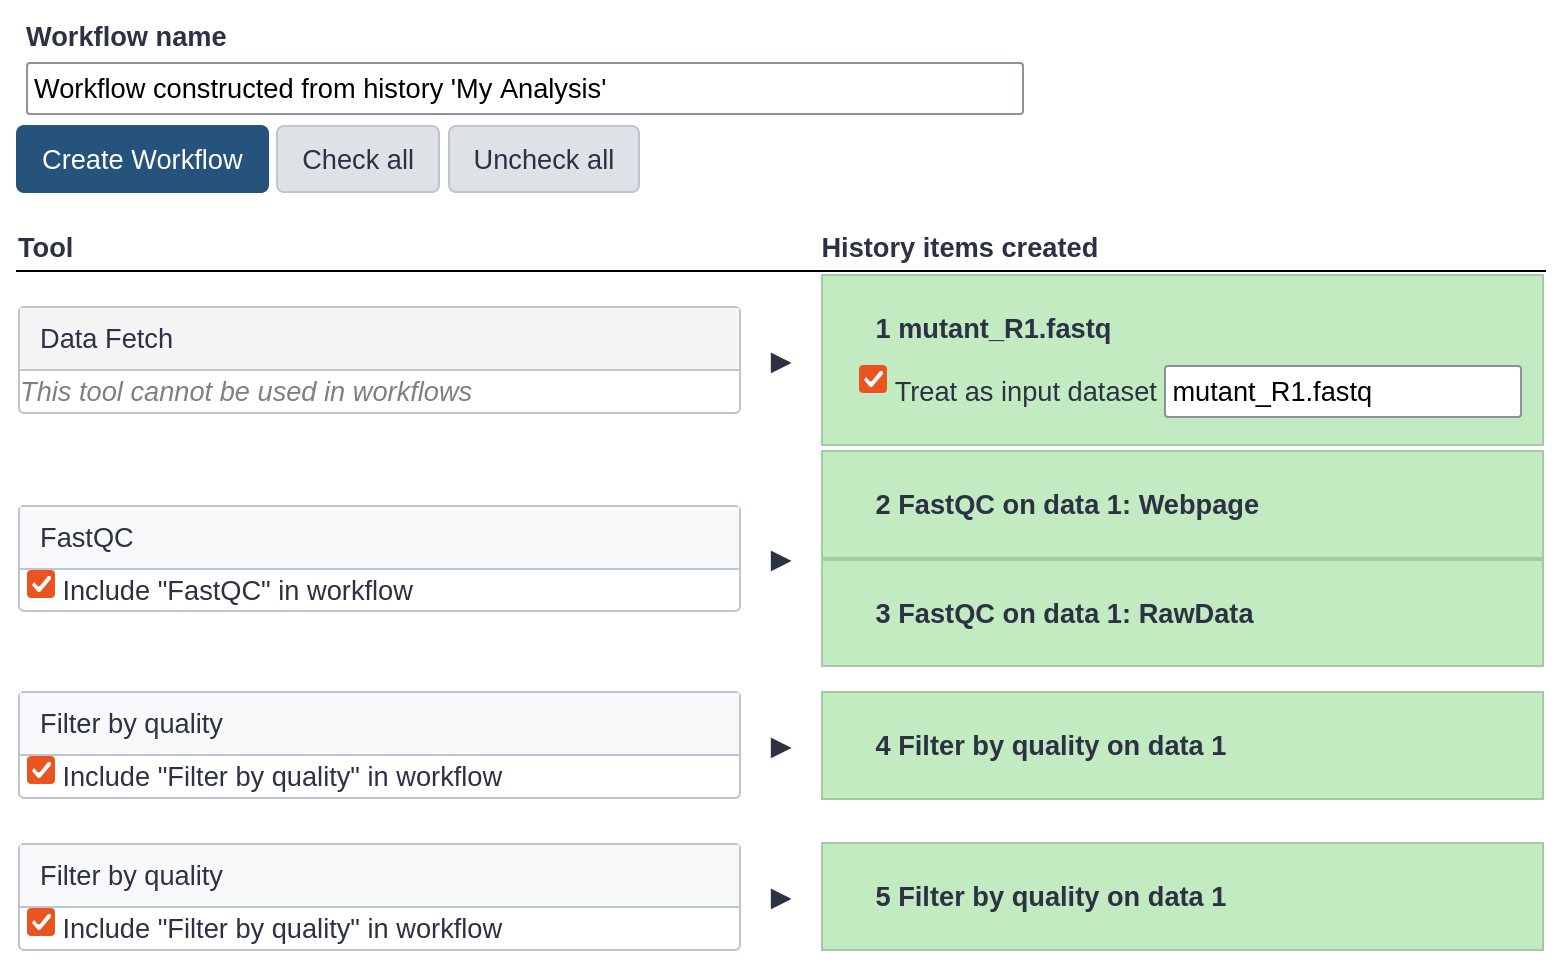
The central panel will show the content of the history in reverse order (oldest on top), and you will be able to choose which steps to include in the workflow.
Replace the Workflow name to something more descriptive, for example: QC and filtering.
Rename the workflow input in the box at the top of second column to: FASTQ reads
If there are any steps that shouldn’t be included in the workflow, you can uncheck them in the first column of boxes. In this case, uncheck the second Filter by quality tool at the bottom, where we used a too high quality cut-off.
Click the Create Workflow button near the top.
You will get a message that the workflow was created.
In a minute we will see how to find the extracted workflow and how to use it.
Create a new history
Let’s create a new history.
Hands On: New history
Create a new history
To create a new history simply click the new-history icon at the top of the history panel:
Rename your history, e.g. “Next Analysis”
Click on galaxy-pencil (Edit) next to the history name (which by default is “Unnamed history”)
Type the new name
Click on Save
To cancel renaming, click the galaxy-undo “Cancel” button
If you do not have the galaxy-pencil (Edit) next to the history name (which can be the case if you are using an older version of Galaxy) do the following:
Click on Unnamed history (or the current name of the history) (Click to rename history) at the top of your history panel
Type the new name
Press Enter
This new history does not have any datasets in it yet.
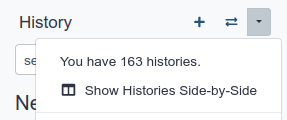
Look at multiple histories
Where is your first history, called “My Analysis”?
Hands On: View histories in History Multiview
One of the ways to view multiple histories at once in Galaxy is through the History Multiview
There are multiple ways to get to the multview:
Click the galaxy-multihistoryHistory Multiview activity in the activity bar
Or, click galaxy-history-options (History options) and then click the galaxy-columnsShow Histories side-by-side option
A new page will appear with your histories displayed side-by-side here.
Figure 2: Copy a dataset between histories by dragging it
This makes a copy of the dataset in the new history (without actually using additional disk space).
Click the Galaxy logo (Home) at the top-left (or Analyze Data on older versions of Galaxy) in the top panel to go back to your analysis window
Your main Galaxy window will now show “Next Analysis” as the current history, and it will have one dataset in it.
Comment
This is not the only way to view your histories in Galaxy:
An exhaustive list (table) of all your histories is available in the My Histories tab in the Histories List accessible via clicking the galaxy-histories-activityHistories activity
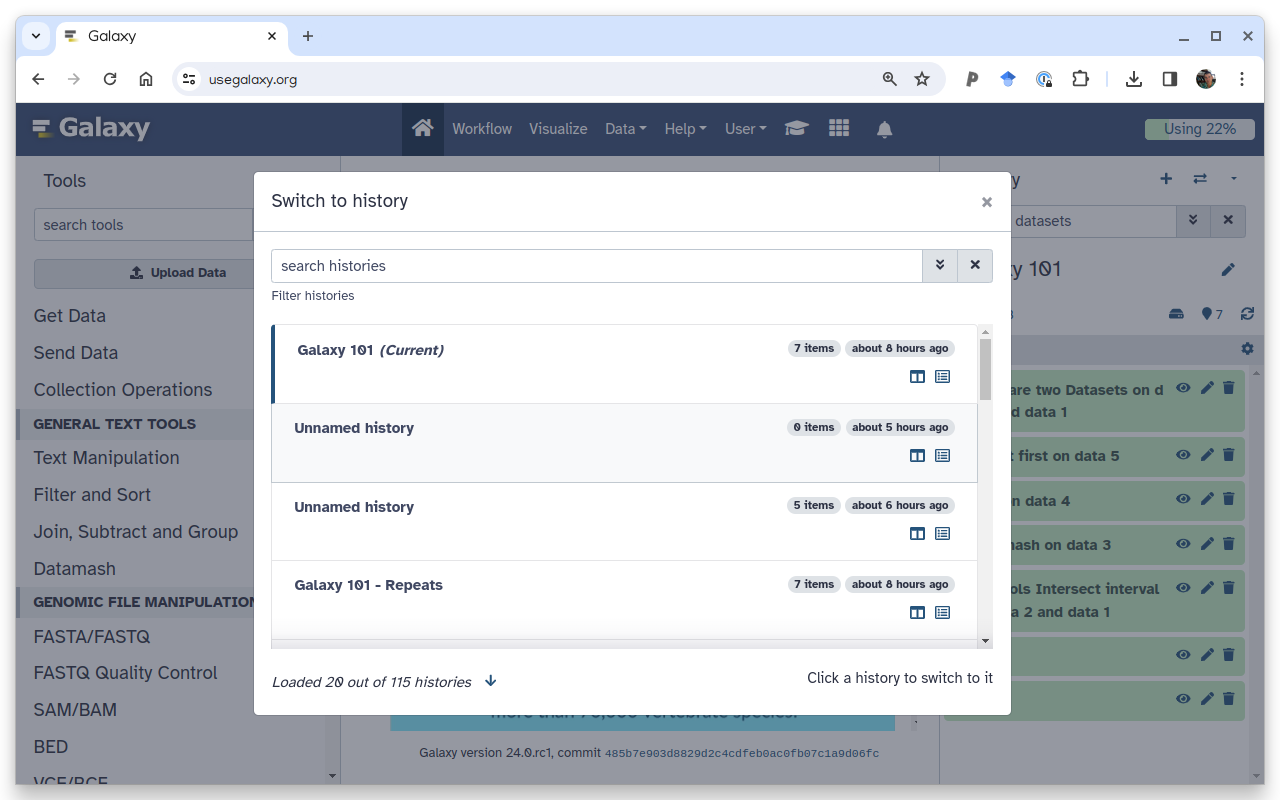
You can quickly switch to another history by clicking the switch-historiesSwitch to history button next to galaxy-history-optionsHistory options:
To switch to an existing history simply click the switch-histories icon at the top of the history panel. This opens a list of histories existing in a given Galaxy account in the middle part of the interface.
Now that we have built our workflow, let’s use it to re-create our small analysis in a single step. The same workflow could also be used on some new FASTQ data to quickly repeat the same analysis on different inputs.
Hands On: Run workflow
Click the galaxy-workflows-activityWorkflows activity in the activity bar.
Here you have a list of all your workflows (the My Workflows tab is active by default).
Your newly created workflow should be listed at the top:
You can see all available actions for the workflow on the workflow card, e.g. edit, copy, rename, share etc. Any other options (e.g.: delete, export etc.) are available by clicking the galaxy-dropdownWorkflow actions button on the top right of the card.
Click the workflow-run (Run workflow) button on the bottom right of the workflow card.
The central panel will change to allow you to configure and launch the workflow.
Check that the “FASTQ reads” input is set to the FASTQ dataset we have copied to the new history.
In this page we could change any parameter for the tools composing the workflow as we would do when running them one by one.
Click the Run Workflow button at the top-right of the screen.
You should see a message that the workflow was successfully invoked. Then jobs will start to run and datasets appear in your “Next Analysis” history, replicating the steps of your previous history.
Conclusion
Well done! You have completed the short introduction to Galaxy, where you named the history, uploaded a file, used a tool, viewed results and run a workflow. Additional tutorials are available for a more in-depth introduction to Galaxy’s features.
You've Finished the Tutorial
Please also consider filling out the Feedback Form as well!
Key points
The Galaxy interface has an activity bar on the left, a tool (or other activated) panel next to it (if expanded), viewing pane in the middle, and a history of your data analysis on the right.
You can create a new history for each analysis. All your histories are saved.
To get data into Galaxy, you can upload a file by pasting in a web address. There are other ways to get data into Galaxy (not covered in this tutorial): you can upload a file from your computer, and you can import an entire history.
Choose a tool and change any settings for your analysis.
Run the tool. The output files will be saved at the top of your history.
View the output files by clicking the eye icon.
View all your histories and move files between them. Switch to a different history.
Log out of your Galaxy server. When you log back in (to the same server), your histories will all be there.
Frequently Asked Questions
Have questions about this tutorial? Have a look at the available FAQ pages and support channels
Did you use this material as an instructor? Feel free to give us feedback on how it went.
Did you use this material as a learner or student? Click the form below to leave feedback.
Hiltemann, Saskia, Rasche, Helena et al., 2023 Galaxy Training: A Powerful Framework for Teaching! PLOS Computational Biology 10.1371/journal.pcbi.1010752
Batut et al., 2018 Community-Driven Data Analysis Training for Biology Cell Systems 10.1016/j.cels.2018.05.012
@misc{introduction-galaxy-intro-short,
author = "Anna Syme and Nicola Soranzo",
	title = "A short introduction to Galaxy (Galaxy Training Materials)",
	year = "",
	month = "",
	day = "",
	url = "\url{https://training.galaxyproject.org/training-material/topics/introduction/tutorials/galaxy-intro-short/tutorial.html}",
	note = "[Online; accessed TODAY]"
}
@article{Hiltemann_2023,
	doi = {10.1371/journal.pcbi.1010752},
	url = {https://doi.org/10.1371%2Fjournal.pcbi.1010752},
	year = 2023,
	month = {jan},
	publisher = {Public Library of Science ({PLoS})},
	volume = {19},
	number = {1},
	pages = {e1010752},
	author = {Saskia Hiltemann and Helena Rasche and Simon Gladman and Hans-Rudolf Hotz and Delphine Larivi{\`{e}}re and Daniel Blankenberg and Pratik D. Jagtap and Thomas Wollmann and Anthony Bretaudeau and Nadia Gou{\'{e}} and Timothy J. Griffin and Coline Royaux and Yvan Le Bras and Subina Mehta and Anna Syme and Frederik Coppens and Bert Droesbeke and Nicola Soranzo and Wendi Bacon and Fotis Psomopoulos and Crist{\'{o}}bal Gallardo-Alba and John Davis and Melanie Christine Föll and Matthias Fahrner and Maria A. Doyle and Beatriz Serrano-Solano and Anne Claire Fouilloux and Peter van Heusden and Wolfgang Maier and Dave Clements and Florian Heyl and Björn Grüning and B{\'{e}}r{\'{e}}nice Batut and},
	editor = {Francis Ouellette},
	title = {Galaxy Training: A powerful framework for teaching!},
	journal = {PLoS Comput Biol}
}
Funding
These individuals or organisations provided funding support for the development of this resource
5 stars:
Liked: The inbuilt data for practice.
Disliked: Include the use of more tool. Maybe from QC to taxonomic classification or gene detection.
May 2026
5 stars:
Liked: each elaborating steps each key points and the practice like in filtering by counts by changing the parameter
4 stars:
Liked: very to the point
Disliked: Not much shorter than the expanded one
5 stars:
Liked: The steps are easy to follow
Disliked: already improved
4 stars:
Liked: very practical and chronological!
Disliked: more explanation on the significance and relevance of the entire practical is required
5 stars:
Liked: The step-by-step instructions
Disliked: For the upload option, it would be good to also include upload from raw FASTQ files from user's experiments.
5 stars:
Liked: The workshop was very clear, beginner-friendly, and well organized. I especially liked the hands-on practical approach and the step-by-step explanation of Galaxy tools and workflows.
Disliked: It would be helpful to include more advanced real-world case studies and provide additional practice exercises after each section.
5 stars:
Liked: It was a fast refreshment of Galaxy usage
5 stars:
Liked: It was clear and didactic
4 stars:
Liked: All of the tutorial
Disliked: I think all of the tutorial is very good and I have no addition
4 stars:
Liked: All of the tutorial
Disliked: I think every thing is very good
5 stars:
Liked: Easy to follow the indications
Disliked: n/a
5 stars:
Liked: I like the way how to use the result
Disliked: n/A
5 stars:
Liked: I like where we teach how to using the tools
Disliked: n/A
5 stars:
Liked: FAST Quality CHECK
5 stars:
Liked: This is the first tutorial I have done on Galaxy and I found that I could follow it. It's clearly written and the instructions actually work.
Disliked: Some of the terms are not entirely clear to me. Eg. Filter by quality, quality cut off '35'
1 stars:
Liked: nic
Disliked: nic
5 stars:
Liked: There were pictures and clips that show what to do, especially since this is such a big program. If the instructions only said click 'Workflow', for example, I would not have known where to look. Instead, the instructions were super clear and showed the icon that is represented by 'Workflow'.
Disliked: Maybe having two windows open for where you read the instructions and one where you execute them. Instead of having to close the windown, going to execute the commands, and having to go back to the instructions again.
April 2026
5 stars:
Liked: It was organized
Disliked: Putting numbers and bigger letters
3 stars:
Liked: Good estructure
Disliked: More interative
2 stars:
Liked: nothing
Disliked: make it easier and less stressful
5 stars:
Liked: all
2 stars:
Liked: Functions introduced
Disliked: Referenced tools for QC and filtering do not appear in the current version
5 stars:
Liked: Clear elaborations
5 stars:
Liked: the language was so easy to understand and overall it was great
Disliked: may be adding more options about understanding the results that come out from the tool
5 stars:
Liked: clear step by step video tutorial, and useful materials like slides, overview, ... etc..
Disliked: however useful, the video needs to be updated to the new version
March 2026
5 stars:
Liked: les details les etapes
Disliked: vous devez envisager de faire des videos en plusieur langues francais ,anlais etc...
4 stars:
Liked: It was very straightforward and easy to understand
Disliked: It was a little bland, and hard for me to stay engaged
5 stars:
Liked: its simplicity
5 stars:
Liked: easy to follow with great explanations
February 2026
5 stars:
Liked: easy to understand
5 stars:
Liked: explicit and cohorent stream of info makes things easy to follow
5 stars:
Liked: very clear
5 stars:
Liked: The step-wise instructions were easy to understand and replicate.
Disliked: None for now
5 stars:
Liked: step by step guidance that given as hand on
January 2026
5 stars:
Liked: Explain all procedures step by step
5 stars:
Disliked: the fetch link is dead
5 stars:
Liked: It was very specific and clear, with all needed information contained
5 stars:
Liked: easy to fallow and undestand the use of the tools presented in this tutorial
December 2025
5 stars:
Liked: It was easy and straightforward to follow along with. I appreciated the questions too!
November 2025
5 stars:
Liked: tools
Disliked: More effective
5 stars:
Liked: I need more information about cut-off, I mean what number should be put and the theory behind it
Disliked: Please provide some theory if possible about the criteria for filtering, since some maybe not familiar enough with molucar field but wanna do the analysis
5 stars:
Liked: I'm completly new to galaxy and working with genomics. all the steps are so clear, and the interactive we of teaching this information, suits me very very well
Disliked: noting I think at this moment
October 2025
5 stars:
Liked: understandable
5 stars:
Liked: explained every step very well! Good to follow.
5 stars:
Liked: Clear and easy to follow steps with interactive data to follow along with
5 stars:
Liked: It was a very detailed tutorial, everything is clear and everything works, it’s great that there is input data that can be used in different ways. Thank you!
Disliked: -
5 stars:
Liked: everything
September 2025
5 stars:
Liked: no video
4 stars:
Liked: It's struction was explained in a great cathegory specially for an internationasl students.
Disliked: Try to be more active inorder to connect with other galaxy websites for other regions too inorder to share the datas between the continenrts too better.
5 stars:
Liked: The detailed explanation.
5 stars:
Liked: SImplicity
5 stars:
Liked: precise and easy to follow. the short videos were helpful and to the point
Disliked: "Rename the workflow input in the box at the top of second column" was a bit confusing of an instruction, i didnt know what exactly to rename
August 2025
5 stars:
Liked: Easy to follow with the graphics
5 stars:
Liked: The hands on activities
5 stars:
Liked: Easy-to-understand explanation
Disliked: You can add variety to examples used
5 stars:
Liked: workflow generation
5 stars:
Liked: The step were detailed and easy to follow with screenshots
Disliked: It maybe just me, i felt like there was much so read but the closed tab like structure did help to focus on one part at a time
July 2025
5 stars:
Liked: very well explained for beginners.
5 stars:
Liked: It was very concise and easy to follow and to perform. Everything is well explained, I really enjoyed it!
Disliked: So far, I do not have any suggestions, this is just the beginning of the Galaxy jurney for me, so far so good!
5 stars:
Liked: The directions are easy to follow.
Disliked: I think the font colors of the bold words can be changed to a brighter color.
4 stars:
Liked: Detailed explanations of exactly what to change and where to find it.
Disliked: Under Extract Workflow, step 4, it's not clear where to rename the workflow input, or even what is the workflow input. On the left (col 1) it says "Data Fetch This tool cannot be used in workflows" and on the right it says "1 mutant_R1.fastq" with a check. and "Treat as input dataset mutant_R1.fastq". A clearer explanation would be good. I couldn't change the filter by quality values when running the workflow? If I should be able to do that, show me how; if not, explain why not.
Questions:


 Open image in new tab

Open image in new tab