“The Sorrows of Yamba” was published in 1795 and was among the most popular antislavery poems. However, the version published by Hannah More in the Cheap Repository Tracts series was not the only version of the poem that circulated. Also, Moore’s authorship on the topic is contested (Richardson 2003). But while we leave this debate to the experts, the different versions of the poem offer a great opportunity to delve into how digital tools can help us compare texts more quickly. We will do this in the following tutorial.
While Richardson compared the poems by hand, we use his example to introduce how Galaxy can help you with your text analysis.
This tutorial covers the basics of Galaxy, from logging in and uploading text to using the first tools.
We will clean the two poem versions and check the texts from a distance by comparing their number of lines and characters, and visualizing both in a word cloud.
Then, we take a closer look. For an easier comparison, we reformat both texts and compare them line by line and side by side. As the word cloud shows, “death” is a dominant theme in the first poem, so we extract all lines including “death” for further in-depth analysis. This helps us gain a better understanding of where those articles differ and is applicable to many other texts you may want to compare.
Click on “Login or Register” in the masthead on the server.
On the login page, find the Register here link and click on it.
Fill in the the registration form, then click on Create.
Your account should now get created, but will remain inactive until you verify the email address you provided in the registration form.
Check for a Confirmation Email in the email you used for account creation.
Missing? Check your Trash and Spam folders.
Click on the Email confirmation link to fully activate your account.
galaxy-info Delivery of the confimation email is blocked by your email provider or you mistyped the email address in the registration form?
Please do not register again, but follow the instructions to change the email address registered with your account! The confirmation email will be resent to your new address once you have changed it.
Trouble logging in later? Account email addresses and public names are caSe-sensiTive. Check your activation email for formats.
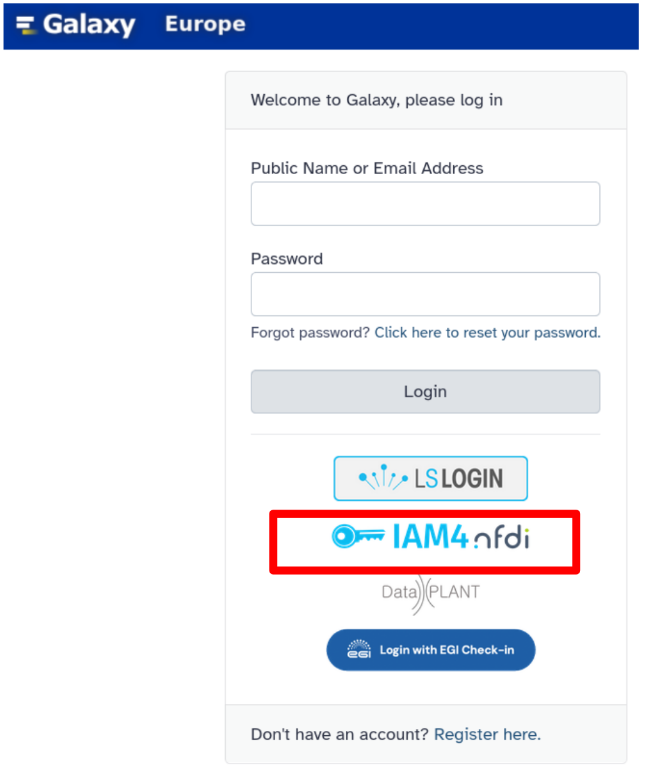
Alternatively, you can log in using a single sign-on of your choice, for example, from IAM4NFDI on Galaxy Europe.
Log in to Galaxy
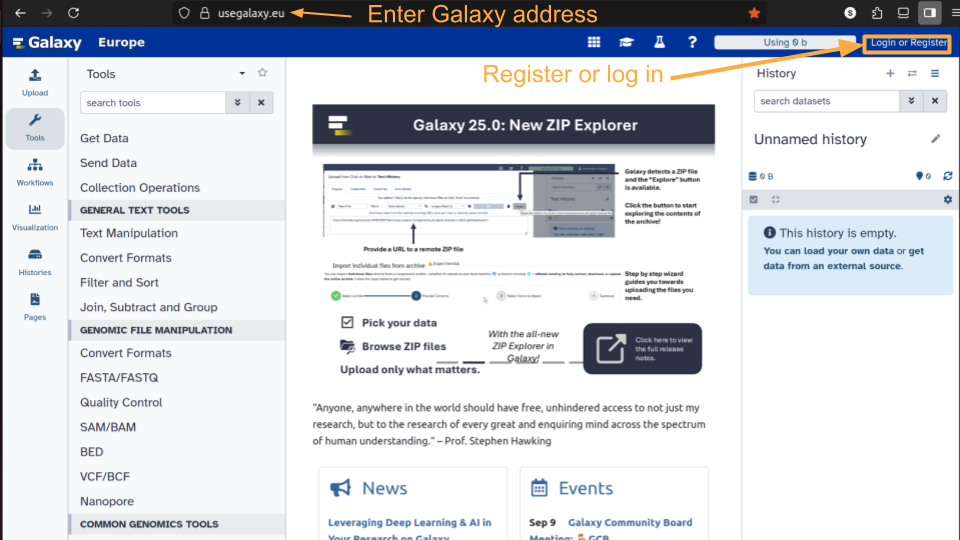
Hands On: Log in to Galaxy
Open your favourite browser (Chrome, Safari, Edge or Firefox as your browser, not Internet Explorer!)
Browse to your Galaxy instance, for example Galaxy Europe
Log in with your credentials
Comment: Different Galaxy servers
This is an image of Galaxy Europe, located at usegalaxy.eu
The particular Galaxy server you are using may look slightly different and have a different web address.
You can also find more possible Galaxy servers at the top of this tutorial in Available on these Galaxies
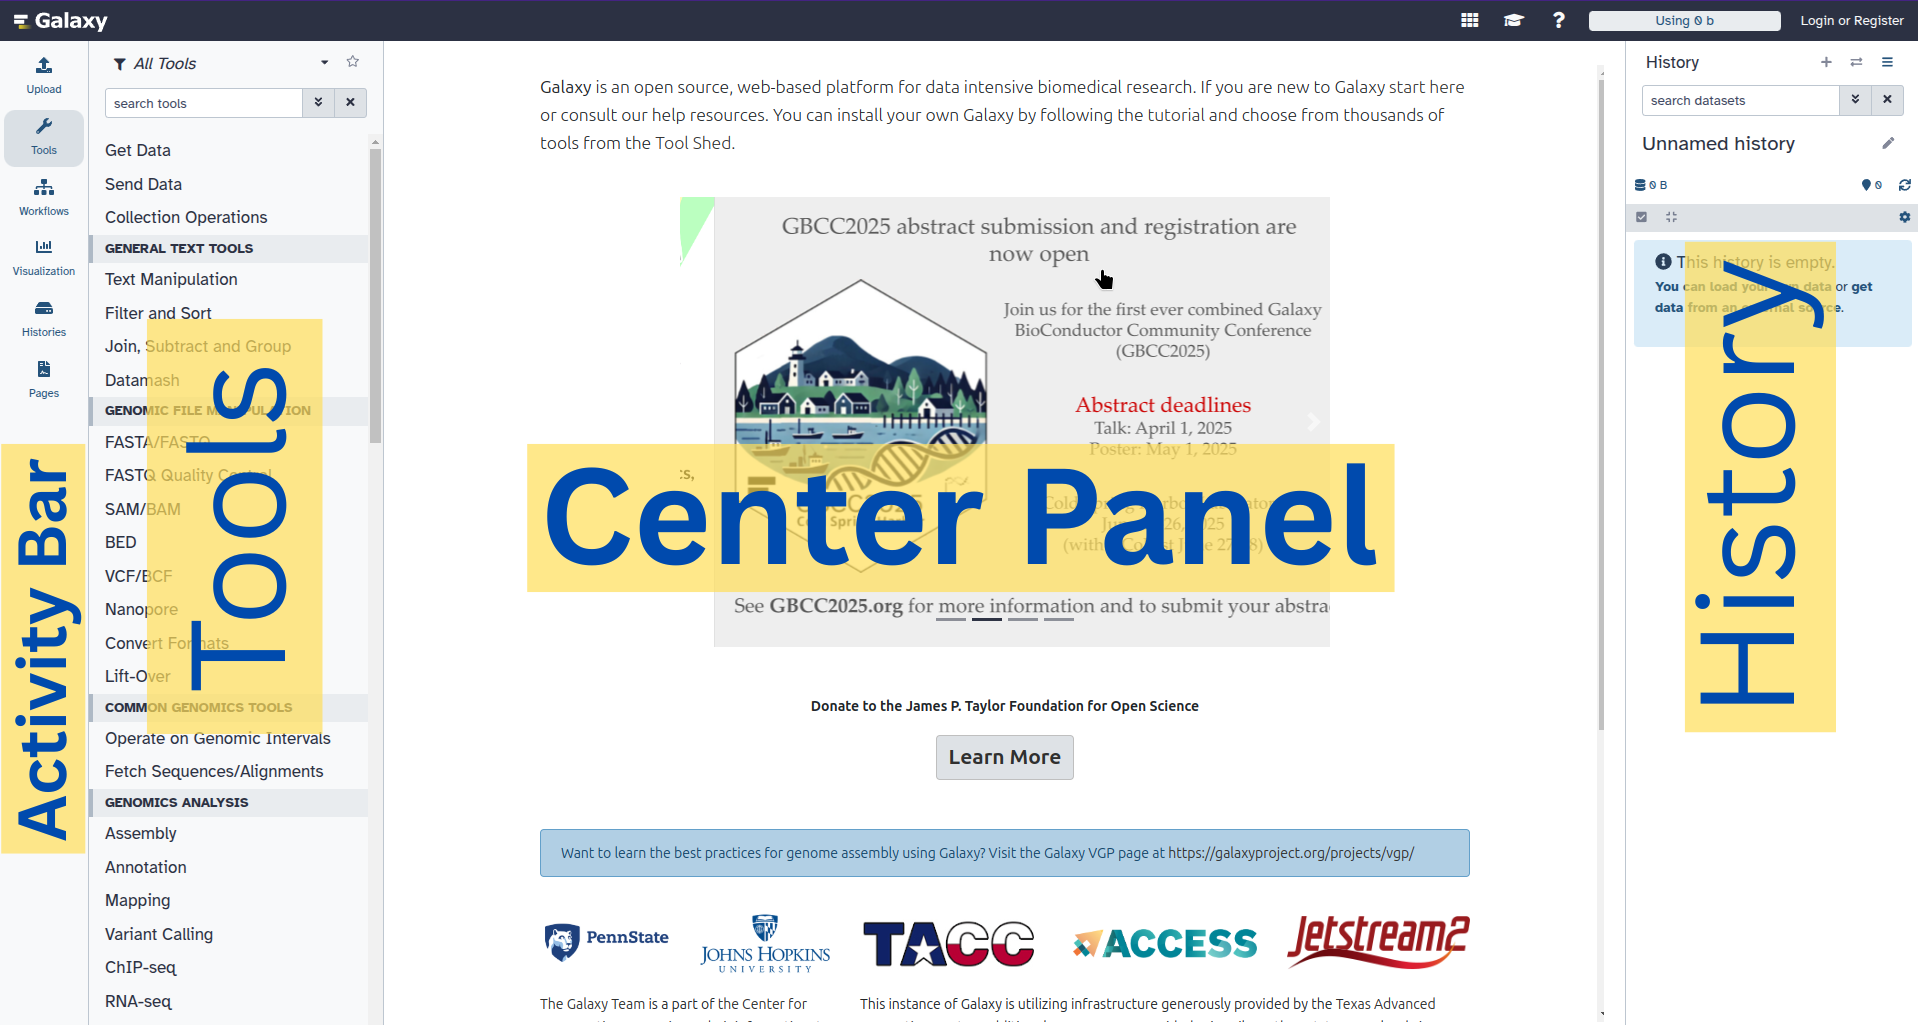
The Galaxy homepage is divided into four sections (panels):
The Activity Bar on the left: This is where you will navigate to the resources in Galaxy (Tools tool, Workflows galaxy-workflows-activity, Histories galaxy-history-storage-choice, etc.)
Currently active “Activity Panel” on the left: By default, the toolTools activity will be active and its panel will be expanded
Viewing panel in the middle: The main area for context for your analysis
History of analysis and files on the right: Shows your “current” history; i.e.: Where any new files for your analysis will be stored
The first time you use Galaxy, your history panel is empty.
Name your current history
Your “History” is on the panel on the right. It is a record of the actions you have taken.
Hands On: Name history
Go to the History panel (on the right)
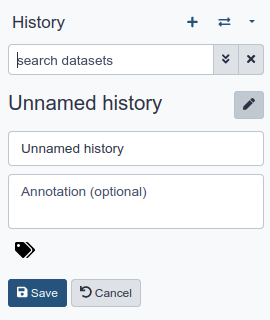
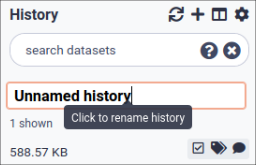
Click galaxy-pencil (Edit) next to the history name (which by default is “Unnamed history”)
Comment
In some previous versions of Galaxy, you will need to click the history name to rename it as shown here:
Type in a new name, for example, “My Analysis”
Click Save
Comment: Renaming not an option?
If renaming does not work, you may not be logged in, so try logging in to Galaxy first. Anonymous users can only have one history, and they cannot rename it.
Upload a file to Galaxy
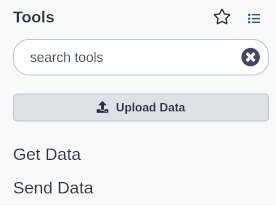
The “Activity Bar” is located on the leftmost part of the interface.
Hands On: Upload a file
At the top of the Activity Bar, click the galaxy-uploadUpload activity
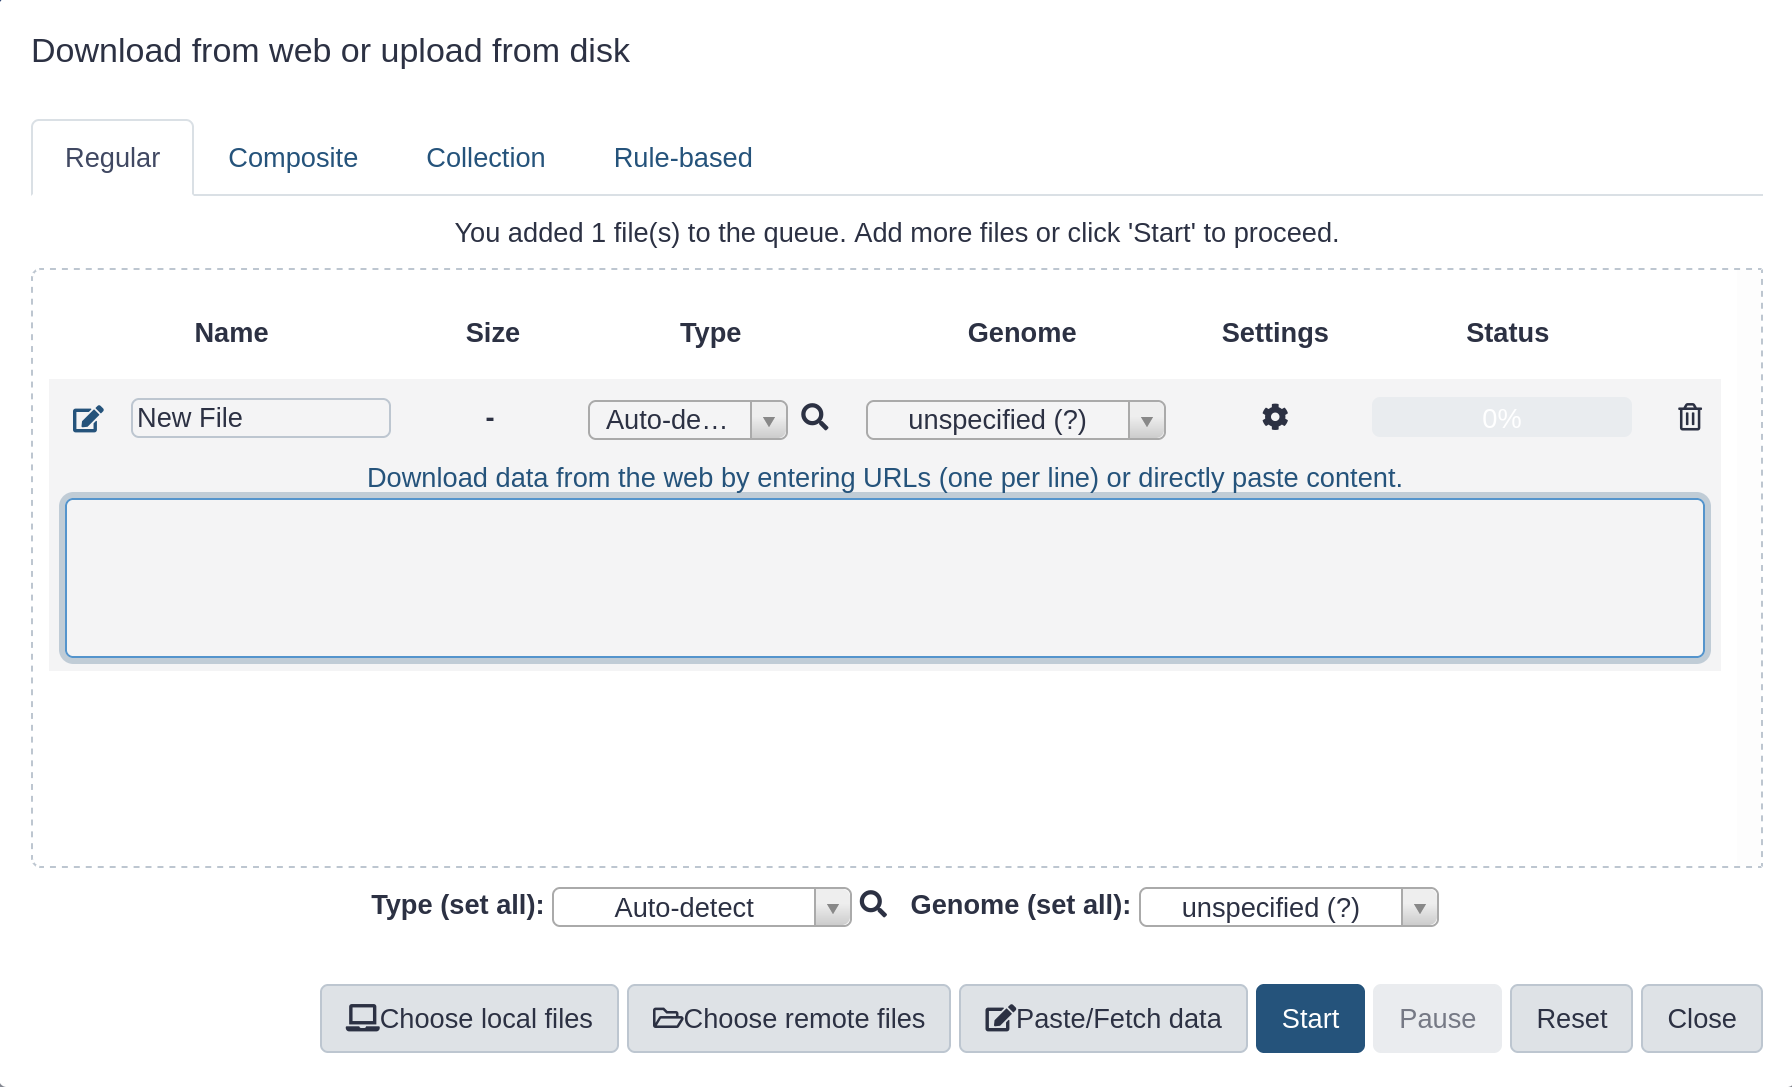
This brings up a box:
Click Paste/Fetch data
Paste in the address of both files in the Zenodo folder:
Option 2: On usegalaxy.eu, you can alternatively import the Zenodo files directly from a data library within Galaxy:
At the top of the Activity Bar, click the galaxy-uploadUpload activity
Click on the bottom of the newly opened window on Choose from repository.
Enter “Zenodo” in the search bar and click on the folder “Zenodo”.
Enter Training material for Galaxy tutorial “Introduction to Digital Humanities in Galaxy” in the search bar and select the items.
Click Select
Click Start
Click Close
Your uploaded file is now in your current history.
When the file has been uploaded to Galaxy, it will turn green.
Comment
After this, you will see your first history item (called a “dataset”) in Galaxy’s right panel. It will go through
the grey (preparing/queued) and yellow (running) states to become green (success).
The contents of the file will be displayed in the central Galaxy panel. If the dataset is large, you will see a warning message which explains that only the first megabyte is shown.
Hands On: View the text files content
Click the galaxy-eye (eye) icon next to the dataset name, to look at the file content
Check the datatype - is it txt? Then you are all set. Otherwise, adapt the datatype.
Click on the galaxy-pencilpencil icon for the dataset to edit its attributes
In the central panel, click galaxy-chart-select-dataDatatypes tab on the top
In the galaxy-chart-select-dataAssign Datatype, select datatypes from “New Type” dropdown
Tip: you can start typing the datatype into the field to filter the dropdown menu
Click the Save button
Add a tag to each dataset, corresponding to the file’s origin.
One saying #cheap for the file from the cheap repository (SoY_Cheap_Repo_Source.txt)
The other one #universal for the second one (SoY_Univ_Mag_Source.txt)
Don’t forget the hashtags
Datasets can be tagged. This simplifies the tracking of datasets across the Galaxy interface. Tags can contain any combination of letters or numbers but cannot contain spaces.
To tag a dataset:
Click on the dataset to expand it
Click on Add Tagsgalaxy-tags
Add tag text. Tags starting with # will be automatically propagated to the outputs of tools using this dataset (see below).
Press Enter
Check that the tag appears below the dataset name
Tags beginning with # are special!
They are called Name tags. The unique feature of these tags is that they propagate: if a dataset is labelled with a name tag, all derivatives (children) of this dataset will automatically inherit this tag (see below). The figure below explains why this is so useful. Consider the following analysis (numbers in parenthesis correspond to dataset numbers in the figure below):
a set of forward and reverse reads (datasets 1 and 2) is mapped against a reference using Bowtie2 generating dataset 3;
dataset 3 is used to calculate read coverage using BedTools Genome Coverageseparately for + and - strands. This generates two datasets (4 and 5 for plus and minus, respectively);
datasets 4 and 5 are used as inputs to Macs2 broadCall datasets generating datasets 6 and 8;
datasets 6 and 8 are intersected with coordinates of genes (dataset 9) using BedTools Intersect generating datasets 10 and 11.
Now consider that this analysis is done without name tags. This is shown on the left side of the figure. It is hard to trace which datasets contain “plus” data versus “minus” data. For example, does dataset 10 contain “plus” data or “minus” data? Probably “minus” but are you sure? In the case of a small history like the one shown here, it is possible to trace this manually but as the size of a history grows it will become very challenging.
The right side of the figure shows exactly the same analysis, but using name tags. When the analysis was conducted datasets 4 and 5 were tagged with #plus and #minus, respectively. When they were used as inputs to Macs2 resulting datasets 6 and 8 automatically inherited them and so on… As a result it is straightforward to trace both branches (plus and minus) of this analysis.
You can see two text files; they are two versions of the poem “The Sorrows of Yamba”.
The file “SoY_Cheap_Repo_Source.txt” is a poem version of Sorrows of Yamba, which was published in the Cheap Repository.
The file “SoY_Univ_Mag_Source.txt” is another version of the poem, first published in the Universal Magazine in 1797.
Both files start with “Text adapted from:” and a different hyperlink. The second paragraph for both texts begins with “the sorrows of yamba,” but the files continue differently. While one gives the year, the other is immediately followed by more text.
Both texts are already pre-cleaned and are entirely in lower case, but still contain punctuation.
It is obvious that the texts have similarities, but they are not identical. Now comes the fun part: Using Galaxy to compare your files. To do that, we first need to clean both files.
Clean your Texts
Delete the hyperlink
When looking at the two datasets, you will notice they still contain the hyperlink from their source.
As this is metadata and not the text we want to compare, we delete it at the beginning of both files.
Hands On: Delete Hyperlink in Text One
Click on Toolstool in the left panel
Search for Remove beginning and pass the following parameters:
“Remove first”: 1 (lines)
param-file“from”: 1: SoY_Cheap_Repo_Source.txt
Click on Run Toolworkflow-run
Comment: What does this tool do?
Remove beginning deletes a selected number of lines from your file. In this case, removing the first line is enough.
When the job is finished and appears green in your history, click on its name.
Question
Check how many lines the file now contains?
How does this differ from the original file you uploaded?
The file now contains only one line.
The originally uploaded text contained two lines. You removed one with this step.
As a result, only the poem’s text remains, while the source was removed for text one.
Galaxy names the files after the task used to create that step. While this can be helpful, we change the name to a clearer filename.
Hands On: Rename the output
Change the namegalaxy-pencil of the output of this tool, which removed the beginning of SoY_Cheap_Repo_Source.txt
Rename it to SoY_Cheap_Repo.txt
Click on the galaxy-pencilpencil icon for the dataset to edit its attributes
In the central panel, change the Name field
Click the Save button
We also use this tool on the second file.
Hands On: Delete Hyperlink in Text Two
Run workflow-runRemove beginning with the following parameters:
“Remove first”: 1 (lines)
param-file“from”: 2: SoY_Univ_Mag_Source.txt
Expand one of the output datasets of the tool (by clicking on it)
Click re-run galaxy-refresh the tool
This is useful if you want to run the tool again but with slightly different paramters, or if you just want to check which parameter setting you used.
Once it is finished, rename this file to SoY_Univ_Mag.txt.
Click on the finished dataset that just appeared in your history. Check that it starts with the poem text and that the hyperlink is removed.
To quickly see which version of the poems we have, we rename both datasets with clearer names and add tags based on the text origin.
The hashtag propagates the tags, so all further outputs from this dataset contain the same hashtag, making it much easier to identify what text we are currently working with.
Depending on how detailed you want to compare your texts, we suggest further unifying them. In the next step, we remove all the punctuation with one command.
Remove punctuation
Regular Expressions (RegEx) allow you to search for particular patterns in your text. They can be a massive help if you want to extract or remove them with minimal work. In our two poems, the punctuation is not unified; therefore, we want to remove it from both using regular expressions (RegEx). If comparing the punctuation of texts is also relevant to you, you can skip this step. Make sure to select the text version from the Cheap Repository that we have earlier removed the hyperlink from.
Hands On: Remove Punctuation in Poem One
Run workflow-runReplace text in entire line ( Galaxy version 9.5+galaxy3) with the following parameters:
param-file“File to process”: SoY_Cheap_Repo.txt
In “Replacement”:
param-repeat“Insert Replacement”
“Find pattern”: [[:punct:]]
“Replace with”: (leave this empty)
Regular expressions are a standardized way of describing patterns in textual data. They can be extremely useful for tasks such as finding and replacing data. They can be a bit tricky to master, but learning even just a few of the basics can help you get the most out of Galaxy.
Finding
Below are just a few examples of basic expressions:
Regular expression
Matches
abc
an occurrence of abc within your data
(abc|def)
abcordef
[abc]
a single character which is either a, b, or c
[^abc]
a character that is NOT a, b, nor c
[a-z]
any lowercase letter
[a-zA-Z]
any letter (upper or lower case)
[0-9]
numbers 0-9
\d
any digit (same as [0-9])
\D
any non-digit character
\w
any alphanumeric character
\W
any non-alphanumeric character
\s
any whitespace
\S
any non-whitespace character
.
any character
\.
literal . (period)
{x,y}
between x and y repetitions
^
the beginning of the line
$
the end of the line
Note: you see that characters such as *, ?, ., + etc have a special meaning in a regular expression. If you want to match on those characters, you can escape them with a backslash. So \? matches the question mark character exactly.
Examples
Regular expression
matches
\d{4}
4 digits (e.g. a year)
chr\d{1,2}
chr followed by 1 or 2 digits
.*abc$
anything with abc at the end of the line
^$
empty line
^>.*
Line starting with > (e.g. Fasta header)
^[^>].*
Line not starting with > (e.g. Fasta sequence)
Replacing
Sometimes you need to capture the exact value you matched on, in order to use it in your replacement, we do this using capture groups (...), which we can refer to using \1, \2 etc for the first and second captured values. If you want to refer to the whole match, use &.
Regular expression
Input
Captures
chr(\d{1,2})
chr14
\1 = 14
(\d{2}) July (\d{4})
24 July 1984
\1 = 24, \2 = 1984
An expression like s/find/replacement/g indicates a replacement expression, this will search (s) for any occurrence of find, and replace it with replacement. It will do this globally (g) which means it doesn’t stop after the first match.
Example: s/chr(\d{1,2})/CHR\1/g will replace chr14 with CHR14 etc.
You can also use replacement modifier such as convert to lower case \L or upper case \U. Example: s/.*/\U&/g will convert the whole text to upper case.
Note: In Galaxy, you are often asked to provide the find and replacement expressions separately, so you don’t have to use the s/../../g structure.
There is a lot more you can do with regular expressions, and there are a few different flavours in different tools/programming languages, but these are the most important basics that will already allow you to do many of the tasks you might need in your analysis.
Tip:RegexOne is a nice interactive tutorial to learn the basics of regular expressions.
Tip:Regex101.com is a great resource for interactively testing and constructing your regular expressions, it even provides an explanation of a regular expression if you provide one.
Tip:Cyrilex is a visual regular expression tester.
Rename your output file (once it is green) to SoY_Cheap_Repo_cleaned.txt
Click on the galaxy-pencilpencil icon for the dataset to edit its attributes
In the central panel, change the Name field
Click the Save button
And we repeat the same for the second text. Remember to use the redo button if you want to save some time.
Also in text two, we search for the pattern [[:punct:]] and omit a replacement, meaning that all punctuation marks will be deleted. Ensure that you select the text version from the Universal Magazine, from which we previously removed the hyperlink.
Hands On: Remove Punctuation in Poem Two
Run workflow-runReplace text in entire line ( Galaxy version 9.5+galaxy3) with the following parameters:
param-file“File to process”: SoY_Univ_Mag.txt
In “Replacement”:
param-repeat“Insert Replacement”
“Find pattern”: [[:punct:]]
“Replace with”: (leave this empty)
Renamegalaxy-pencil the output file to SoY_Univ_Mag_cleaned.txt
To get an idea of how the two cleaned texts compare, we check out their metadata.
Different ways to compare the texts
There are various ways to compare two texts.
You could, for example, compare them quantitatively with the tool Line/Word/Character count.
The output of the tool would show, that the texts have different lengths.
While both files are only two lines long, the poem from the cheap repository is 1139 words long, more than double the amount of the second poem.
Another option for comparing the texts is by visualising their content.
We will use a word cloud next to do just that.
Compare visually
A picture says more than 1000 words! Accordingly, we aim to delve deeper into the actual content of both texts.
Particularly for larger corpora, a word cloud can be a nice way to get a first idea of what a text is about.
Hands On: Visualize the Content of Poem One
Run workflow-runGenerate a word cloud ( Galaxy version 1.9.6+galaxy0) with the following parameters:
param-file“Input file”: SoY_Cheap_Repo_cleaned.txt (output of Replace Texttool)
“Do you want to select a special font?”: Use the default DroidSansMono font
“Color option”: Colormap
“Scaling of words by frequency (0 - 1)”: 0.8
Renamegalaxy-pencil the output file to Wordcloud Poem One.
Comment: Adapting the Word Cloud
The word cloud has many different features. You can upload a stop word list that should be excluded from the visualization, or play around with other parameters like the text size. Rerun dataset-rerun the tool with some changed parameters and see what happens.
The word cloud for the second text is created in the same way.
We suggest using the rerun dataset-rerun button on Wordcloud Poem One, to reun the tool with SoY_Univ_Mag_cleaned.txt as an input and create a wordcloud for it. That way we can make sure to use identical input parameters (e.g. font, color option, etc.) which helps for easy comparison.
This should look as follows:
Hands On: Visualize the Content of Poem Two
Run workflow-runGenerate a word cloud ( Galaxy version 1.9.6+galaxy0) with the following parameters:
param-file“Input file”: SoY_Univ_Mag_cleaned.txt (output of Replace Texttool)
“Do you want to select a special font?”: Use the default DroidSansMono font
“Color option”: Colormap
“Scaling of words by frequency (0 - 1)”: 0.8
Renamegalaxy-pencil the output file to Wordcloud Poem Two.
Comment: Uniqueness of the Word Cloud
The word cloud from this tool looks a little different each time you run it. The layout may vary even when you redo it with the exact same text and inputs.
Comparing items from your history is easiest when you enable the window manager and view both images side by side.
If you would like to view two or more datasets at once, you can use the Window Manager feature in Galaxy:
Click on the Window Manager icon galaxy-scratchbook on the top menu bar.
You should see a little checkmark on the icon now
Viewgalaxy-eye a dataset by clicking on the eye icon galaxy-eye to view the output
You should see the output in a window overlayed over Galaxy
You can resize this window by dragging the bottom-right corner
Viewgalaxy-eye a second dataset from your history
You should now see a second window with the new dataset
This makes it easier to compare the two outputs
Repeat this for as many files as you would like to compare
You can turn off the Window Managergalaxy-scratchbook by clicking on the icon again
Question
What is the most prominent word in each of the clouds?
How do the Word Clouds for Poem One and Poem Two compare?
The most prominent word in the word cloud created from the cheap repository is “yamba”, while the one from the universal text is “death”.
The word cloud from the cheap repository has four words that appear most prominent and are much bigger - and therefore more frequent in the text. They are “yamba”, “now”, “death” and “ye”. The most prominent words in the universal text are “death”, “yamba” and “africs”. They appear a bit smaller than the words from the cheap repository, suggesting a lower frequency.
You can disable the window manager again by clicking on the item, then you will see your datasets again in your middle panel, once you click on its eye galaxy-eye symbol.
The visualisation suggests that the text’s metrics, which we checked with the line and character count, and their messages differ. The cheap repository text addresses the reader with multiple mentions of “ye”, you, which is rare in the second poem. In the universal poem, death is more central than yamba, which is the other way around in the cheap repository text.
With this text’s length and just two poems, this is, of course, something you can find out by reading both texts. However, this distant reading approach can give you important preliminary insights to guide your close reading, particularly with bigger corpora.
Of course, the word cloud insights are just a first glance and do not allow a proper analysis;
we need to compare both texts properly.
Compare texts side by side
But what is a good way to compare those texts in depth?
We suggest comparing them side by side and line by line.
For that, we adapt the layout once more.
Replace spaces with line breaks to prepare side-by-side comparison
We used Replace text in entire line to remove the punctuation earlier.
This time, we use the same tool to replace characters in our files.
To get a convenient layout that shows one word per line, we use Regular Expressions to replace the spaces (\s) with line breaks (\n).
That way, each word gets displayed in a different line, which prepares the detailed comparison in the next step.
Hands On: Changing Layout of Poem One
Run workflow-runReplace text in entire line ( Galaxy version 9.5+galaxy3) with the following parameters:
param-file“File to process”: SoY_Cheap_Repo_cleaned.txt
In “Replacement”:
param-repeat“Insert Replacement”
“Find pattern”: \s
“Replace with:”: \n
Comment: How do I understand the RegEx commands?
Don’t worry, if you have never used Regular Expressions. Several websites help you find out what patterns to detect and how to catch the passages you need. For now, you can just add the symbols that stand for the space \s and the line break \n.
Renamegalaxy-pencil this text SoY_Cheap_Repo_word_per_line.txt.
When you click on the eye galaxy-eye icon of the data set in the history, when the dataset turns green, you can see that it now contains one word per line.
To match this, we rerun dataset-rerun the step with the same parameters also for the second poem.
Hands On: Changing Layout of Poem Two
Run workflow-runReplace text in entire line ( Galaxy version 9.5+galaxy3) with the following parameters:
param-file“File to process”: SoY_Univ_Mag_cleaned.txt
In “Replacement”:
param-repeat“Insert Replacement”
“Find pattern”: \s
“Replace with:”: \n
Renamegalaxy-pencil this text SoY_Univ_Mag_word_per_line.txt.
Question
How many lines long are the poems now?
When you click on the two names of the two new datasets you just worked on, you see that one is now 539, the other 1139 lines long. The number of lines matches the amount of words you might have detected with the tool Line/Word/Character count.
Now, both poems show one word per line, which is the perfect setup to compare them side by side.
Use a tool called diff to visualise this.
To reproduce the setup from this tutorial, make sure to select the version from the Cheap Repository as the first input file and the one from the Universal Magazine as the second input file.
Using diff to compare texts side by side
Hands On: Compare the Poems
Run workflow-rundiff ( Galaxy version 3.10+galaxy1) with the following parameters:
“Choose a report format”: Generates an HTML report to visualize the differences
“Choose report output format”: Side by side
Comment: Different Report Formats
The diff tool allows you to create different outputs, depending on your goal. In this case, the HTML report contains colours to highlight the changes between both texts, making it really useful for researchers to quickly identify. If you want to extract information automatically, the option text file, side by side could also be helpful.
We get two new files as a result. The HTML report and the raw output it is based on, in txt format.
Question
What is the first difference between the two texts visualized in the HTML report?
Lines 6-40 of the cheap poem are marked in green. They are not part of the universal poem. The couple of lines before and after are identical.
In the HTML report, you can quickly identify deletions (in red) and additions (in green) between both texts.
You can also see smaller details, which you might quickly miss manually.
Lines 63/64 and 28/29, respectively, show that also changes within one word (prisoner / prisner) are detected.
You can furthermore see how the perspective was changed between the poems.
While line 359-361 in the cheap repository text states “they sell us”, the other text states “they sell them” (l. 298-300), suggesting the reader is (no longer) among the group which is sold.
You can go through the HTML file and detect further changes in language and length.
Seeing this, you might want to go into detail with the respective themes once more. As “death” was central in both word clouds, we will extract sentences containing this word so you can analyze them further.
The recent files without punctuation and one word per line are not the easiest form for this.
Instead, we use an earlier version from our history.
Extract specific sentences
Breaking text into sentences
We return to Regular Expressions a third time, but this time we use a different tool with further functionalities.
The tools helps us to divide the text into more lines, to make it easier to extract sentences containing the word “death”.
Full stops help us to indicate a sentence, which will not be perfectly accurate but sufficient for this case.
Of course, you could spend more time on this and make it neater.
Make sure to use not the last input but the poems without a hyperlink, but including punctuation.
This will not work if the text contains no more full stops.
Hands On: Rearrange Poem One
Run workflow-runReplace parts of text ( Galaxy version 9.5+galaxy2) with the following parameters:
param-file“File to process”: SoY_Cheap_Repo.txt
In “Find and Replace”:
param-repeat“Insert Find and Replace”
“Find pattern”: \.
“Replace with”: \.\n
“Find-Pattern is a regular expression”: Yes
“Replace all occurences of the pattern”: Yes
“Find and Replace text in”: entire line
Comment: What do those inputs mean?
A full stop . has its own meaning in Regular Expressions. It stands for all elements. To show that we do not mean all characters but actually a full stop, we need to escape it in RegEx by putting \. instead of . if we mean a full stop. We want to add a line break afterwards, which we already learned is indicated as \n. The replacement pattern, therefore, is \.\n. As a result, the text will now be split in multiple lines.
Renamegalaxy-pencil your resulting file to SoY_Cheap_Repo_sent_per_line.txt.
when you have finished this step, remember to rerun dataset-rerun this tool for the second poem
Hands On: Rearrange Poem Two
Run workflow-runReplace parts of text ( Galaxy version 9.5+galaxy2) with the following parameters:
param-file“File to process”: SoY_Univ_Mag.txt
In “Find and Replace”:
param-repeat“Insert Find and Replace”
“Find pattern”: \.
“Replace with”: \.\n
“Find-Pattern is a regular expression”: Yes
“Replace all occurences of the pattern”: Yes
“Find and Replace text in”: entire line
Renamegalaxy-pencil your resulting file to SoY_Univ_Mag_sent_per_line.txt for easier distinction.
As a result, you get two files, each split at full stops. How can you now extract the sentences that are relevant to you?
Extract sentences containing ‘death’
Use Search in textfiles to select all lines containing the word “death”.
Hands On: Extract particular sentences
Run workflow-runSearch in textfiles ( Galaxy version 9.5+galaxy2) with the following parameters:
You can see that the tool has many parameters you can tweak. The ones not mentioned here are kept at the default input, like Match and Perl, which is the kind of RegEx applied. But you could also select all lines that do not contain “death” by selecting Do not match or extracting lines before or after the line containing the content you chose.
Renamegalaxy-pencil your output SoY_Cheap_Repo_death.txt
And for the last time, we rerun dataset-rerun this step for the second poem.
Hands On: Extract particular sentences from Poem Two
Run workflow-runSearch in textfiles ( Galaxy version 9.5+galaxy2) with the following parameters:
Renamegalaxy-pencil your output SoY_Univ_Mag_death.txt.
When you enable the window manager at the top bar, you can click on the eye galaxy-eye symbols of your last two outputs and visualize them side by side in two different windows. Six and seven lines from the poems contain the term, respectively. You could analyze them in detail now to see where they differ. While the first lines are nearly identical, the last ones are completely different in both versions of the poem. An intriguing insight for further analysis. No wonder the poems and their many editions have sparked the interest of many researchers.
If you only analyze those two poems, you might find it easier to do those steps manually. But particularly, if you create a workflow out of this, you can reproduce this process with only a few clicks, saving you considerable work.
Alternatively, you can make your analysis more complex and extract further differences between the poems automatically to adapt the above analysis. For inspiration, check out
the advanced tutorial on Text-Mining.
Conclusion
Congratulations! You just finished your first analysis with Galaxy, well done! The tutorial covered the basic setup of Galaxy and how you can register, log in and upload your material. You are now familiar with terms in Galaxy, like history, dataset, tool, etc. We used several tools, learned to rerun them and how we can see the outputs in different ways. We used various versions of Regular Expressions to rearrange and clean your text. We also reshaped the text to compare it with the diff tool. In the end, we extracted notable sentences for further close reading.
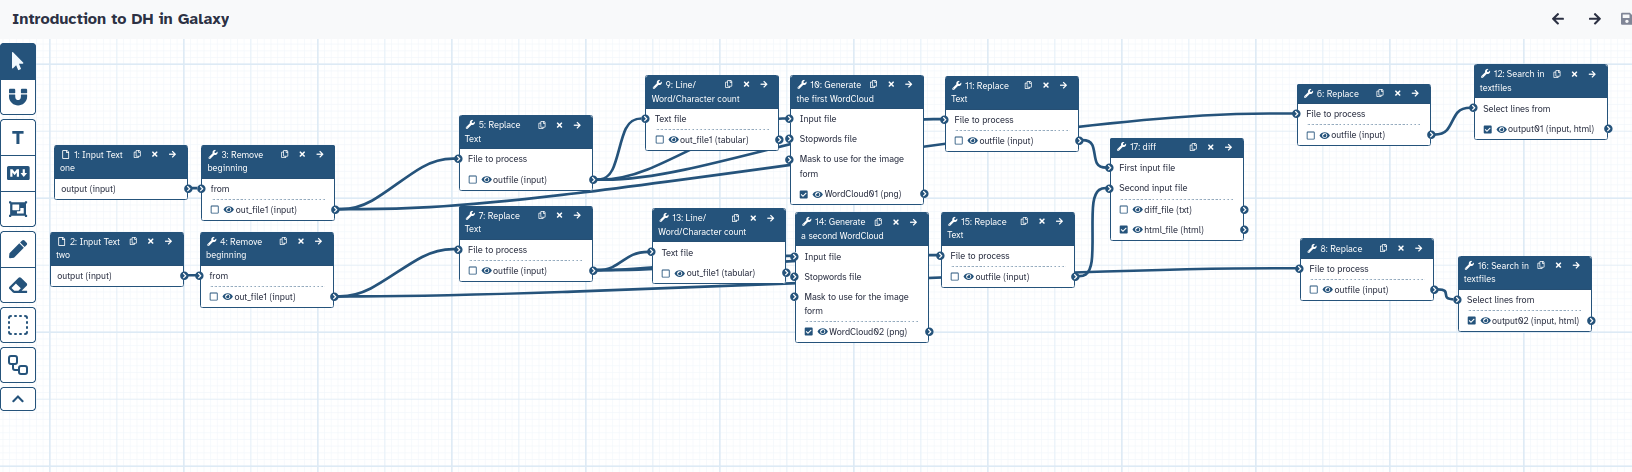
The workflow created from this history would look as follows:
With all this knowledge in mind, you can now continue with one of our other tutorials or experiment with your own input. Enjoy!
Thanks to Lilli Fortmeier for suggesting this use case! ↩
You've Finished the Tutorial
Please also consider filling out the Feedback Form as well!
Key points
Galaxy has many tools for text analysis that you can adapt for your needs.
Frequently Asked Questions
Have questions about this tutorial? Have a look at the available FAQ pages and support channels
Richardson, A., 2003 “The Sorrows of Yamba,” by Eaglesfield Smith and Hannah More: Authorship, Ideology, and the Fractures of Antislavery Discourse. Romanticism on the Net. 10.7202/007209ar
Feedback
Did you use this material as an instructor? Feel free to give us feedback on how it went.
Did you use this material as a learner or student? Click the form below to leave feedback.
Hiltemann, Saskia, Rasche, Helena et al., 2023 Galaxy Training: A Powerful Framework for Teaching! PLOS Computational Biology 10.1371/journal.pcbi.1010752
Batut et al., 2018 Community-Driven Data Analysis Training for Biology Cell Systems 10.1016/j.cels.2018.05.012
@misc{digital-humanities-introduction_to_dh,
author = "Daniela Schneider and Rand Zoabi",
	title = "Introduction to Digital Humanities in Galaxy (Galaxy Training Materials)",
	year = "",
	month = "",
	day = "",
	url = "\url{https://training.galaxyproject.org/training-material/topics/digital-humanities/tutorials/introduction_to_dh/tutorial.html}",
	note = "[Online; accessed TODAY]"
}
@article{Hiltemann_2023,
	doi = {10.1371/journal.pcbi.1010752},
	url = {https://doi.org/10.1371%2Fjournal.pcbi.1010752},
	year = 2023,
	month = {jan},
	publisher = {Public Library of Science ({PLoS})},
	volume = {19},
	number = {1},
	pages = {e1010752},
	author = {Saskia Hiltemann and Helena Rasche and Simon Gladman and Hans-Rudolf Hotz and Delphine Larivi{\`{e}}re and Daniel Blankenberg and Pratik D. Jagtap and Thomas Wollmann and Anthony Bretaudeau and Nadia Gou{\'{e}} and Timothy J. Griffin and Coline Royaux and Yvan Le Bras and Subina Mehta and Anna Syme and Frederik Coppens and Bert Droesbeke and Nicola Soranzo and Wendi Bacon and Fotis Psomopoulos and Crist{\'{o}}bal Gallardo-Alba and John Davis and Melanie Christine Föll and Matthias Fahrner and Maria A. Doyle and Beatriz Serrano-Solano and Anne Claire Fouilloux and Peter van Heusden and Wolfgang Maier and Dave Clements and Florian Heyl and Björn Grüning and B{\'{e}}r{\'{e}}nice Batut and},
	editor = {Francis Ouellette},
	title = {Galaxy Training: A powerful framework for teaching!},
	journal = {PLoS Comput Biol}
}
Funding
These individuals or organisations provided funding support for the development of this resource
5 stars:
Liked: It was easy to follow, and very understandable (except the word cloud I didn't find on the .org server)
February 2026
4 stars:
Liked: Good pace nice format
Disliked: It would be nice to have a DH example for the figure that illustrates the propagation of name "tags" as this is suddenly a life sciences tag I am not an expert in the subject matter but it is an interesting sample text. I think some of the language which is today used by many racists should be briefly put in its historical context in the tutorial. I understand this tutorial is a gentle introduction and I am sure Galaxy supports programmatic file renaming. There is a lot of manual renaming required in this tutorial and I can imagine that some learners will find it repetitive - even though this is something tool can in the long term help with. I am not sure what the suggestion for improvement is.
Questions:


Open image in new tab
Open image in new tab