Adding and updating best practice metadata for Galaxy tools using the bio.tools registry
| Author(s) |
|
| Editor(s) |
|
| Reviewers |
|
OverviewQuestions:
Objectives:
How are Galaxy tools linked to EDAM ontology?
How to connect Galaxy tools to bio.tools?
What is bio.tools?
How to add, and update, entries in bio.tools?
Identify Galaxy tools without bio.tools entry
Create a bio.tools entry
Update a bio.tools entry
Add EDAM ontology terms to a bio.tools entry
Link a Galaxy tool to its corresponding bio.tools entry
Time estimation: 1 hourLevel: Introductory IntroductorySupporting Materials:
Published: Mar 6, 2024Last modification: Nov 6, 2024License: Tutorial Content is licensed under Creative Commons Attribution 4.0 International License. The GTN Framework is licensed under MITpurl PURL: https://gxy.io/GTN:T00421version Revision: 5
Galaxy offers thousands of tools. Many of these tools either have incomplete metadata or are not yet linked to sources of high-quality metadata such as bio.tools.
This prevents filtering for all tools in a specific research community or domain, and makes it all but impossible to employ advanced filtering with ontology terms like the ones from EDAM or to group tools based on an ontology to improve the Galaxy tool panel.
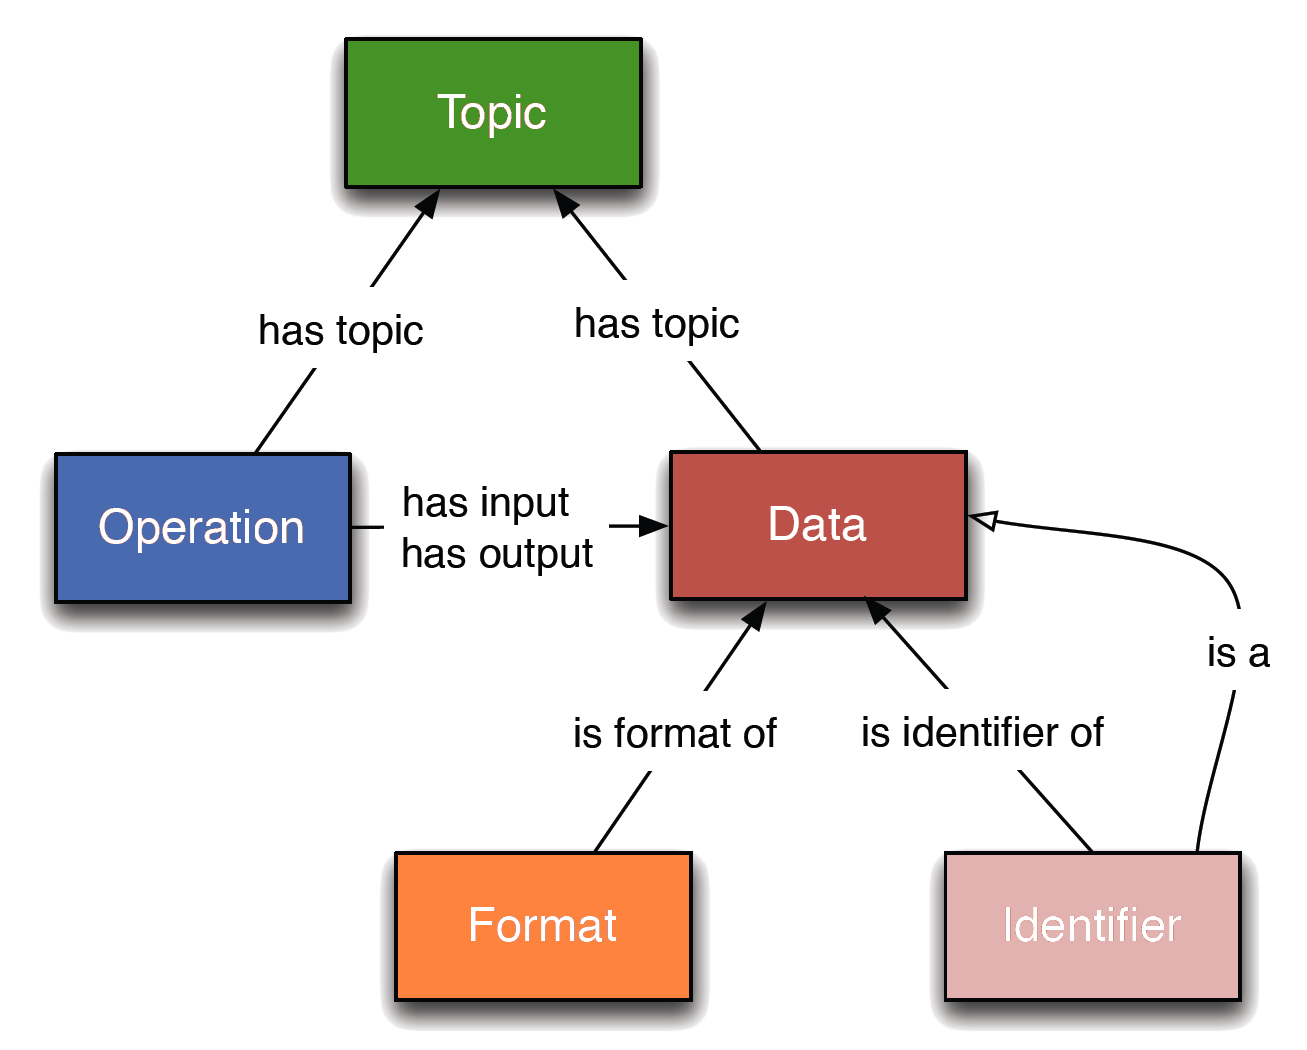
EDAM (Black et al. 2021) is a comprehensive ontology of well-established, familiar concepts that are prevalent within bioscientific data analysis and data management. It includes 4 main sections of concepts (sub-ontologies):
- Topic: A category denoting a rather broad domain or field of interest, of study, application, work, data, or technology. Topics have no clearly defined borders between each other.
- Operation: A function that processes a set of inputs and results in a set of outputs, or associates arguments (inputs) with values (outputs).
- Data: Information, represented in an information artefact (data record) that is “understandable” by dedicated computational tools that can use the data as input or produce it as output.
- Format: A defined way or layout of representing and structuring data in a computer file, blob, string, message, or elsewhere.
 Open image in new tab
The ontology can be navigated using EDAM Browser:
A tool or software can then be characterized by different EDAM terms:
- A topic term, e.g.
Proteomics, - An operation (a specific scientific thing that a tool does) term, e.g.
Peptide identification, - A data term for the type of biological data, e.g.
Mass spectrum, - A format term, e.g.
Thermo RAW.
The annotation of tools can be done on bio.tools. bio.tools (Ison et al. 2016) is a global portal for bioinformatics resources that helps researchers to find, understand, compare, and select resources suitable for their work. It relies on the EDAM ontology for standardizing the annotations.
In Galaxy, tools can be annotated with EDAM concepts, either by adding them directly to the XML wrapper or extracting them from their corresponding bio.tools entry by linking to it in the wrapper. The advantage of the second approach is that there is one source of truth (i.e. the bio.tools entry), which centralises the location for storage and update of metadata, including EDAM concepts, as well as preventing replication of metadata across multiple platforms.
The aim of this tutorial is to improve the annotation of a given Galaxy tool by either:
- Linking it to an existing bio.tools identifier,
- Creating a new bio.tools identifier first and then linking the Galaxy tool, or
- Updating an existing bio.tools entry with the proper EDAM concepts
AgendaIn this tutorial, we will cover:
Choose a tool without a bio.tools identifier
To start, we need to select a tool without a bio.tools identifier.
Hands On: Choose a tool without a bio.tools identifier
- Open the list of Galaxy tools
- Click on Add Condition
- Select bio.tool id in Data drop-down
- Select Empty in Condition drop-down
- Select a tool in the list
Determine if a bio.tools entry exists for your chosen tool
Now let’s search for our selected tool on bio.tools.
Hands On: Search for a tool in bio.tools
- Open bio.tools
- Type the name of your tool in the “Search bio.tools” bar on the top
- Try also other naming possibilities of your tool, e.g. sometimes the galaxy tool name is not identical to the name of the tool in the publication.
Hands-on: Choose Your Own TutorialThis is a 'Choose Your Own Tutorial' (CYOT) section (also known as 'Choose Your Own Analysis' (CYOA)), where you can select between multiple paths. Click one of the buttons below to select how you want to follow the tutorial
Have you found the tool in bio.tools?
Create a bio.tools entry for a tool
If the tool is not on bio.tools, we need to create a new entry and populate it with metadata.
Hands On: Create a bio.tools entry with minimum metadata
- Sign up to bio.tools
- Select Add a tool from the drop-down Menu
- Fill in general information in the first tab of the wizard. Required information includes:
- Tool name
- Description
- Homepage URL
Add EDAM operation concepts, as well as EDAM data concepts for both inputs and outputs
- Click on Function tab
- Click on Add function
- Add EDAM operation terms
- Click on Add operation
- Search for operation in the filter or in the hierarchy
- Click on the selected term
- Repeat to add as many operation terms as needed
- (Optional) Add input
- Click on Add input
- Add EDAM data term
- Click on Add data type
- Search for data type in the filter or in the hierarchy
- Add EDAM format term
- Click on Add data format
- Search for data format in the filter or in the hierarchy
- (Optional) Add output
- Click on Add output
- Add EDAM data term
- Click on Add data type
- Search for data type in the filter or in the hierarchy
- Add EDAM format term
- Click on Add data format
- Search for data format in the filter or in the hierarchy
- Repeat to add as many inputs and outputs as needed
Add EDAM topic concepts
- Click on Labels tab
- Add EDAM topic terms
- Click on Add topic
- Search for topic in the filter or in the hierarchy
- Click on the selected term
- Repeat to add as many topic terms as needed
- Add license
- Fill in any known extra information
- Add the tool type, license, language, and other metadata as needed
- In the Permissions tab, select Make this resource editable by anyone
- Click on Validate on the top
- Click on Save to create the bio.tools entry
- Copy the bio.tools id
Review and update the EDAM terms for an existing bio.tools entry
Before linking a Galaxy tool with its corresponding bio.tools entry, we need to check if the tool is correctly annotated with EDAM concepts.
Hands On: Check EDAM terms in a bio.tools entry
- Open the bio.tools entry for the tool
- Check the EDAM Topic terms by looking at the green boxes (if they exist) below the tool name, URL, and available versions
- Check the EDAM Operation terms by looking at the blue boxes (if they exist) below the tool description
Hands-on: Choose Your Own TutorialThis is a 'Choose Your Own Tutorial' (CYOT) section (also known as 'Choose Your Own Analysis' (CYOA)), where you can select between multiple paths. Click one of the buttons below to select how you want to follow the tutorial
What do you think about the EDAM terms in the bio.tools entry?
To modify EDAM terms in a bio.tools entry, we need to request editing rights and then modify this entry.
Hands On: Modify the EDAM concepts in a bio.tools entry
- Sign up for bio.tools
- Click on Request editing rights at the bottom of the bio.tools entry page
- Wait for the request to be approved
- Click on Update this record
Update, or add, EDAM Operation term(s) and EDAM Data term(s) for both inputs and outputs
- Click on Function tab
- Click on Add function
- Add EDAM operation terms
- Click on Add operation
- Search for operation in the filter or in the hierarchy
- Click on the selected term
- Repeat to add as many operation terms as needed
- (Optional) Add input
- Click on Add input
- Add EDAM data term
- Click on Add data type
- Search for data type in the filter or in the hierarchy
- Add EDAM format term
- Click on Add data format
- Search for data format in the filter or in the hierarchy
- (Optional) Add output
- Click on Add output
- Add EDAM data term
- Click on Add data type
- Search for data type in the filter or in the hierarchy
- Add EDAM format term
- Click on Add data format
- Search for data format in the filter or in the hierarchy
- Repeat to add as many inputs and outputs as needed
Update, or add, EDAM Topic term(s)
- Click on Labels tab
- Add EDAM topic terms
- Click on Add topic
- Search for topic in the filter or in the hierarchy
- Click on the selected term
- Repeat to add as many topic terms as needed
- Add license
- Fill in any known extra information
- Update, or add, the metadata for tool type, license, language, and other fields as needed
- Click on Validate on the top
- Click on Save to create the bio.tools entry
- Copy the bio.tools ID
Linking a Galaxy tool to a bio.tools entry
To link a Galaxy tool to its corresponding bio.tools entry, we need to first find the source of the wrapper.
Hands On: Find the Galaxy wrapper
- Go to the tool on any Galaxy server
- Click on the drop-down menu next to the Run tool button
- Select See in Tool Shed
- Once in the Tool Shed, click on the link to the development repository
- Fork the repository
If the link to the development repository is not correct the column
Galaxy wrapper parsed folderfrom the Galaxy Codex will also show you the location of the wrapper.
- Open Galaxy Codex
- Search your tool
- Expand the row
- Open the link shown in the
Galaxy wrapper parsed foldercolumn
Now we have the wrapper, and can add the bio.tools entry.
Hands-on: Choose Your Own TutorialThis is a 'Choose Your Own Tutorial' (CYOT) section (also known as 'Choose Your Own Analysis' (CYOA)), where you can select between multiple paths. Click one of the buttons below to select how you want to follow the tutorial
How do you want to add the bio.tools entry?
Hands On: Check for an existing xrefs section
- Open the Galaxy tool
macros.xmlfile (If this does not exist: You have to add the entry to a single tool instead)- Check if a
xml name="xrefs"section exists in this file.
Hands-on: Choose Your Own TutorialThis is a 'Choose Your Own Tutorial' (CYOT) section (also known as 'Choose Your Own Analysis' (CYOA)), where you can select between multiple paths. Click one of the buttons below to select how you want to follow the tutorial
Does an xref section already exist?
Hands On: Add bio.tools entry to the Galaxy toolsuite
- In the
macros.xmlfile, add the following lines into the existingxrefssection:<xrefs> <xref type="bio.tools">biotool-id</xref> </xrefs>Replace
biotool-idin the example snippet above with the bio.tools ID for your toolThis section should now look a bit like this, but with other xref text inside:
supercool your-biotool-id - Commit the change on a new branch
- Make a pull request (PR) against the original repository
- Wait patiently for the PR to be merged, at which point the new bio.tools reference will be added to the Galaxy tool wrapper
- Make sure to respond to any feedback from the owner of the wrapper
Hands On: Add bio.tools entry to the Galaxy toolsuite
- In the
macros.xmlfile, add the following lines above anyrequirementssections, such that it does not break an existing block.<xml name="xrefs"> <xrefs> <xref type="bio.tools">biotool-id</xref> </xrefs> </xml>- Replace
biotool-idin the example snippet above with the bio.tools ID for your tool- Commit the change on a new branch
- Make a pull request (PR) against the original repository
- Wait patiently for the PR to be merged, at which point the new bio.tools reference will be added to the Galaxy tool wrapper
- Make sure to respond to any feedback from the owner of the wrapper
Now, we need to make sure that each tool pulls the bio.tools entry from the macro.
Hands On: Add bio.tools line to each tool
- In each tool
.xmlfile, add the following line after themacrossection. Usually, there are other similar lines that alsoexpand macroto follow.<expand macro="xrefs"/>- Commit the change on a new branch
- Make a pull request (PR) against the original repository
- Wait patiently for the PR to be merged, at which point the new bio.tools reference will be added to the Galaxy tool wrapper
- Make sure to respond to any feedback from the owner of the wrapper
Hands On: Add bio.tools entry to the Galaxy wrapper
- Open the Galaxy tool XML file
Add the xref snippet indicated below:
<xrefs> <xref type="bio.tools">biotool-id</xref> </xrefs>It should appear below the
macrossection and before therequirementssection. If the tools already definesxrefsin themacro.xmlfile. The snippet should be placed there.- Replace
biotool-idin the example snippet above with the bio.tools ID for your tool- Commit the change on a new branch
- Make a pull request (PR) against the original repository
- Wait patiently for the PR to be merged, at which point the new bio.tools reference will be added to the Galaxy tool wrapper
- Make sure to respond to any feedback from the owner of the wrapper
Conclusion
You've Finished the Tutorial
Key points
Galaxy tools can get EDAM ontology terms from bio.tools
bio.tools entry can be created and modified to provide the best EDAM annotations
An up-to-date bio.tools entry provides readily accessible metadata that can help users find and understand tools that are available on Galaxy
bio.tools entry can easily be added to a Galaxy tool
Frequently Asked Questions
Have questions about this tutorial? Have a look at the available FAQ pages and support channelsReferences
- Ison, J., K. Rapacki, H. Ménager, M. Kalaš, E. Rydza et al., 2016 Tools and data services registry: a community effort to document bioinformatics resources. Nucleic acids research 44: D38–D47. 10.1093/nar/gkv1116
- Black, M., L. Lamothe, H. Eldakroury, M. Kierkegaard, A. Priya et al., 2021 EDAM: The bioscientific data analysis ontology (update 2021)[version 1; not peer reviewed]. 10.7490/f1000research.1118900.1
Feedback
Did you use this material as an instructor? Feel free to give us feedback on how it went.
Did you use this material as a learner or student? Click the form below to leave feedback.

Citing this Tutorial
- Bérénice Batut, Johan Gustafsson, Paul Zierep, Adding and updating best practice metadata for Galaxy tools using the bio.tools registry (Galaxy Training Materials). https://training.galaxyproject.org/training-material/topics/dev/tutorials/tool-annotation/tutorial.html Online; accessed TODAY
- Hiltemann, Saskia, Rasche, Helena et al., 2023 Galaxy Training: A Powerful Framework for Teaching! PLOS Computational Biology 10.1371/journal.pcbi.1010752
- Batut et al., 2018 Community-Driven Data Analysis Training for Biology Cell Systems 10.1016/j.cels.2018.05.012
Congratulations on successfully completing this tutorial!@misc{dev-tool-annotation, author = "Bérénice Batut and Johan Gustafsson and Paul Zierep", title = "Adding and updating best practice metadata for Galaxy tools using the bio.tools registry (Galaxy Training Materials)", year = "", month = "", day = "", url = "\url{https://training.galaxyproject.org/training-material/topics/dev/tutorials/tool-annotation/tutorial.html}", note = "[Online; accessed TODAY]" } @article{Hiltemann_2023, doi = {10.1371/journal.pcbi.1010752}, url = {https://doi.org/10.1371%2Fjournal.pcbi.1010752}, year = 2023, month = {jan}, publisher = {Public Library of Science ({PLoS})}, volume = {19}, number = {1}, pages = {e1010752}, author = {Saskia Hiltemann and Helena Rasche and Simon Gladman and Hans-Rudolf Hotz and Delphine Larivi{\`{e}}re and Daniel Blankenberg and Pratik D. Jagtap and Thomas Wollmann and Anthony Bretaudeau and Nadia Gou{\'{e}} and Timothy J. Griffin and Coline Royaux and Yvan Le Bras and Subina Mehta and Anna Syme and Frederik Coppens and Bert Droesbeke and Nicola Soranzo and Wendi Bacon and Fotis Psomopoulos and Crist{\'{o}}bal Gallardo-Alba and John Davis and Melanie Christine Föll and Matthias Fahrner and Maria A. Doyle and Beatriz Serrano-Solano and Anne Claire Fouilloux and Peter van Heusden and Wolfgang Maier and Dave Clements and Florian Heyl and Björn Grüning and B{\'{e}}r{\'{e}}nice Batut and}, editor = {Francis Ouellette}, title = {Galaxy Training: A powerful framework for teaching!}, journal = {PLoS Comput Biol} }