In this tutorial we will briefly cover what Terraform is and how you can leverage it for your needs. This will not make you an expert on Terraform but will give you the tools you need in order to maintain your cloud infrastructure as code.
This will be a very practical training with emphasis on looking at examples from modules and becoming self sufficient. This tutorial uses the OpenStack provider for Terraform. Other Cloud providers are available, but their invocation will be different from that which is described here.
For those of you with more experience as System Administrators, you may have heard the term “cattle vs. pets.”
Pets
These servers are managed by hand, with admins SSHing in to make changes directly on the machine, and no log of this. If a “pet” dies, everyone is sad.
Cattle
These servers are managed in bulk, you no longer own a beloved pet but hundreds of identical ones. You stop caring if an individual server lives or dies as you have many identical ones ready to take its place, and you can easily replace them.
What is Terraform?
Terraform is a tool you can use to “sync” your infrastructure (VMs in Clouds, DNS records, etc.) with code you have written in configuration files. This is known as infrastructure as code.
Knowing that your infrastructure is exactly what you expect it to be can simplify your operations significantly. You can have confidence that if anything changes, any images crash or are accidentally deleted, that you can immediately re-build your infrastructure.
UseGalaxy.eu used Terraform to migrate easily between clouds, when our old cloud shut down and our new cloud was launched. We simply updated the credentials for connecting to the cloud, and ran Terraform. It recognised that none of our existing resources were there and recreated all of them. This made life incredibly easy for us, we knew that our infrastructure would be exactly correct relative to what it looked like in the previous cloud.
What can be managed
Terraform supports many providers, allowing you to easily manage resources no matter where they are located. Primarily this consists of resources like virtual machines and DNS records.
If you have VMs you are managing, whether for individual projects or for large scale infrastructure like UseGalaxy.eu, your work or research can be simpler and more reproducible if you are doing it with automation like Terraform.
What should be managed
Support for certain databases and other software is available, but whether or not this is a good idea depends heavily on your workflow. UseGalaxy.eu found that managing databases and database users was not a good fit with our workflow. We launch VMs with terraform and then provision them with ansible. To then have a second step where we re-connect and provision the database with terraform was an awkward workflow, so we mostly let Ansible manage these resources.
Some groups use Ansible or Bash scripts in order to launch VMs. This can be a better workflow for certain cases. Launching VMs that manage themselves or are automatically scaled by some external process is not a good fit. Terraform expects the resource to be there the next time, with the same ID, with the same values, and will alert you if it isn’t.
Managing a Single VM
We will start small, by managing a single VM in our cloud account. Make sure you have your OpenStack credentials available.
You can download the environment file with the credentials from the OpenStack dashboard.
Log in to the OpenStack dashboard, choose the project for which you want to download the OpenStack RC file, and click “Access & Security”.
Click “Download OpenStack RC File” and save the file.
Keypair
Terraform reads all files with the extension .tf in your current directory. Resources can be in a single file, or organised across several different files. We had the best experience by separating out logical groups of resources:
Create a providers.tf file with the following contents:
provider"openstack"{}
This specifies the configuration for the OpenStack plugin. You can either specify the configuration in the plugin, or it will automatically load the values from the normal OpenStack environment variable names.
Run terraform init
Question
What did the output look like?
If this is not the first time you’ve run it, you will see Terraform download any missing providers:
Initializing provider plugins...
- Checking for available provider plugins on https://releases.hashicorp.com...
- Downloading plugin for provider "openstack" (1.10.0)...

The following providers do not have any version constraints in configuration,
so the latest version was installed.

To prevent automatic upgrades to new major versions that may contain breaking
changes, it is recommended to add version = "..." constraints to the
corresponding provider blocks in configuration, with the constraint strings
suggested below.

* provider.openstack: version = "~> 1.10"

Terraform has been successfully initialized!

You may now begin working with Terraform. Try running "terraform plan" to see
any changes that are required for your infrastructure. All Terraform commands
should now work.

If you ever set or change modules or backend configuration for Terraform,
rerun this command to reinitialize your working directory. If you forget, other
commands will detect it and remind you to do so if necessary.
This is the minimum to get started with Terraform, defining which providers we will use and any parameters for them. We have two options now:
We can load the OpenStack credentials as environment variables
We can code the OpenStack credentials in the providers.tf file
We recommend the first option, as often Terraform plans are made publicly available in order to collaborate on them, and this prevents accidentally committing your credentials to the git repository where.
We will start by managing your SSH keypair for the cloud as this is an easy thing to add.
Comment: Your Operating System
If you are on Windows and do not know your public key, please skip to the “Adding an Instance” section, as you probably do not have the tools installed to do this, and we cannot document how to do it. Instead you can simply reference the key by name later. We will point out this location.
Hands On: Keypairs
Find the public key you will use for connecting to the your new VM. It is usually known as id_rsa.pub
Comment: No public key
If you can find the private key file (possibly a cloud.pem file you downloaded earlier from OpenStack), then you can find the public key by running the command:
$ ssh-keygen -y-f /path/to/key.pem
Create a new file, main.tf with the following structure. In public_key, write the complete value of your public key that you found in the first step.
You should run source /path/to/file.sh in your terminal, and then re-run terraform plan:
An execution plan has been generated and is shown below.
Resource actions are indicated with the following symbols:
  + create

Terraform will perform the following actions:

  + openstack_compute_keypair_v2.my-cloud-key
      id:          <computed>
      fingerprint: <computed>
      name:        "my-key"
      private_key: <computed>
      public_key:  "ssh-rsa AAAAB...."
      region:      <computed>


Plan: 1 to add, 0 to change, 0 to destroy.
If you see this, then everything ran successfully
Let’s look at the output in detail:
An execution plan has been generated and is shown below.
Resource actions are indicated with the following symbols:
  + create

Terraform will perform the following actions:

  + openstack_compute_keypair_v2.my-cloud-key
      id:          <computed>
      fingerprint: <computed>
      name:        "my-key"
      private_key: <computed>
      public_key:  "ssh-rsa AAAAB..."
      region:      <computed>


Plan: 1 to add, 0 to change, 0 to destroy.

------------------------------------------------------------------------

Note: You didn't specify an "-out" parameter to save this plan, so Terraform
can't guarantee that exactly these actions will be performed if
"terraform apply" is subsequently run.
Terraform informs us first about the different symbols used. Here it tells us that it will + create a resource. Sometimes it will - delete or ~ update in-place. Next it describes in detail what will be done and why. For creating a resource it does not give us much information, we will see more types of changes later.
Lastly it informs us that we did not save our plan. Terraform can maintain a concept of what the remote resource’s state looks like between your terraform plan and terraform apply steps. This is a more advanced feature and will not be covered today.
Hands On: Applying our plan
Now that you’ve reviewed the plan and everything looks good, we’re ready to apply our changes.
Run terraform apply. Because we did not re-use our plan from the previous step, terraform will re-run the plan step first, and request your confirmation:
An execution plan has been generated and is shown below.
Resource actions are indicated with the following symbols:
  + create

Terraform will perform the following actions:

  + openstack_compute_keypair_v2.my-cloud-key
      id:          <computed>
      fingerprint: <computed>
      name:        "my-key"
      private_key: <computed>
      public_key:  "" => "ssh-rsa AAAAB3..."
      region:      <computed>


Plan: 1 to add, 0 to change, 0 to destroy.

Do you want to perform these actions?
  Terraform will perform the actions described above.
  Only 'yes' will be accepted to approve.

  Enter a value:
Confirm that everything looks good and enter the value ‘yes’, and hit enter.
The documentation below notes some specific values for the image_name, flavor_name, security_groups, and network properties. These may not be correct for your training, instead your instructor will provide these values to you.
This uses Terraform’s knowledge of the
openstack_compute_keypair_v2.my-cloud-key resource which you
previously described. Then it accesses the .name attribute.
This allow your to update the name at any time, and still have your
resource definitions be correct.
The security group to apply. This is a comma separated list, but
default should work for most OpenStack clouds.
security_groups = ["default"]
A network that is accessible to you.
  network {
    name = "public"
  }
Run terraform apply. Running the plan step is not necessary, it is just useful to see what changes will be applied without starting the apply process.
Note that first terraform “refreshes” the state of the remote resources that it already manages, before checking what changes need to be made.
$ terraform apply
openstack_compute_keypair_v2.my-cloud-key: Refreshing state... (ID: my-key)

An execution plan has been generated and is shown below.
Resource actions are indicated with the following symbols:
  + create

Terraform will perform the following actions:

  + openstack_compute_instance_v2.test
      id:                         <computed>
      access_ip_v4:               <computed>
      access_ip_v6:               <computed>
      all_metadata.%:             <computed>
      availability_zone:          <computed>
      flavor_id:                  <computed>
      flavor_name:                "m1.tiny"
      force_delete:               "false"
      image_id:                   <computed>
      image_name:                 "denbi-centos7-j10-2e08aa4bfa33-master"
      key_pair:                   "my-key"
      name:                       "test-vm"
      network.#:                  "1"
      network.0.access_network:   "false"
      network.0.fixed_ip_v4:      <computed>
      network.0.fixed_ip_v6:      <computed>
      network.0.floating_ip:      <computed>
      network.0.mac:              <computed>
      network.0.name:             "public"
      network.0.port:             <computed>
      network.0.uuid:             <computed>
      power_state:                "active"
      region:                     <computed>
      security_groups.#:          "1"
      security_groups.3814588639: "default"
      stop_before_destroy:        "false"


Plan: 1 to add, 0 to change, 0 to destroy.

Do you want to perform these actions?
  Terraform will perform the actions described above.
  Only 'yes' will be accepted to approve.

  Enter a value:
You now have a running instance! We do not know the IP address so we cannot login yet. You can obtain that from the OpenStack dashboard, or via the terraform show command
Hands On: `terraform show` and logging in
Run terraform show
The values in the following output will not match yours.
Lastly, we’ll add the execution nodes. Here we will launch two servers at once by using the count parameter. We can add count in the main portion of a Terraform resource definition and it will create that many copies of that same resource. In the case where we wish to be able to distinguish between them, we can use ${count.index} in the name or another field to distinguish them.
openstack_compute_keypair_v2.my-cloud-key: Refreshing state... (ID: my-key)
openstack_compute_instance_v2.test: Refreshing state... (ID: 7a2ed5ba-0801-49b5-bf1b-9bf9cec733fa)

An execution plan has been generated and is shown below.
Resource actions are indicated with the following symbols:
  + create
  ~ update in-place

Terraform will perform the following actions:

  + openstack_compute_instance_v2.exec[0]
      id:                         <computed>
      access_ip_v4:               <computed>
      access_ip_v6:               <computed>
      all_metadata.%:             <computed>
      availability_zone:          <computed>
      ...

  ~ openstack_compute_instance_v2.test
      name:                       "test-vm" => "central-manager"


Plan: 3 to add, 1 to change, 0 to destroy.

Do you want to perform these actions?
  Terraform will perform the actions described above.
  Only 'yes' will be accepted to approve.

  Enter a value:
This time, Terraform is able to modify the openstack_compute_instance_v2.test resource in place, it can just update the name of the VM. It will also create the other three requested resources.
Enter yes and terraform will make the requested changes
It should complete successfully
Question
What did the output look like?
openstack_compute_instance_v2.nfs: Creation complete after 2m55s (ID: 421f0899-f2c1-43c9-8bbe-9b0415c8f4f4)
openstack_compute_instance_v2.exec[0]: Creation complete after 2m57s (ID: 1ae02775-a0ff-47a5-907f-513190a8548e)
openstack_compute_instance_v2.exec[1]: Creation complete after 2m59s (ID: d339ebeb-4288-498c-9923-42fce32a3808)

Apply complete! Resources: 3 added, 0 changed, 0 destroyed.
cloud-init
These VMs that we have launched currently are all absolutely identical, except for the host name. There is no specialisation. They all do nothing. We will fix that and make these machines have individual roles by booting them with metadata attached to each instance.
cloud-init is used for this process, it allows for injecting files and executing commands as part of the boot process.
cloud-init allows for many more actions to be executed as well, you can read about them in the documentation.
The cloud-init configuration is a YAML file. Here we can see an example of how it is used, we have a YAML array at the top level. Inside, a hash of content, owner, path, and permissions.
This will create a file with the value from content, owned by root/group root, in /etc/condor/condor_config.local. So let’s re-structure our main.tf file to have some configuration:
Hands On: cloud-init
Edit your central-manager server and add a block like the following at the end.
Near the end we see an interesting thing, ${openstack_compute_instance_v2.nfs.access_ip_v4}, this will template the user_data that is passed to cloud-init, with the IP address of the NFS server.
Edit your NFS server and add a user data block like:
$ terraform apply
openstack_compute_keypair_v2.my-cloud-key: Refreshing state... (ID: my-key)
openstack_compute_instance_v2.nfs: Refreshing state... (ID: 421f0899-f2c1-43c9-8bbe-9b0415c8f4f4)
openstack_compute_instance_v2.test: Refreshing state... (ID: 7a2ed5ba-0801-49b5-bf1b-9bf9cec733fa)
openstack_compute_instance_v2.exec[0]: Refreshing state... (ID: 1ae02775-a0ff-47a5-907f-513190a8548e)
openstack_compute_instance_v2.exec[1]: Refreshing state... (ID: d339ebeb-4288-498c-9923-42fce32a3808)

An execution plan has been generated and is shown below.
Resource actions are indicated with the following symbols:
-/+ destroy and then create replacement

Terraform will perform the following actions:

-/+ openstack_compute_instance_v2.exec[0] (new resource required)
      id:                         "1ae02775-a0ff-47a5-907f-513190a8548e" => <computed> (forces new resource)
      access_ip_v4:               "192.52.32.255" => <computed>
      ...
      user_data:                  "" => "07d27d50dbdf12a5647d9fd12a3510861d32203c" (forces new resource)

...
Plan: 4 to add, 0 to change, 4 to destroy.

Do you want to perform these actions?
  Terraform will perform the actions described above.
  Only 'yes' will be accepted to approve.

  Enter a value:
Here Terraform has detected that the userdata has changed. It cannot change this dynamically at runtime, only at boot time. So it decides that it must destroy and then replace that resource.
Login / HTCondor / A Test Job
We now have a running cluster! Let’s log in
Hands On: Cluster Usage
Now that we have a cluster in the cloud, let’s login. Look through the output of terraform show to find your central-manager server and its IP address.
ssh centos@<your manager ip>
Run condor_status which will show you the status of your cluster.
After your central manager VM booted, the executor nodes booted as well. Then, using the IP address of the central manager, the executors contacted that machine, and advertised their availability to run jobs.
Question
What does the output look like? How many executor nodes do you see?
[centos@central-manager share]$ condor_status
Name                   OpSys      Arch   State     Activity LoadAv Mem   ActvtyTime

slot1@exec-0.novalocal LINUX      X86_64 Unclaimed Idle      0.150  991  0+00:15:28
slot1@exec-1.novalocal LINUX      X86_64 Unclaimed Idle      0.000  991  0+00:15:32

                     Machines Owner Claimed Unclaimed Matched Preempting  Drain

        X86_64/LINUX        2     0       0         2       0          0      0

               Total        2     0       0         2       0          0      0
Change into the /data/share/
Create a file, test.job with the following contents:
(Quickly) Run condor_q to see the queue status. You can invoke this repeatedly to watch the queue update.
Run cat *.out and you should see the hostnames where the jobs were run
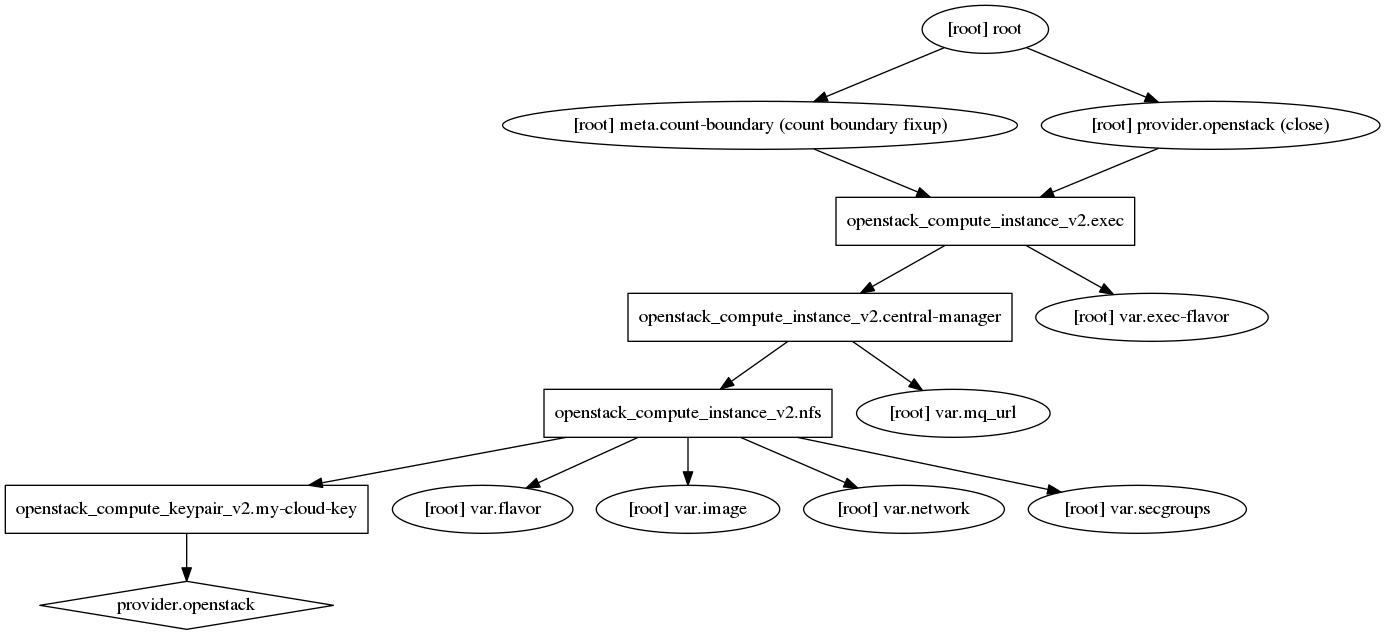
Infrastructure Graph
Terraform has the ability to produce a graph showing the relationship of resources in your infrastructure. We will produce a graphic for our current terraform plan:
Hands On: Infrastructure Graph
Run:
terraform graph | dot -Tpng > graph.png
You may need the graphviz package installed in order to produce the graph
Figure 2: A simple graph showing the structure of the infrastructure in this lesson
The dependencies follow the arrows, the NFS depends on the keypair being setup. The test machine (central manager) depends on the NFS server being available (and having an IP), the exec nodes depend on the central manager server. This is a somewhat simplified view, there are more dependencies which are not shown for simplicity (e.g. the exec nodes depend on NFS)
If you have variables this can produce a more complex dependency graph:
Once you develop complex infrastructure, these graphics become less useful.
Tearing Everything Down
Hands On: Cleanup
Simple delete your main.tf file (or rename it without the .tf extension)
Run terraform apply. Terraform will see that the resource is no longer part of your code and remove it.
openstack_compute_keypair_v2.my-cloud-key: Refreshing state... (ID: my-key)
openstack_compute_instance_v2.nfs: Refreshing state... (ID: 0b58d613-48f2-49c4-9d8a-3623d17f1c93)
openstack_compute_instance_v2.test: Refreshing state... (ID: e433f772-6f17-4609-aa61-053f7602533f)
openstack_compute_instance_v2.exec[0]: Refreshing state... (ID: 034a4206-b0ad-4d0e-9c75-27d3966f99ac)
openstack_compute_instance_v2.exec[1]: Refreshing state... (ID: fe576776-397e-4f1f-a8e7-4a9203764567)

An execution plan has been generated and is shown below.
Resource actions are indicated with the following symbols:
  - destroy

Terraform will perform the following actions:

  - openstack_compute_instance_v2.exec[0]

  - openstack_compute_instance_v2.exec[1]

  - openstack_compute_instance_v2.nfs

  - openstack_compute_instance_v2.test

  - openstack_compute_keypair_v2.my-cloud-key


Plan: 0 to add, 0 to change, 5 to destroy.

Do you want to perform these actions?
  Terraform will perform the actions described above.
  Only 'yes' will be accepted to approve.

  Enter a value:
Destroy time provisioners
Sometimes, immediately terminating the VM is not ideal behaviour. Especially if you’re managing a cluster like HTCondor which can gracefully terminate jobs, you might want to permit that. Terraform provides ‘destroy-time provisioners’, code snippets that are run before the VM is destroyed. If they return successfully, destruction continues. If they exit with an error code, then destruction is halted. We can write a simple one for HTCondor like so:
set-ex
condor_drain $(hostname)||true;my_ip=$(/sbin/ifconfig eth0 | grep'inet ' | awk'{print $2}')# Find slots which have an address associated with us.slots=$(condor_status -autoformat Name State MyAddress | grep"<${my_ip}?9618" | wc-l)# If there are more than one slots, leave it.if(( slots > 1 ));then
exit 1;else# Otherwise, poweroff.
/usr/sbin/condor_off -gracefulexit 0;fi
Which can be provided to your VM like:
provisioner "remote-exec" {
  when = "destroy"

  scripts = [
    "prepare-restart.sh",
  ]

  connection {
    type        = "ssh"
    user        = "centos"
    private_key = "${file("~/.ssh/id_rsa")}"
  }
}
Terraform will SSH in with those credentials, copy over the script in prepare-restart.sh, and execute it.
UseGalaxy.eu’s Terraform Usage
All of our virtual infrastructure is managed, publicly, with Terraform. We hope that this can inspire others and give people ideas of the sort of things they can accomplish with Terraform. If you have questions over the way we have done certain things, feel free to file an issue and ask us!
You've Finished the Tutorial
Please also consider filling out the Feedback Form as well!
Key points
Terraform lets you develop and implement infrastructure-as-code within your organisation
It can drastically simplify management of large numbers of VMs
Frequently Asked Questions
Have questions about this tutorial? Have a look at the available FAQ pages and support channels
Did you use this material as an instructor? Feel free to give us feedback on how it went.
Did you use this material as a learner or student? Click the form below to leave feedback.
Hiltemann, Saskia, Rasche, Helena et al., 2023 Galaxy Training: A Powerful Framework for Teaching! PLOS Computational Biology 10.1371/journal.pcbi.1010752
Batut et al., 2018 Community-Driven Data Analysis Training for Biology Cell Systems 10.1016/j.cels.2018.05.012
@misc{admin-terraform,
author = "Helena Rasche",
	title = "Deploying a compute cluster in OpenStack via Terraform (Galaxy Training Materials)",
	year = "",
	month = "",
	day = "",
	url = "\url{https://training.galaxyproject.org/training-material/topics/admin/tutorials/terraform/tutorial.html}",
	note = "[Online; accessed TODAY]"
}
@article{Hiltemann_2023,
	doi = {10.1371/journal.pcbi.1010752},
	url = {https://doi.org/10.1371%2Fjournal.pcbi.1010752},
	year = 2023,
	month = {jan},
	publisher = {Public Library of Science ({PLoS})},
	volume = {19},
	number = {1},
	pages = {e1010752},
	author = {Saskia Hiltemann and Helena Rasche and Simon Gladman and Hans-Rudolf Hotz and Delphine Larivi{\`{e}}re and Daniel Blankenberg and Pratik D. Jagtap and Thomas Wollmann and Anthony Bretaudeau and Nadia Gou{\'{e}} and Timothy J. Griffin and Coline Royaux and Yvan Le Bras and Subina Mehta and Anna Syme and Frederik Coppens and Bert Droesbeke and Nicola Soranzo and Wendi Bacon and Fotis Psomopoulos and Crist{\'{o}}bal Gallardo-Alba and John Davis and Melanie Christine Föll and Matthias Fahrner and Maria A. Doyle and Beatriz Serrano-Solano and Anne Claire Fouilloux and Peter van Heusden and Wolfgang Maier and Dave Clements and Florian Heyl and Björn Grüning and B{\'{e}}r{\'{e}}nice Batut and},
	editor = {Francis Ouellette},
	title = {Galaxy Training: A powerful framework for teaching!},
	journal = {PLoS Comput Biol}
}
Congratulations on successfully completing this tutorial!
5 stars
7
4 stars
1
3 stars
1
June 2023
5 stars:
Liked: very nice progression in the explanation! I like the practicality of the tasks
Disliked: the "openstack" provider has been demoted(?) so the source "terraform-provider-openstack/openstack" has to be added to the configuration to make this work now. it would be nice if the cluster example worked with a plain centos7 image. there does not seem to be a condor package in plain centos7, so I guess it would have to be replaced by some other cluster service, e.g., haproxy and nginx. still, it was nice to see the NFS setup - although the automounter did not work for me, that's not the point of the tutorial. thanks!
June 2021
3 stars:
Liked: realistc examples
Disliked: More details regarding used scripts and templates
June 2020
5 stars:
Liked: Basically I love all of them, It's simple, clear and easy to follow.
Disliked: Would be nice to have more complex examples to follow, if that possible
December 2018
5 stars:
Liked: Really detailed, could use it for my project for creating my project
Disliked: maybe go deeper and show a template for a project
Questions:
Open image in new tab
 Open image in new tab