The next sections explain how to qualify and calibrate the nitrate sensor mounted on the Argo float 4903881 either tool by tool or by running a pre-defined Galaxy workflow.
This requires two preliminary steps to prepare the environment.
For your information, execution time for running tools depends on the number of files, their size and/or the number of people working on Galaxy.
Warning: Do not change file name
DO NOT change file names to ensure that any changes you make with ODV will be carried over. However, it is possible to change the name of Galaxy collections to make them easier to find.
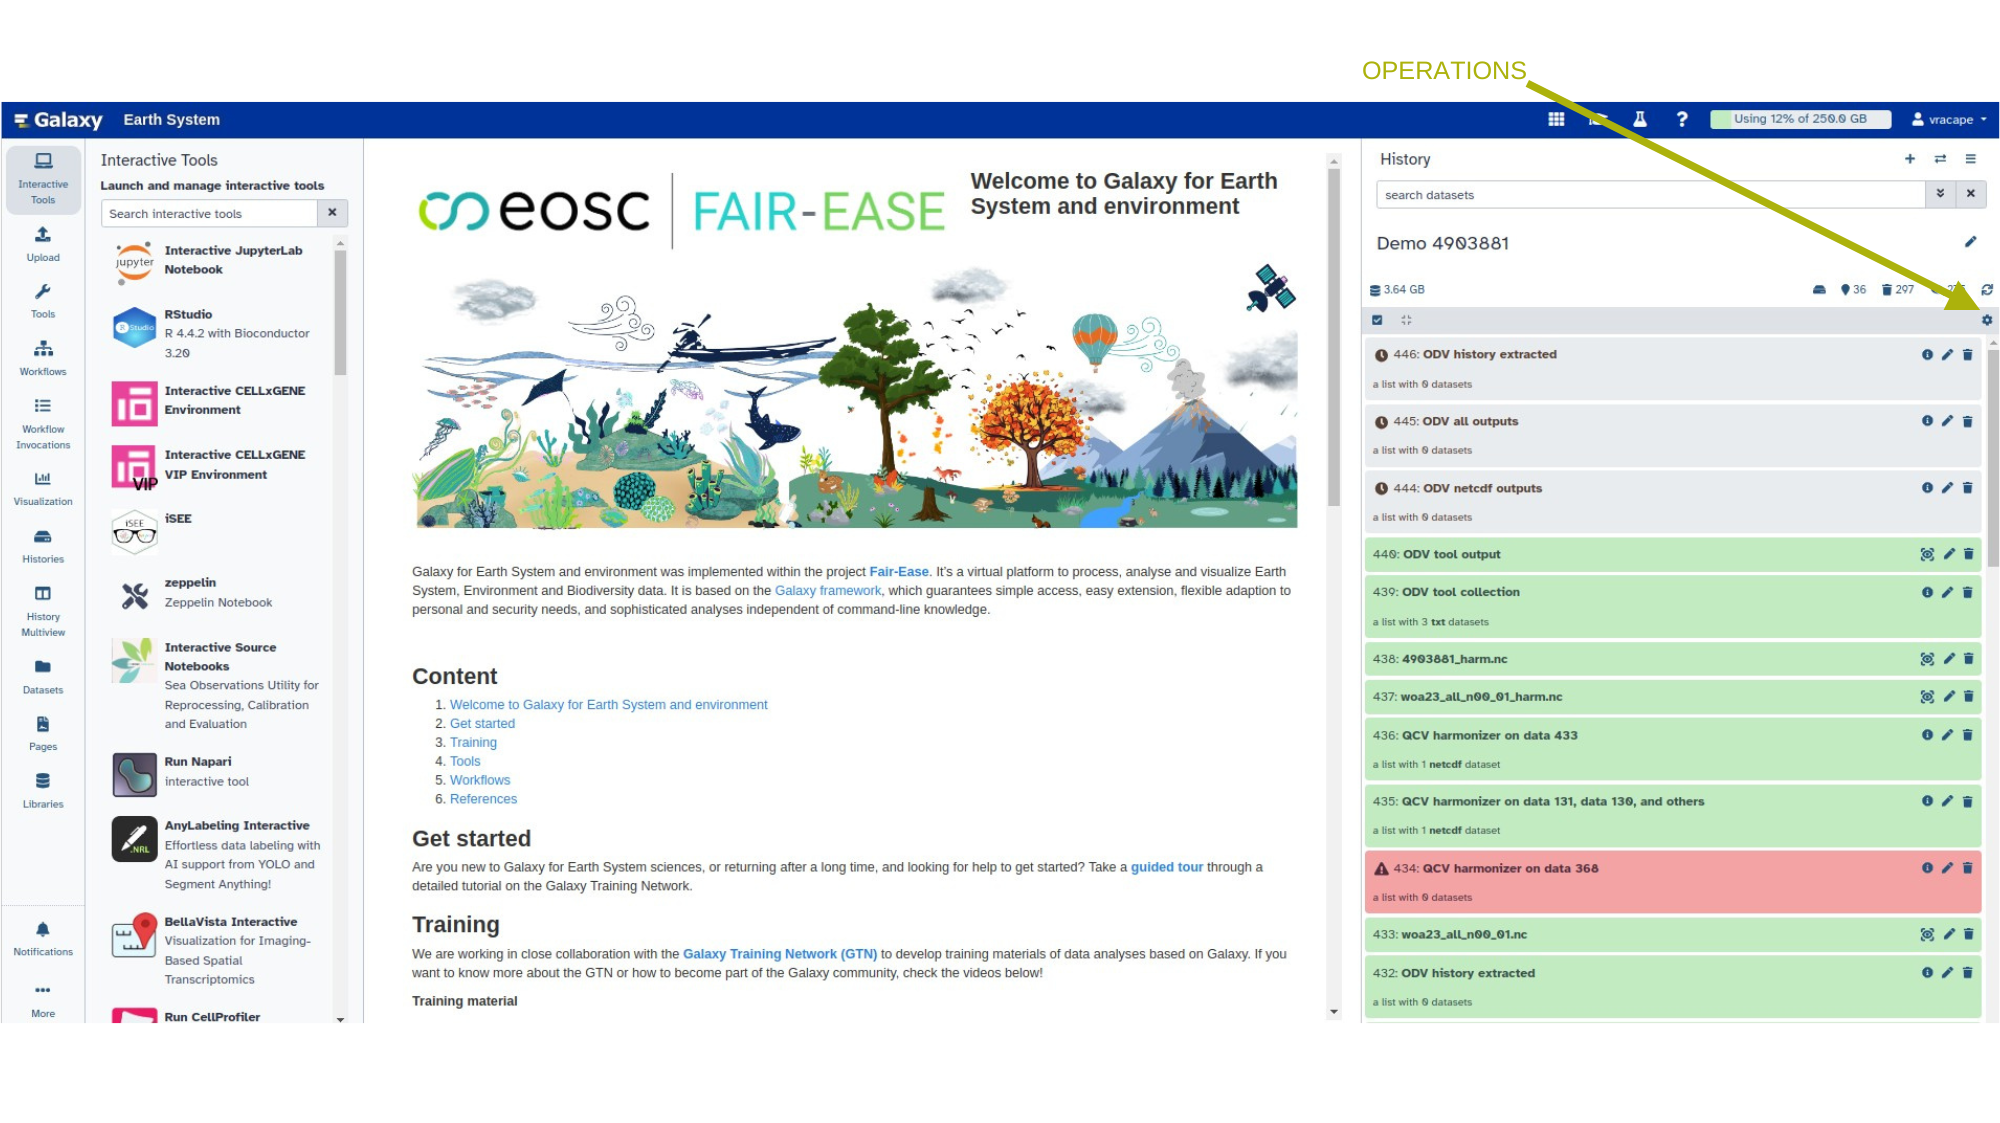
Once you are logged in, Galaxy is divided into 4 vertical panels:
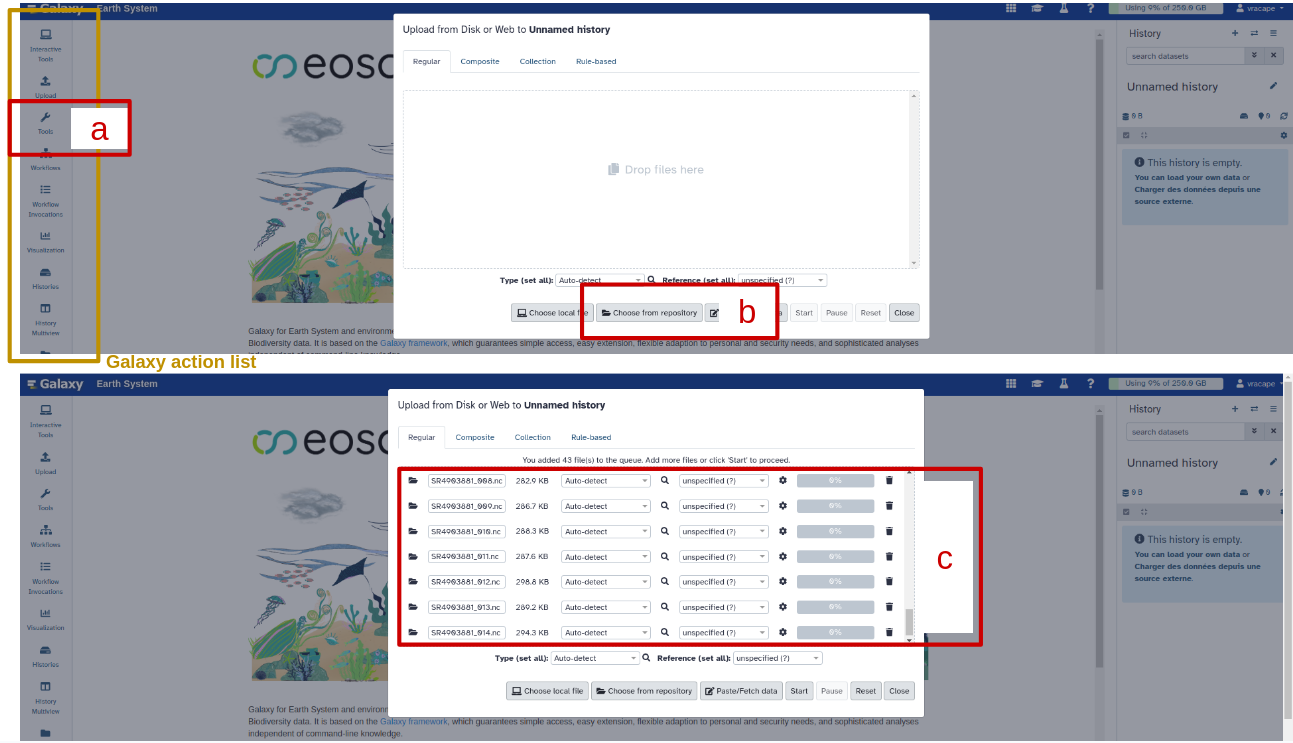
Far left: Galaxy action list (Upload, Tools, Interactive Tools…)
Center: Main panel
Far right: History section
All symbols have a tooltip when you hover them. These names will be indicated with {} in this tutorial.
The history section stores all your job results with the following color code:
Grey = cancelled
Orange = running
Green = finished with success
Red = failed
It is possible to organise your history with sub-directories:
New history: click on + at the top-right of history, edit the name with the pencil, save
Switch history: click on the ⇄ icon and select a history
Copy datasets: click on Operations → Copy datasets and choose source/destination histories
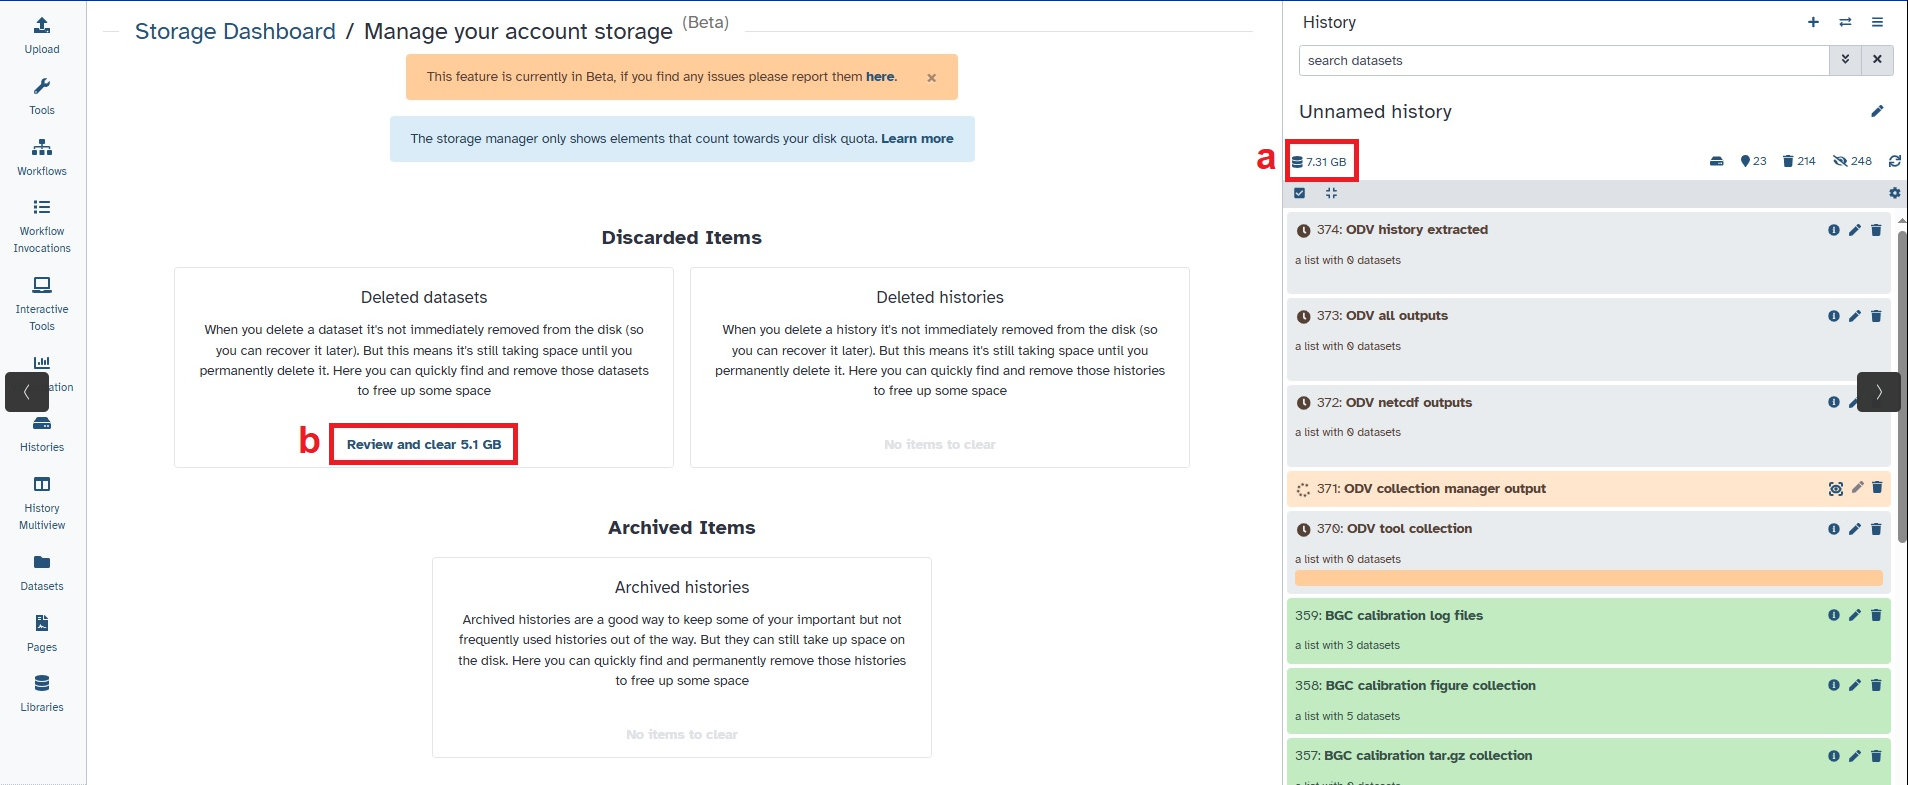
Quota per user account: check your quota.
Free space by clicking the database icon in the history panel and “Review and clear” GB.
(Note: deleting a dataset in the history does not free quota until you purge it.)
Time limit for interactive tools: 24h. After that, ODV closes automatically.
Avoid weekends: upgrades are performed and can stop tools/workflows.
Max interactive tools simultaneously: 2.
Nitrate calibration
Comment: Oxygen prerequisite
Because oxygen concentration is implied in the estimation of the nitrate adjustment from neural network method,
platforms to be calibrated must have good-quality oxygen (adjusted in real time or delayed mode for Argo floats or gliders).
Nitrate calibration needs a potential reference dataset such as the WOA annual climatology.
You can download it here and upload it into Galaxy.
Manage your data
Get your data
Hands On: Get your data from the S3 server
Click on Upload in the vertical panel on the left
In the pop-up window, click on Choose from repository
In the top search bar, search for argo
In the result list, select Argo marine floats data and metadata from Global Data Assembly Centre (Argo GDAC)
Navigate to pub/dac/coriolis/4903881
Tick the following:
4903881_meta.nc
All files under profiles/
Click on Select (bottom-right)
Remove the synthetic files SR4903881_*.nc (by clicking the trash icon)
Click on Start
Wait until all files are stored in your history on the right (green color)
Hands On: Get your data from your computer
Click on Upload in the vertical panel on the left
In the pop-up, click on Choose local file
Select the files on your system (Argo float or WOA)
Click on Open then Start
Wait until all files are stored in your history (green color)
Organize your data
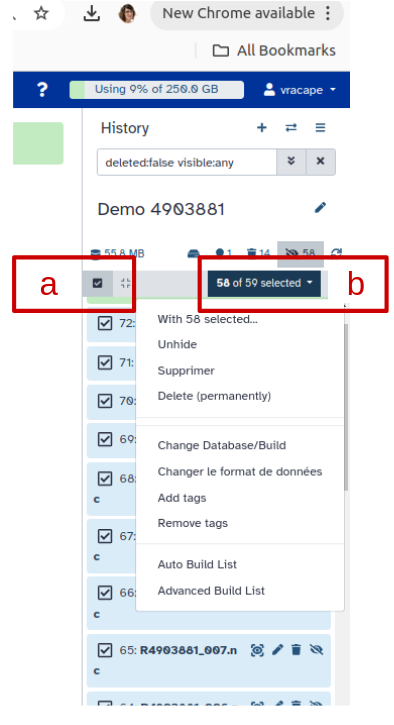
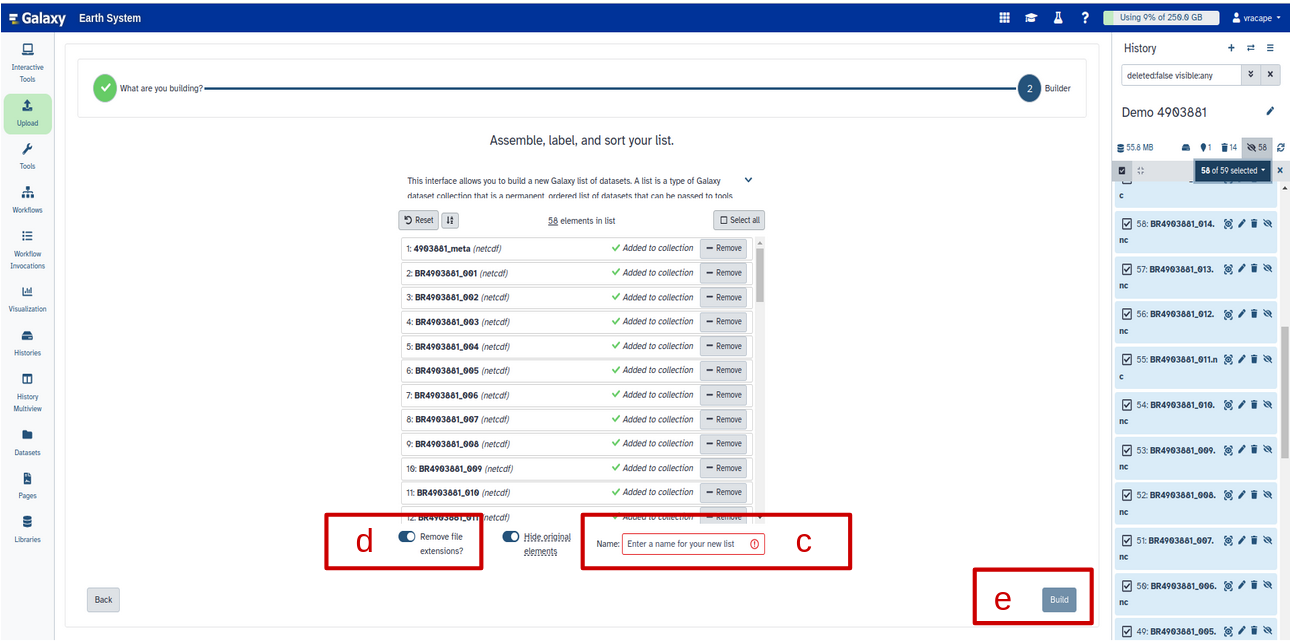
Hands On: Creating a dataset collection with autobuild
Click on galaxy-selectorSelect Items at the top of the history panel (letter a)
Check n files of interest
Click n of N selected (see letter b below) and choose Auto build List
Enter a name for your collection (letter c) to 4903881
Turn off Remove file extension (letter d)
Click Build to build your collection (letter e)
Click on the checkmark icon at the top of your history again (first letter a)
Once the collection is created, all files turn green. You can limit visible files using the eye icons in the history panel.
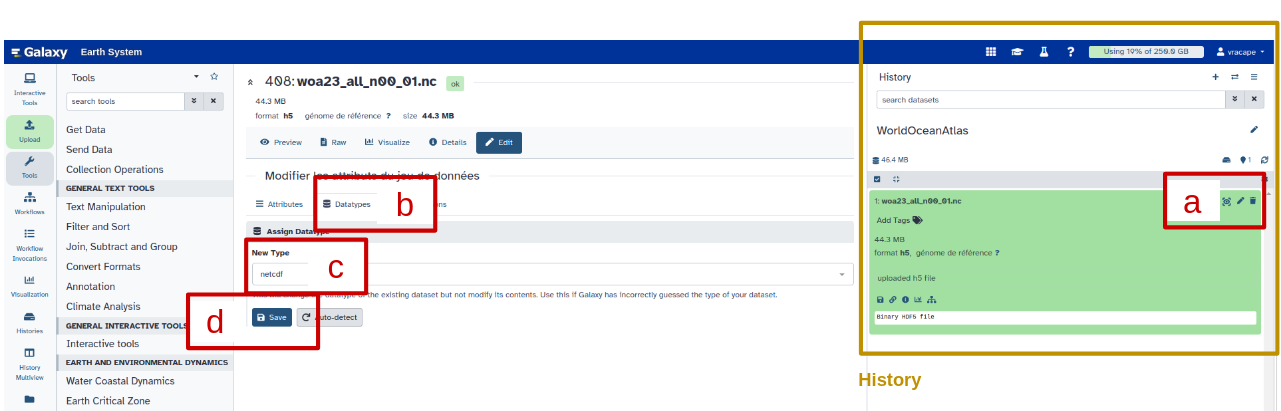
Hands On: Change file extension (for WOA file)
Change the datatype of the WOA file to NetCDF
Click on the galaxy-pencilpencil icon for the dataset to edit its attributes
In the central panel, click galaxy-chart-select-dataDatatypes tab on the top
In the galaxy-chart-select-dataAssign Datatype, select NetCDF from “New Type” dropdown
Tip: you can start typing the datatype into the field to filter the dropdown menu
Click the Save button
Hands-on: Choose Your Own Tutorial
This is a 'Choose Your Own Tutorial' (CYOT) section (also known as 'Choose Your Own Analysis' (CYOA)), where you can select between multiple paths. Click one of the buttons below to select how you want to follow the tutorial
Do you want to run a workflow ‘human in the loop’ or to discover the tools one by one?
Run a predefined workflow
Hands On: Run a public workflow
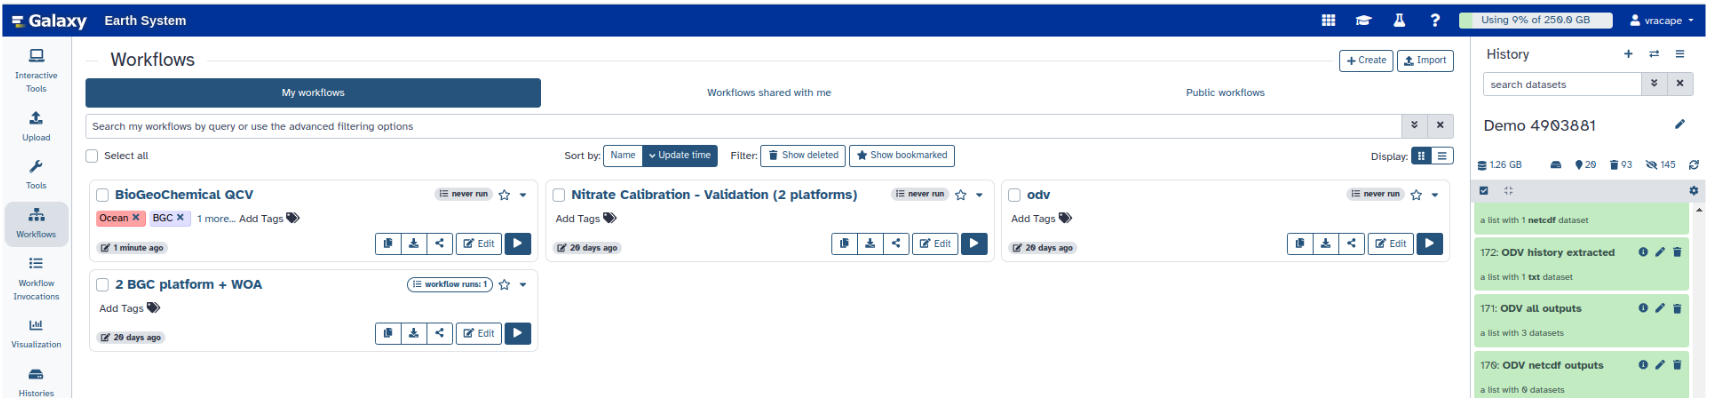
Click on Workflows on the Activity Bar on the left.
At the top of the resulting page you will have the option to switch between the My workflows, Workflows shared with me and Public workflows tabs.
Select the tab you want to see all workflows in that category
Search workflows Argo-Glider Nitrate QCV.
Click on the workflow name: a pop-up window opens with a preview of the workflow.
To run it directly: click Run (top-right).
Recommended: click Import (left of Run) to make your own local copy under Workflows / My Workflows.
When you click Run, a panel asks you for the input files:
Is the workflow not available on your Galaxy instance? You can upload the workflow yourself as follows:
Click on galaxy-workflows-activityWorkflows in the Galaxy activity bar (on the left side of the screen, or in the top menu bar of older Galaxy instances). You will see a list of all your workflows
Click on galaxy-uploadImport at the top-right of the screen
Provide your workflow
Option 1: Paste the URL of the workflow into the box labelled “Archived Workflow URL”
Option 2: Upload the workflow file in the box labelled “Archived Workflow File”
Click the Import workflow button
Below is a short video demonstrating how to import a workflow from GitHub using this procedure:
Video: Importing a workflow from URL
Workflow human in the loop
Now that your workflow is running, remember it contains both non-interactive and interactive steps. For the interactive tools (ODV), user action is required.
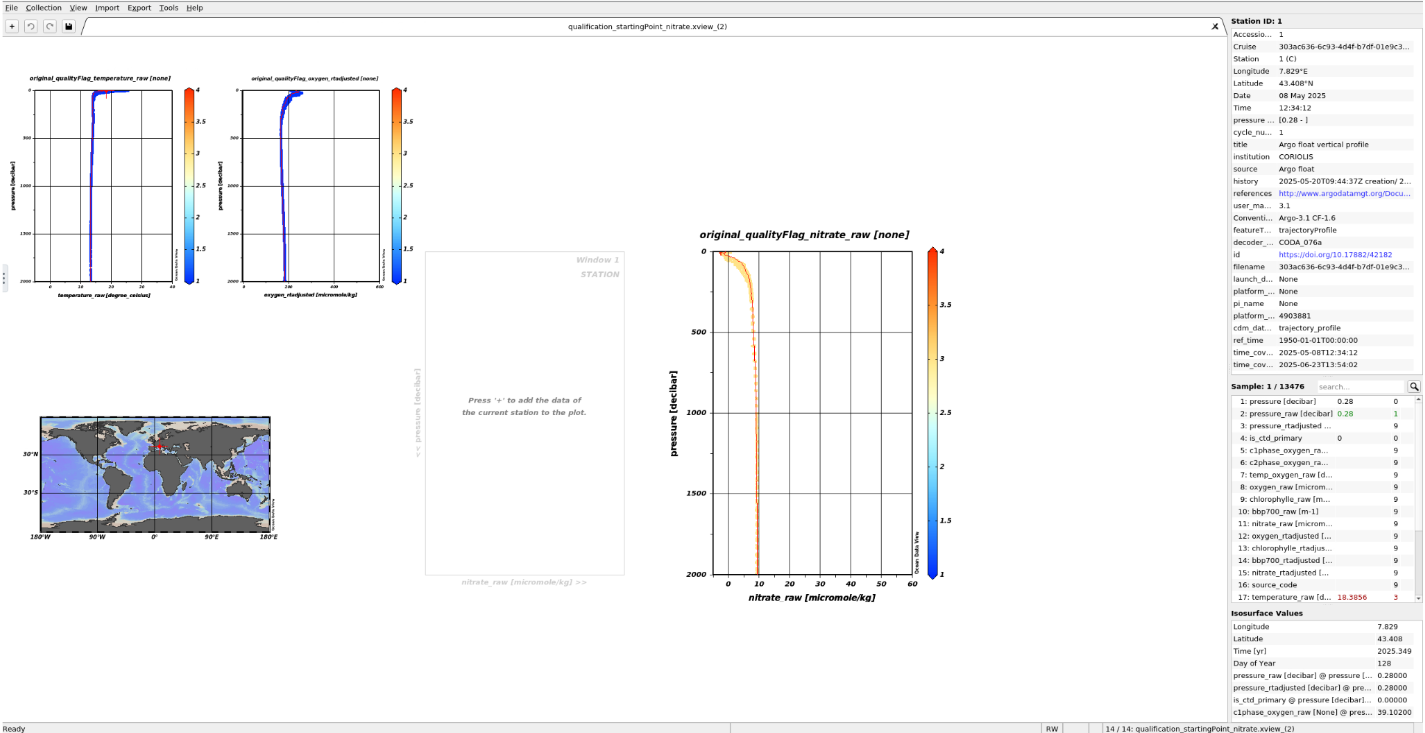
When the workflow arrives at the ODV interactive step for qualification:
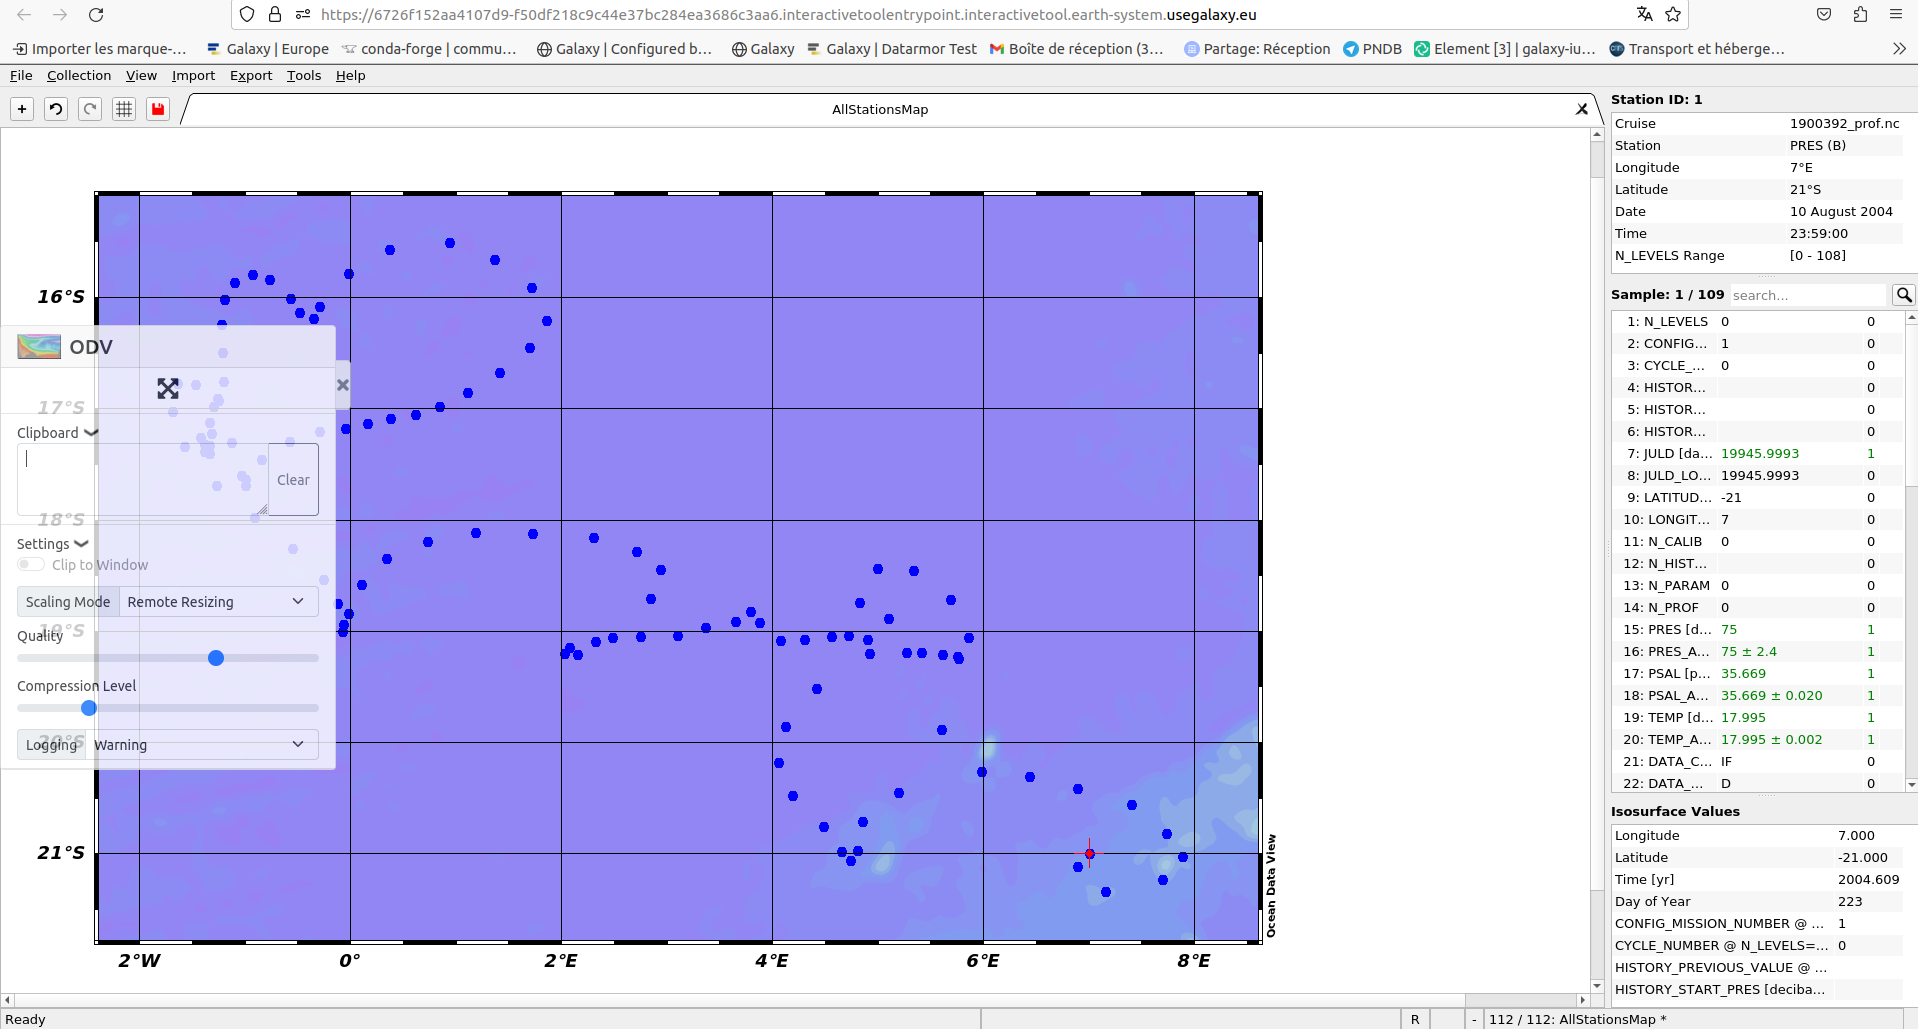
Open ODV
Apply QC following
Export history
Once the qualification step is finished and the history exported, close ODV. The workflow will then continue automatically.
When the workflow arrives at the ODV interactive step for validation:
Open ODV again
Follow the validation phase as described in
Expand the ODV left panel (3 vertical dots) to access the clipboard. Paste text into ODV forms via this clipboard. Click outside the panel to collapse it.
If ODV becomes grey with the red banner ODV - Disconnected, refresh the tab.
Warning: ODV execution limit
ODV has a 24h time limit. If you launch a workflow and wait longer than 1 day before opening ODV, the workflow will continue automatically without your qualification step.
Available public workflows
Workflow to perform Qualification, Nitrate Calibration, and Validation of one Argo float or one Glider.
Uses Neural Network + Climatology.
Copy it before running and adjust calibration parametrizations if necessary.
Tool by tool
Warning: Before starting
Before running the QCV procedure tool by tool, be sure that your environment (see Prerequisites and Manage your data) is ready!
Harmonize your data
The original files must be pre-processed in order to use the same tools regardless of their origin. This is performed by the tool QCV harmonizer.
This tool:
harmonizes vocabulary and format
aggregates multiple files from the same platform into one single file
Its outputs:
a single NetCDF file named ###_harm.nc (since version 3.0)
This tool is currently operational for Argo floats, World Ocean Atlas, and Gliders.
It should be run as many times as there are datasets/platforms.
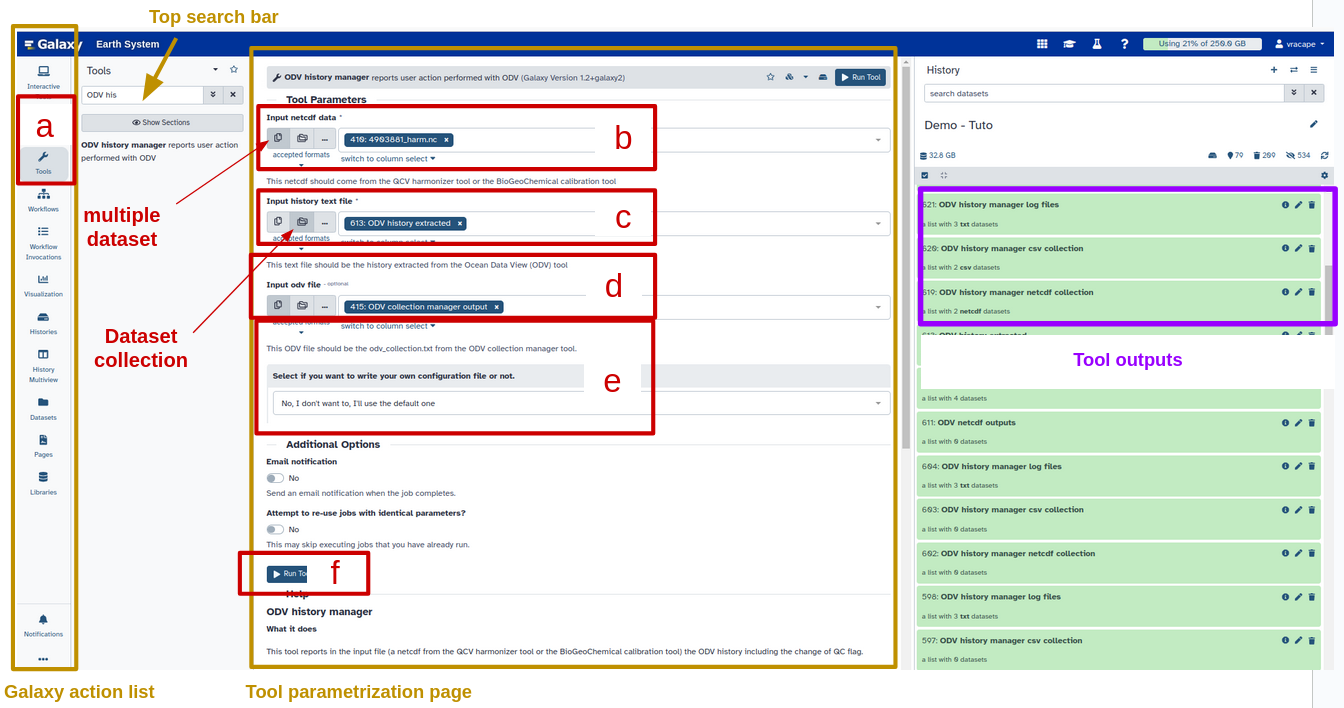
Hands On: Run QCV harmonizer
Finding your tool
Click on Tools just below Upload on the left panel
Search for QCV harmonizer in the search bar
Select the tool. Its configuration page opens.
QCV harmonizer ( Galaxy version 3.0+galaxy1) with the following parameters:
In Input the NetCDF data files:
If using a dataset collection (e.g. 4903881):
Select Dataset collection → click on Select Value → choose 4903881
If using WOA:
Select Single dataset → click on Select Value → choose woa###.nc
Click Run
If your file is not listed in the selection window, you can drag and drop it from the history panel into the Select value box.
Qualify your data
Create the ODV collection
The visualization tools for the qualification, the validation and the extraction or reporting of the user actions include ODV software, the ODV collection manager and the ODV history manager.
This tool creates:
ODV spreadsheet collections from harmonized file(s)
ODV view for nitrate qualification
Capabilities:
maps input QC flags with expected output QC flag scale
ODV convention regarding changes performed on the ODV collection:
EDITFLAGS = report QC flag changes from history to the data collection
EDITDATA = report data edits from history to the data collection
You can unselect either EDITFLAGS or EDITDATA if you want to report only QC changes or only data changes.
However, you cannot unselect both. If you do, the backend will actually apply both edit types.
Warning: Check the logs
At the end of the process, Galaxy distributes the tool outputs into 3 collections:
ODV history manager netcdf collection (extended harmonized NetCDFs, ###_harm_qced.nc)
ODV history manager csv collection (CSV summaries, ###_harm_history.csv)
ODV history manager log files (with YYYY-MM-DDTHHMM_galaxy_odv-history-manager_history.log)
Always check the log file (click the galaxy-eye icon) to ensure that changes were correctly reported.
If issues persist, make sure filenames match the step Export history conventions.
All these outputs will appear in your History (green status). They are now ready for the next step: Biogeochemical Calibration.
Calibrate your data
Nitrate
Hands On: (optional) Choose Reference dataset
Upload WOA nitrate climatology (NetCDF) from your computer
Harmonize it with QCV harmonizer as in the step Export history
Currently, the tool Biogeochemical calibration is operational for nitrate.
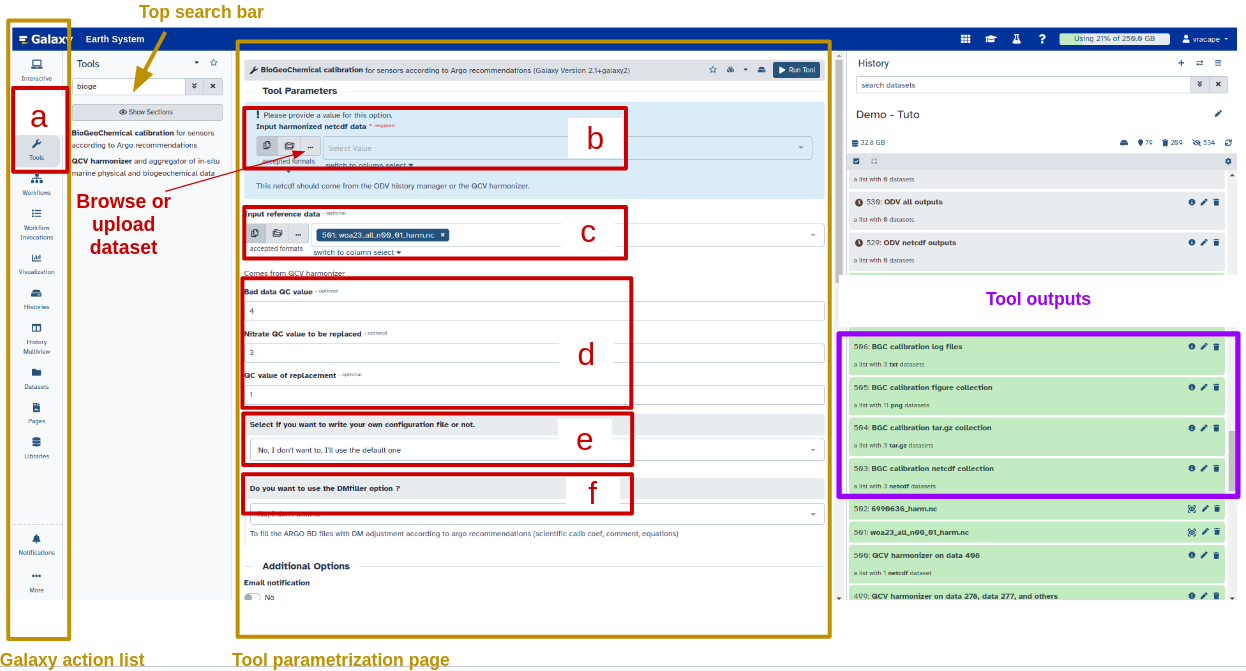
Hands On: Run Biogeochemical calibration
Find your tool
Click on Tools → search Biogeochemical calibration
BioGeoChemical calibration ( Galaxy version 2.1+galaxy2) with the following parameters:
Input harmonized netcdf data: ###_harm_qced.nc (created by QCV harmonizer + ODV history manager)
Input reference data (optional): WOA harmonized NetCDF file if you want to estimate reference nitrate from climatology
(Optional) Change default QC flag configuration (ARGO QC flag scale by default)
(Optional) Add calibration parametrizations:
Single regression
CanyonB (default)
Climatology / WOA
Custom P value with user-defined breakpoints
Run the tool
By default, the tool calibrates nitrate using:
Automatic evaluation of reference pressure
CanyonB as reference method
Linear regression for correction
ARGO QC flag convention
Default QC flag mapping:
Bad Data QC = 4
Raw QC value to replace = 3
Replacement QC value = 1 (adjusted value)
Possible configurations:
User-defined reference pressure
Canyon-med or WOA as reference method
Multi-linear regression with automatic or user-defined breakpoints
Did you use this material as an instructor? Feel free to give us feedback on how it went.
Did you use this material as a learner or student? Click the form below to leave feedback.
Hiltemann, Saskia, Rasche, Helena et al., 2023 Galaxy Training: A Powerful Framework for Teaching! PLOS Computational Biology 10.1371/journal.pcbi.1010752
Batut et al., 2018 Community-Driven Data Analysis Training for Biology Cell Systems 10.1016/j.cels.2018.05.012
@misc{climate-ocean_qcv_analysis,
author = "Marie Josse and Virginie Racape",
	title = "Nitrate DMQC for autonomous platforms such as Argo floats (Galaxy Training Materials)",
	year = "",
	month = "",
	day = "",
	url = "\url{https://training.galaxyproject.org/training-material/topics/climate/tutorials/ocean_qcv_analysis/tutorial.html}",
	note = "[Online; accessed TODAY]"
}
@article{Hiltemann_2023,
	doi = {10.1371/journal.pcbi.1010752},
	url = {https://doi.org/10.1371%2Fjournal.pcbi.1010752},
	year = 2023,
	month = {jan},
	publisher = {Public Library of Science ({PLoS})},
	volume = {19},
	number = {1},
	pages = {e1010752},
	author = {Saskia Hiltemann and Helena Rasche and Simon Gladman and Hans-Rudolf Hotz and Delphine Larivi{\`{e}}re and Daniel Blankenberg and Pratik D. Jagtap and Thomas Wollmann and Anthony Bretaudeau and Nadia Gou{\'{e}} and Timothy J. Griffin and Coline Royaux and Yvan Le Bras and Subina Mehta and Anna Syme and Frederik Coppens and Bert Droesbeke and Nicola Soranzo and Wendi Bacon and Fotis Psomopoulos and Crist{\'{o}}bal Gallardo-Alba and John Davis and Melanie Christine Föll and Matthias Fahrner and Maria A. Doyle and Beatriz Serrano-Solano and Anne Claire Fouilloux and Peter van Heusden and Wolfgang Maier and Dave Clements and Florian Heyl and Björn Grüning and B{\'{e}}r{\'{e}}nice Batut and},
	editor = {Francis Ouellette},
	title = {Galaxy Training: A powerful framework for teaching!},
	journal = {PLoS Comput Biol}
}
Funding
These individuals or organisations provided funding support for the development of this resource
Questions: