Contribute to the BioImage.IO models
Contributors
Questions
What is contained in a BioImage.IO model?
Which are the requirements to contribute?
How to contribute?
Objectives
Get to know how to contribute with models to the BioImage.IO
What is a BioImage.IO model?
A BioImage.IO model contains:
- A trained model in the correct format
- Example input image
- Example output
- An example cover image for visual representation of the model in the zoo
- Resource description file specifications
Speaker Notes A BioImage.IO model is a zip file containing all the items, technical description and metadata of the model, together with the trained architecture of the model. Hence, a BioImage.IO model contains different items such as the trained model, an example input image as a numpy array, an example output (also as a numpy array), an example cover image and, particularlly, a resource description file specifications as a r d f . yaml. —
Model contribution requirements
- Follow the BioImage.IO Model RDF Specification with
format_version>= 0.4.5 - The model is expected to be cross-compatible among the consumer software, and should always run on at least one.
- The model should be well documented (i.e., human readable name and rich description tailored for life-scientists, citations)
- The model should be public and can be used by anyone under the chosen licensing conditions.
Speaker Notes If you want to contribute with models, there are some requirements that need to be followed. For example, you have to follow the bioimage.io model Resource Description File Specification with a certain format version. The model is expected to be cross-compatible among the consumer software. It also should be well documented and, of course, it has to be public and can be used by anyone unde the chosen licensing conditions. —
Model contribution guidelines
- Create a BioImage.IO model
- Upload the model to the BioImage Model Zoo
Speaker Notes To contribute with a model to the BioImage Model Zoo you will only need to follow two steps. Let’s see them closely! —
Create a BioImage.IO model
Two steps:
- Choose one way to create your model (automatically or manually)
- Check that the model is correctly created
Speaker Notes Firstly, you will need to create a Bioimage.io model. To do so, you will need to create the model and check that it is correct. To create the model, you will have to choose if you want to do it automatically or manually. After that, you will have to check that the model is correctly created. —
Create a BioImage.IO model: Create your model
- Automatic export of the model using the bioimage.core python library (recomended). Example code here.
- The main function to build the model is
bioimageio.core.build_model - Manual generation of the model.
- Creating the BioImage.IO Model Resource Description File Specifications (rdf.yaml file)
- Some examples can be found on the Bioimage Model Zoo webpage.
Speaker Notes When creating your model, the first step would consist in choosing how to create this model: you can either do an automatic expoert of the model using the bioimageio.core python library (the recommended option with an example code available) or to generate the model manually. If you choose to do it manually, you will have to create the r d f . yaml file where there exist mandatory or optional fields on it. In the Bioimage Model Zoo webpage you can find different examples. —
Create a BioImage.IO model: Check that the model is correctly created
- Static Validation of the model format using the bioimage.core python library
bioimageio validate /../rdf.yaml - Dynamic Validation of the model’s deployment
bioimageio test-model --weights tensorflow_saved_model_bundle --device cpu /.../rdf.yaml
Speaker Notes Then, you will need to check that the model is correctly created. To do so, you should perform a static and dynamic validation of the model format by executing those commands in the terminal. —
Upload the model to the BioImage Model Zoo
In the bioimage.IO click on the Upload button.
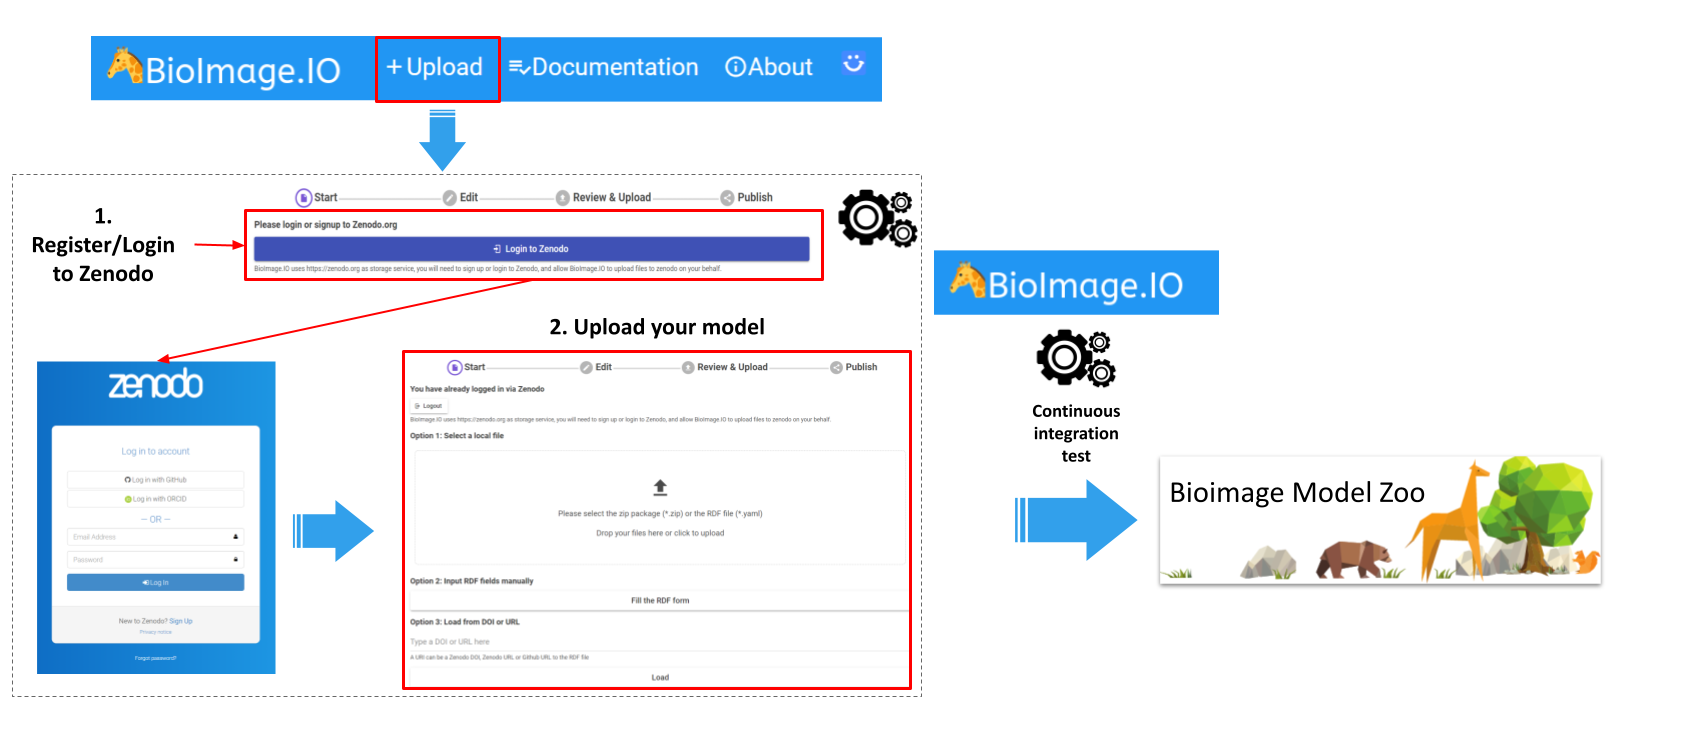
Speaker Notes Now it is time to upload your crated model through several new steps that you need to follow. —
Upload the model: Log in to Zenodo
Log in to Zenodo and give access to the BioEngine application.
Speaker Notes The first step will be to log in to Zenodo and give access to the BioEngine application. You will see an automatic message once you are logged in. If not, refresh the page. This step needs to be done only for the first time you upload a model. —
Upload your model: Upload your model RDF

Speaker Notes The second step will be to upload your model r d f as you see in the image. —
Upload your model: Complete fields
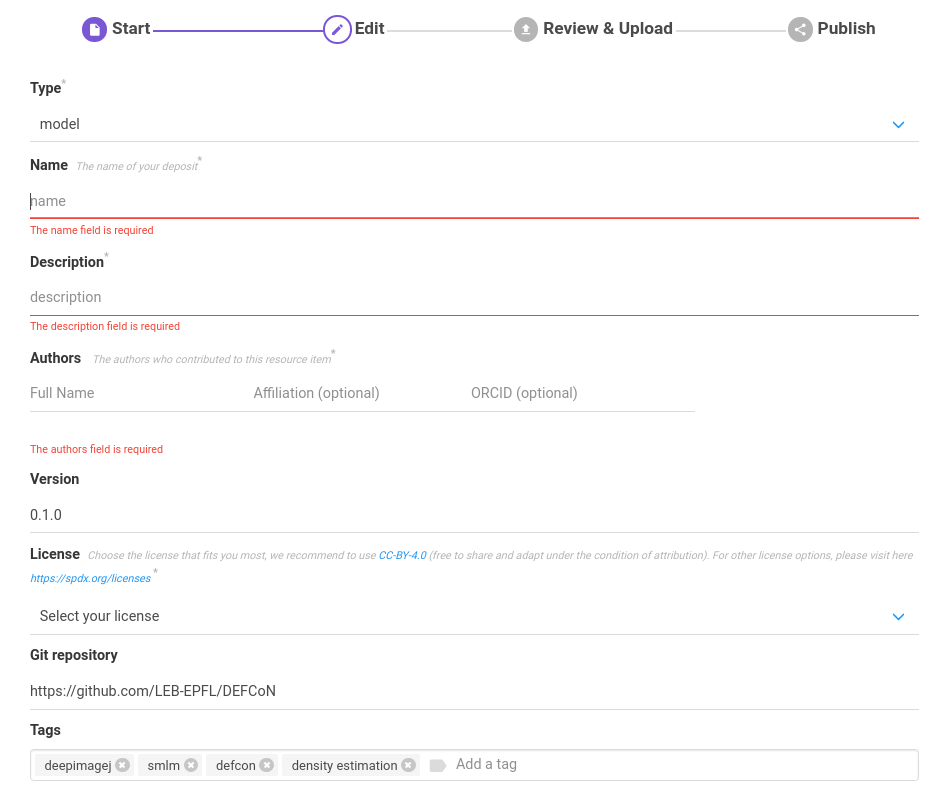
Speaker Notes Then you will have to complete all the missing fields as in the image shown here. —
Upload your model: Complete fields
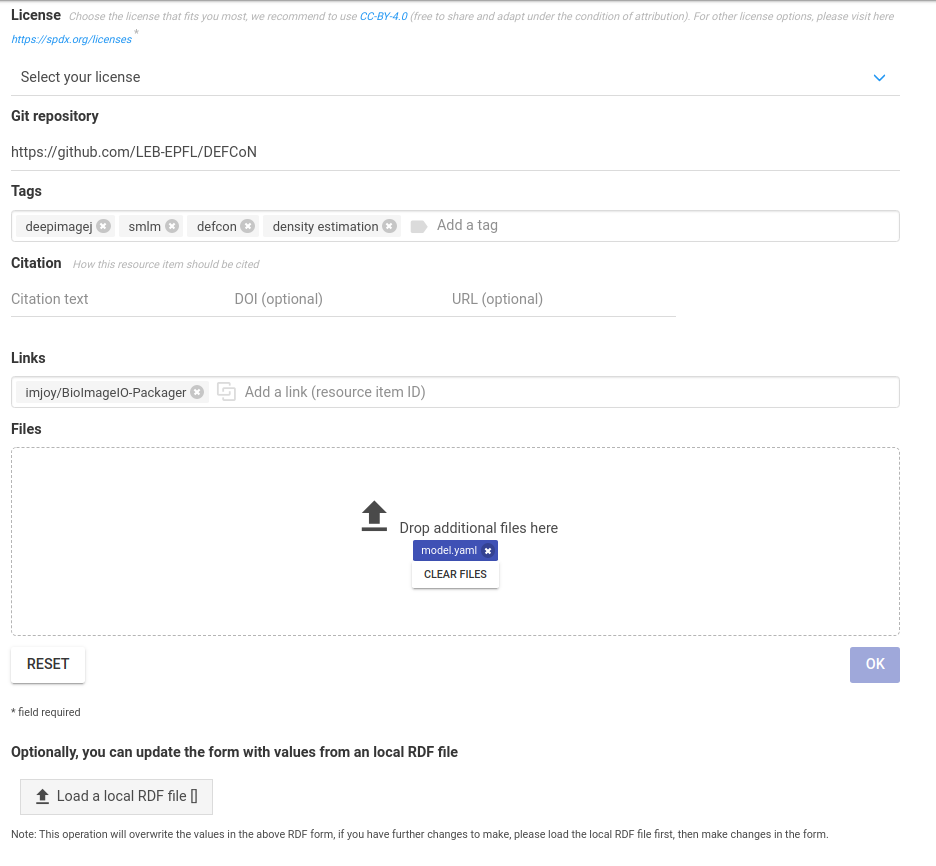
Speaker Notes And here. —
Upload your model: pull request
- A Pull Request (PR) will be generated
- Continious Integration (CI) workflow test
- Review by a maintainer from the BioImage.IO terminal
Speaker Notes A pull request (PR) is generated (this process may take some minutes). In the PR, the model is tested by a Continuous Integration (CI) workflow for its technical correctness. and reviewed by a maintainer from the BioImage.IO team. This PR is aimed for further discussions between model contributors and the BioImage.IO team. —
Upload your model: you are done!
If everything went as it should be, your model will be uploaded and displayed in the webpage!
Speaker Notes Once the model passes all checks and has the approval of a maintainer, it will be added to the BioImage.IO collection and displayed in the webpage (this process may take some minutes). —
Additional information
Speaker Notes Remember that you can always read our documentation or additional information on this topic or others in our resources. For example, you could check how to get most of your model documentation and considerations for the model description file. —