Best Practices for Citing Galaxy
| Author(s) |
|
| Reviewers |
|
OverviewQuestions:
Objectives:
How to cite Galaxy in Publications?
Apply the Galaxy citation guidelines to your own work.
Prepare your methodology section based on your Galaxy Histories.
Time estimation: 20 minutesSupporting Materials:Published: Nov 6, 2025Last modification: Jul 8, 2026License: Tutorial Content is licensed under Creative Commons Attribution 4.0 International License. The GTN Framework is licensed under MITpurl PURL: https://gxy.io/GTN:T00566rating Rating: 5.0 (1 recent ratings, 1 all time)version Revision: 3
Overview
This is a short primer on how to cite Galaxy in your publication and also how to prepare your Methodology based on your Galaxy history or histories. Following these steps will make it easy to cite Galaxy, share your methods, and adhere to best practices for FAIR and open science.
AgendaIn this tutorial we will deal with:
Citing Galaxy
Citing Galaxy comes in two main actions:
- Citing the global Galaxy Project that provides the core code that all Galaxy instances operate on.
- Citing the instance of Galaxy, you did your work on.
Citing Galaxy Project
Please cite Galaxy Project’s primary publication:
- Galaxy for accessible, reproducible, and collaborative data analyses: 2026 update
- Nucleic Acids Research, gkag469, https://doi.org/10.1093/nar/gkag469
This is also found on the Galaxy Project Hub with more specific examples of how to cite individual aspects of Galaxy Project - https://galaxyproject.org/citing-galaxy/
CommentThe main Galaxy Project publication will be included in the list if you follow the instructions below to extract tool citations from your History.
Citing a Galaxy Service
Service Descriptions
Each public Galaxy service benefits from being able to track the amazing work done by researchers using its service. Provided below are the DOIs for the Galaxy Australia, France and Main usegalaxy.* services. The linked papers are available on Zenodo in the Galaxy Project Zenodo Community at https://zenodo.org/communities/galaxy/:
- Galaxy Australia - https://doi.org/10.5281/zenodo.17298823
- Galaxy France - https://doi.org/10.5281/zenodo.17298858
- Galaxy Main - https://doi.org/10.5281/zenodo.17298864
We recommend including the relevant service name and DOI link in your Methods.
Acknowledging a Service
Each public Galaxy service is provided through a complex mixture of funding, governance and infrastructure providers. As such, each service provides a cut/paste Acknowledgement statement that supports their particular configuration and this can be found on each service. If your publication supports Acknowledgements, we strongly recommend you include the service-recommended Acknowledgements.
Acknowledgement statements for the four main usegalaxy.* services can be found using the following links:
- Galaxy Australia - https://site.usegalaxy.org.au/about#acknowledgement-statement
- Galaxy Europe - https://usegalaxy-eu.github.io/about
- Galaxy France - https://www.france-bioinformatique.fr/en/services/acknowledgement/
- Galaxy Main - https://usegalaxy.org/#about
Writing a Methods section based on your Galaxy work
Making a History public
We provide the following recommendations and process for making your History persistent and your options for public archiving of your History. Sharing your History will make it easier for others to understand or replicate your analysis. You can also add annotations and tags to ensure your history aligns to the FAIR principles.
Preparing a History
We recommend cleaning up your History when preparing to make your History public.
Hands On: Clean up Unneeded Datasets
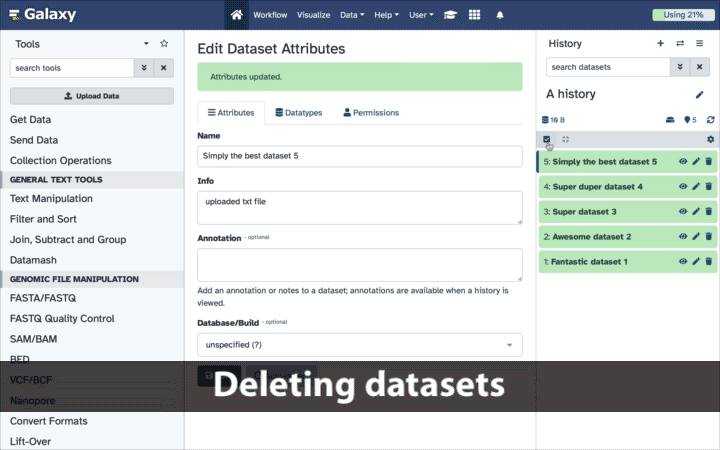
DeleteandDelete (permanently)(purge) any failed jobs.DeleteandDelete (permanently)(purge) any datasets/job outputs that were used for testing and are not required for the final, published analysis.DeleteandDelete (permanently)(purge) any datasets that you don’t want to share publicly (e.g. restricted data, unpublished results) - but make sure you save them to a private history first.Deleting datasets individually
To delete datasets individually simply click the galaxy-delete button with dataset’s box. That’s it! This action is reversible: datasets can be undeleted.
Deleting datasets in bulk
To delete multiple datasets at once:
- Click history-select-multiple icon at the top of the history pane;
- Select datasets you want to delete;
- Click the dropdown that would appear at the top of the history;
- Select “Delete” option.
This action is also reversible: datasets can be undeleted.
Deleting datasets permanently warning Danger zone!
Warning: Permanent is ... PERMANENT!Datasets deleted in this fashion CANNOT be undeleted!
To delete multiple datasets PERMANENTLY:
- Click history-select-multiple icon at the top of the history pane;
- Select datasets you want to delete;
- Click the dropdown that would appear at the top of the history;
- Select “Delete (permanently)” option.
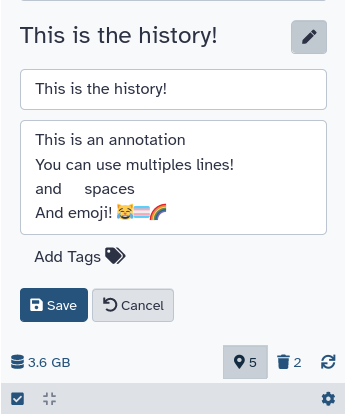
We also suggest providing a description/context of the History in the History Annotation.
Hands On: Annotating a History
- Add an annotation to your History.
Sometimes tags and names are not enough to describe the work done within a history. Galaxy allows you to create history annotations: longer text entries that allow for more formatting options. The formatting of the text is preserved. Later, if you publish or share the history, the annotation will be displayed automatically - allowing you to share additional notes about the analysis. Multiple lines, spaces, and emoji! 😹🏳️⚧️🌈 can be used while writing annotations.
To annotate a history:
- Click on galaxy-pencil (Edit) next to the history name. A larger text section will appear displaying any existing annotation or
Annotation (optional)if empty.- Add your text. Enter will move the cursor to the next line. (Tabs cannot be entered since the ‘Tab’ button is used to switch between controls on the page - tabs can be pasted in, however).
- Click on Save galaxy-save.
- To cancel, click the galaxy-undo “Cancel” button.
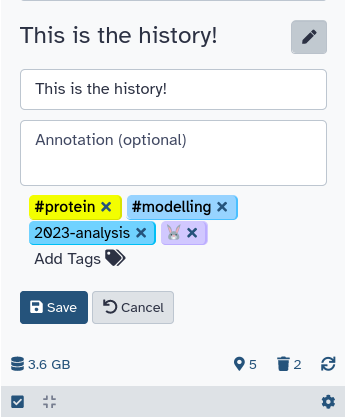
Users can add tags to their Galaxy histories to organise and connect them to specific analyses. Tags improve the findability and traceability of your work, aligning with the FAIR principles. Applying relevant tags before publishing your history is recommended to enhance its clarity and usefulness for both yourself and others.
Hands On: Adding Tags to a History
- Add Tags to your History
Tags are short pieces of text used to describe the thing they’re attached to and many things in Galaxy can be tagged. Each item can have many tags and you can add new tags or remove them at any time. Tags can be another useful way to organize and search your data. For instance, you might tag a history with the type of analysis you did in it:
assemblyorvariants. Or you may tag them according to data sources or some other metadata:long-term-care-facilityoryellowstone-park:2014.To tag a history:
- Click on galaxy-pencil (Edit) next to the history name (which by default is “Unnamed history”).
- Click on Add tags galaxy-tags and start typing. Any tags that you’ve used previously will show below your partial entry - allowing you to use this ‘autocomplete’ data to re-use your previous tags without typing them in full.
- Click on Save galaxy-save.
- To cancel, click the galaxy-undo “Cancel” button.
Warning: Do not use spacesIt is strongly recommended to replace spaces in tags with
_or-, as spaces will automatically be removed when the tag is saved.
Sharing a History
Galaxy provides a number of options for sharing histories which allows others to import and access the datasets, parameters, and steps of your history.
Hands On: Sharing a History
- Choose one or several ways to share your History.
Sharing your history allows others to import and access the datasets, parameters, and steps of your history.
Access the history sharing menu via the History Options dropdown (galaxy-history-options), and clicking “history-share Share or Publish”
- Share via link
- Open the History Options galaxy-history-options menu at the top of your history panel and select “history-share Share or Publish”
- galaxy-toggle Make History accessible
- A Share Link will appear that you give to others
- Anybody who has this link can view and copy your history
- Publish your history
- galaxy-toggle Make History publicly available in Published Histories
- Anybody on this Galaxy server will see your history listed under the Published Histories tab opened via the galaxy-histories-activity Histories activity
- Share only with another user.
- Enter an email address for the user you want to share with in the Please specify user email input below Share History with Individual Users
- Your history will be shared only with this user.
- Finding histories others have shared with me
- Click on the galaxy-histories-activity Histories activity in the activity bar on the left
- Click the Shared with me tab
- Here you will see all the histories others have shared with you directly
Note: If you want to make changes to your history without affecting the shared version, make a copy by going to History Options galaxy-history-options icon in your history and clicking Copy this History
Exporting a History to Zenodo
Integration of InvenioRDM and Zenodo into Galaxy now enables you to export your history directly to Zenodo. Publishing your history on Zenodo will generate a DOI for your history, which you can include in your publication and share with other researchers to make your work easily citable.
For instructions on connecting to Zenodo and exporting your history, see the following tutorial on the Galaxy Training Network:
Making a Workflow public
We recommend publishing a workflow alongside your data and in your article. In addition to providing a complete description of your method, the published workflow will also make your approach reproducible and citeable.
If you have not created and used a workflow for your analysis, Galaxy can automatically create a workflow based on the analysis you have performed in a history.
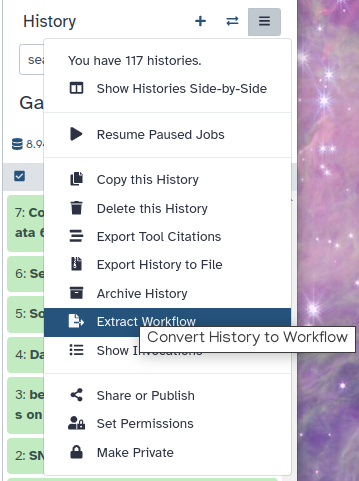
Hands On: Extract a Workflow from a History
- Extract a Workflow from a Galaxy History
Clean up your history: remove any failed (red) jobs from your history by clicking on the galaxy-delete button.
This will make the creation of the workflow easier.
Click on galaxy-gear (History options) at the top of your history panel and select Extract workflow.
The central panel will show the content of the history in reverse order (oldest on top), and you will be able to choose which steps to include in the workflow.
Replace the Workflow name to something more descriptive.
Rename each workflow input in the boxes at the top of the second column.
If there are any steps that shouldn’t be included in the workflow, you can uncheck them in the first column of boxes.
Click on the Create Workflow button near the top.
You will get a message that the workflow was created.
For instructions on preparing your workflow, see the following tutorial on the Galaxy Training Network:
Two repository options that we recommend for publishing your Workflows are:
- WorkflowHub (https://workflowhub.eu/)
- Dockstore (https://dockstore.org/)
Citing Public Workflows
If you used a workflow that was published on Galaxy, in Galaxy’s workflow library, the IWC], or a repository such as WorkflowHub, then we recommend you cite the original workflow. You can cite a workflow as you would any other software. If the information is available, we recommend including the creator’s name, the date of creation, the name of the repository, and the workflow’s DOI or URL.
Citing Public Data
If you used a public data source in your work, we recommend you cite both the data source publication DOI and the dataset itself. Most citation styles will include options for citing datasets. You should include the repository name and accession code in your Methods section to make it easy to find.
Extracting Tool Citations from a Galaxy History
Galaxy can all citations of the tools used in your history. You can directly extract them from your history. It is the quickest way to add all these tools to your references, and you might find this helpful when writing up your methods.
Hands On: Extracting Tool Citations
- Export a list of tool citations from your History
If you performed your data analysis in Galaxy, you can easily export a list of all the tools you used—and should cite—as follows:
- Click on the History options button ( galaxy-history-options ) in the right-hand panel.
- Select Export Tool Citations from the menu.
- The middle panel will display a list of tools used in your history, with citation information provided in two formats: APA and BibTeX.
- Don’t forget to also cite Galaxy itself in your publication.
Proper citation helps support the developers and ensures reproducibility—thank you for taking this step!
CommentYou will also get the Galaxy Project publication in all History citation exports!
Conclusion
In this tutorial, we have covered how to cite Galaxy Project and the specific Galaxy server that you used and how to prepare your methodology based on your Galaxy History.
You've Finished the Tutorial
Key points
The Galaxy Project primary publication should always be cited.
When analysing data using a public Galaxy server, include an acknowledgement for the Galaxy server(s) used.
Analysis methods can be made transparent and reproducible by publishing Galaxy Histories and Workflows.
Public data used in an analysis should always be cited.
A list of tool citations can be extracted directly from your Galaxy History.
Frequently Asked Questions
Have questions about this tutorial? Have a look at the available FAQ pages and support channelsFeedback
Did you use this material as an instructor? Feel free to give us feedback on how it went.
Did you use this material as a learner or student? Click the form below to leave feedback.

Citing this Tutorial
- Tristan Reynolds, Gareth Price, Mirela Minkova, Marisa Loach, Best Practices for Citing Galaxy (Galaxy Training Materials). https://training.galaxyproject.org/training-material/topics/introduction/tutorials/galaxy-cite/tutorial.html Online; accessed TODAY
- Hiltemann, Saskia, Rasche, Helena et al., 2023 Galaxy Training: A Powerful Framework for Teaching! PLOS Computational Biology 10.1371/journal.pcbi.1010752
- Batut et al., 2018 Community-Driven Data Analysis Training for Biology Cell Systems 10.1016/j.cels.2018.05.012
@misc{introduction-galaxy-cite,
author = "Tristan Reynolds and Gareth Price and Mirela Minkova and Marisa Loach",
	title = "Best Practices for Citing Galaxy (Galaxy Training Materials)",
	year = "",
	month = "",
	day = "",
	url = "\url{https://training.galaxyproject.org/training-material/topics/introduction/tutorials/galaxy-cite/tutorial.html}",
	note = "[Online; accessed TODAY]"
}
@article{Hiltemann_2023,
	doi = {10.1371/journal.pcbi.1010752},
	url = {https://doi.org/10.1371%2Fjournal.pcbi.1010752},
	year = 2023,
	month = {jan},
	publisher = {Public Library of Science ({PLoS})},
	volume = {19},
	number = {1},
	pages = {e1010752},
	author = {Saskia Hiltemann and Helena Rasche and Simon Gladman and Hans-Rudolf Hotz and Delphine Larivi{\`{e}}re and Daniel Blankenberg and Pratik D. Jagtap and Thomas Wollmann and Anthony Bretaudeau and Nadia Gou{\'{e}} and Timothy J. Griffin and Coline Royaux and Yvan Le Bras and Subina Mehta and Anna Syme and Frederik Coppens and Bert Droesbeke and Nicola Soranzo and Wendi Bacon and Fotis Psomopoulos and Crist{\'{o}}bal Gallardo-Alba and John Davis and Melanie Christine Föll and Matthias Fahrner and Maria A. Doyle and Beatriz Serrano-Solano and Anne Claire Fouilloux and Peter van Heusden and Wolfgang Maier and Dave Clements and Florian Heyl and Björn Grüning and B{\'{e}}r{\'{e}}nice Batut and},
	editor = {Francis Ouellette},
	title = {Galaxy Training: A powerful framework for teaching!},
	journal = {PLoS Comput Biol}
}
Funding
These individuals or organisations provided funding support for the development of this resource
Congratulations on successfully completing this tutorial!