This tutorial aims to familiarize you with the Galaxy user interface, with a special focus on highlighting Galaxy’s many RDM (Research Data Management) features.
Galaxy has over 10,000 available tools in its Tool Shed, covering a wide variety of scientific domains, ranging from life sciences to astronomy and digital humanities, and covering techniques from simple text manipulation to advanced machine learning and other complex algorithms.
To keep this tutorial accessible for people with different backgrounds, we perform a toy analysis on a tabular dataset, namely a table of all athletes competing in the Olympics. The question we ask ourselves is “What is the age distribution of Olympic athletes?”. In addition, we want to make sure our analysis is reproducible, so that it can be easily repeated on different datasets and shared with others.
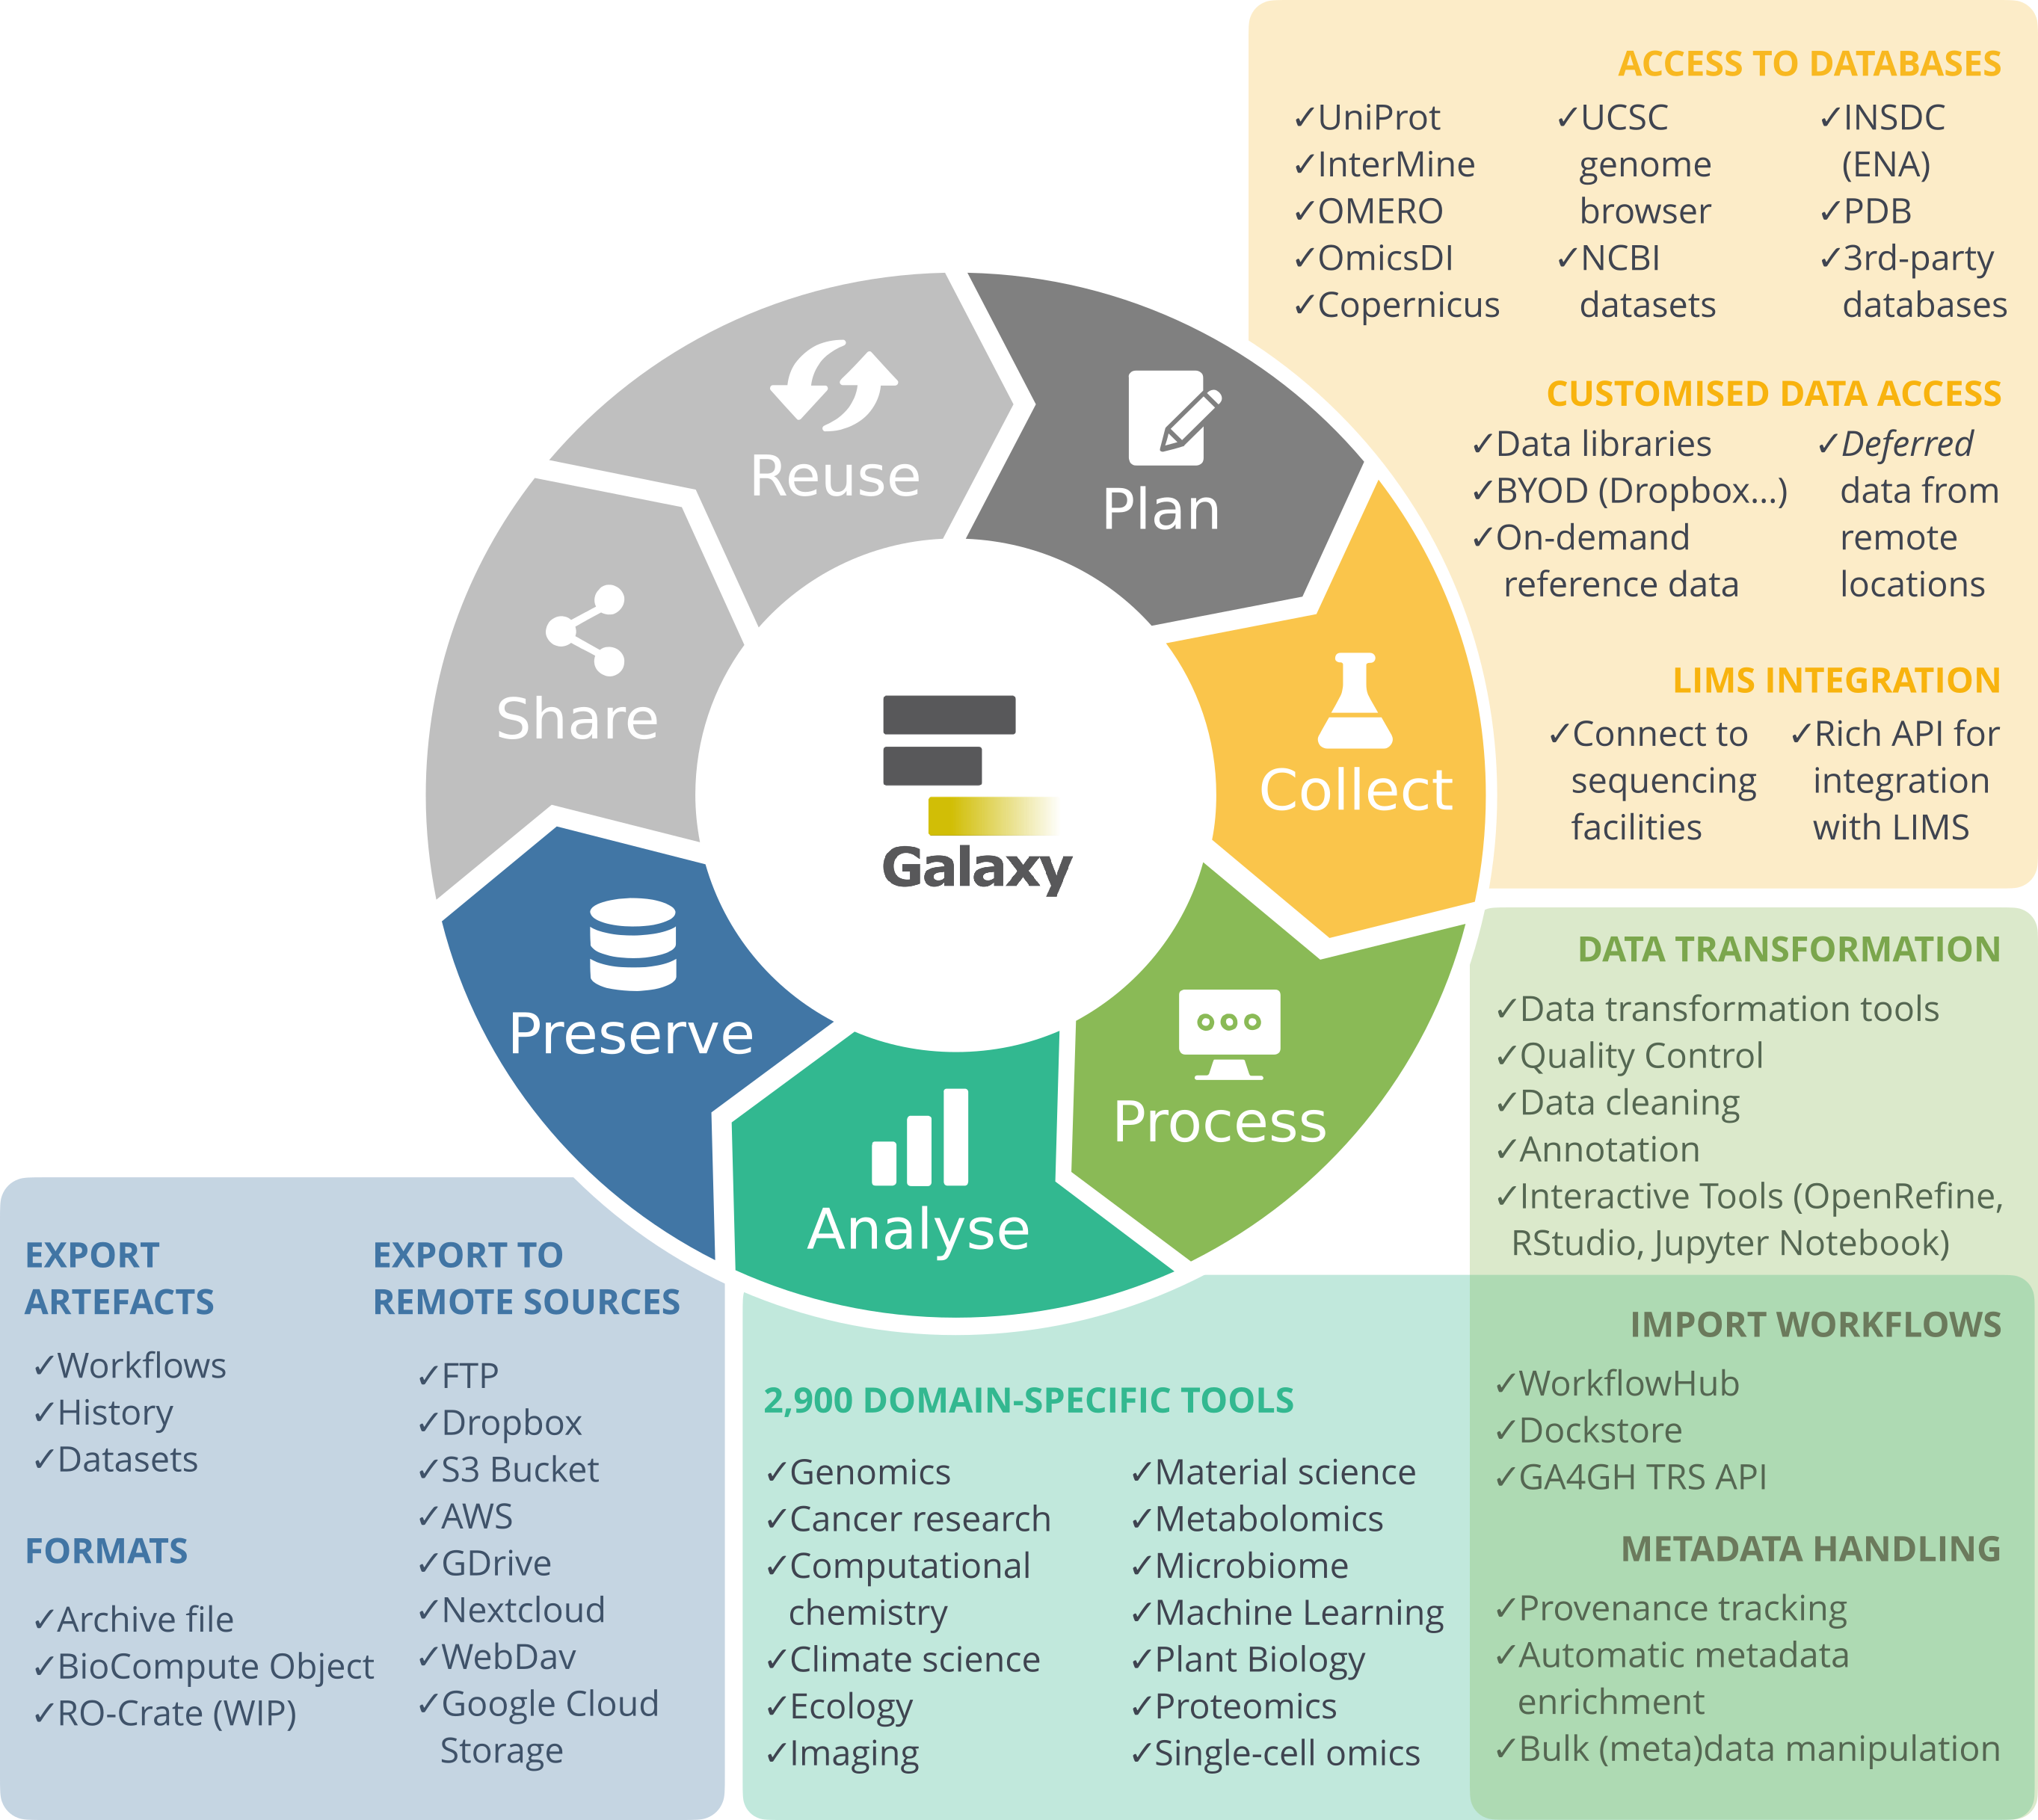
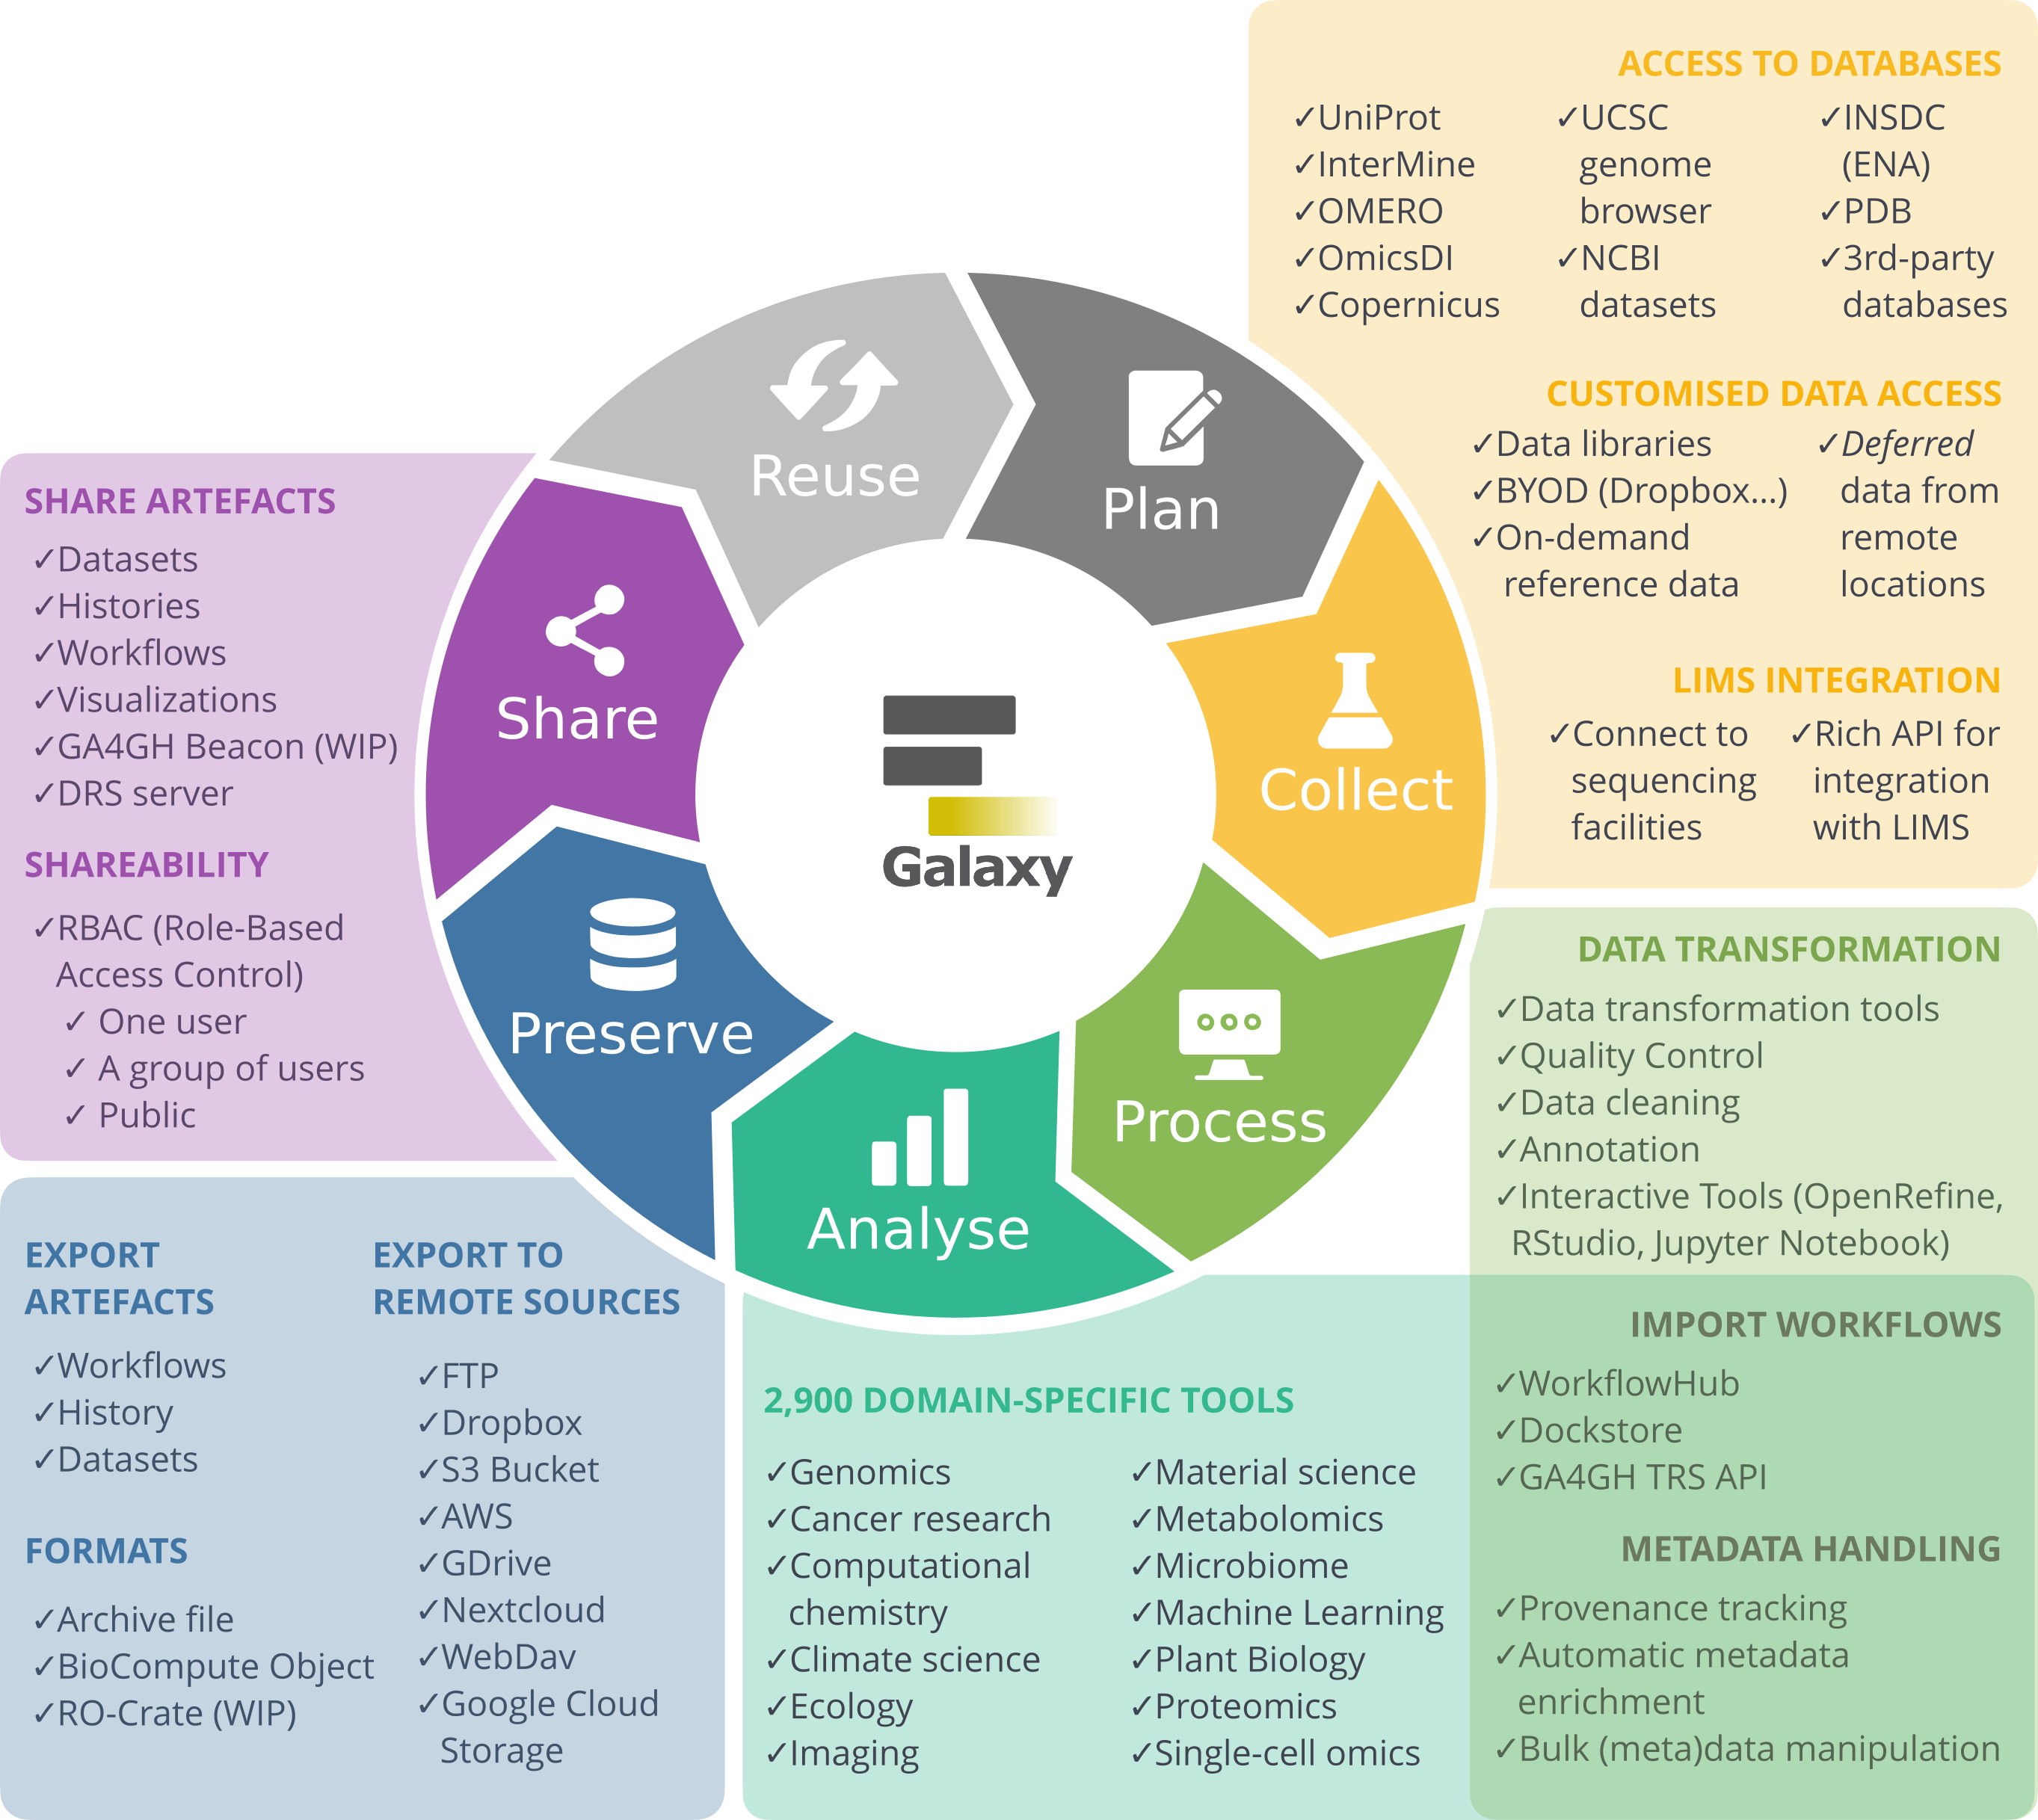
The research life cycle refers to the series of stages through which a research project or study progresses from inception to completion. Although the specifics of the research process vary across disciplines, they share several key phases that help ensure systematic, rigorous research and reliable results. It ranges from planning and designing your study, to collecting, processing, and analysing your data, evaluating results, and finally preserving and sharing your data and findings for reuse by others. As this is an iterative process, it is often referred to as the Research data life cycle.
Good RDM practices are critical to scientific research, to illustrate this in a fun way, have a look at the RDM Scary Tales game (based on the game Black Stories)
Galaxy as part of the RDM Life Cycle
Galaxy supports you in your research throughout the different stages of the life cycle, covering the steps from data collection to data reuse.
Below is a 5-minute video introducing Galaxy as a cross-domain RDM platform.
Scope
In this tutorial, we will take you through all the stages of the Research data life cycle and provide a hands-on introduction to the Galaxy platform at each stage.
The Galaxy Web Interface
Before we go into the stages of the RDM life cycle, let’s start with the basics and log into Galaxy and explore the graphical user interface.
Create an account on a Galaxy instance/server
If you already have an account, skip to the next section!
In Galaxy, server and instance are often used interchangeably. These terms basically mean that different regions have different Galaxy servers/instances, with slightly different tool installations and appearances. If you don’t have a specific server/instance in mind, we recommend registering at one of the main public servers/instances, detailed below.
To create an account at any public Galaxy instance, choose your server from the available list of Galaxy Platforms.
Click on “Login or Register” in the masthead on the server.
On the login page, find the Register here link and click on it.
Fill in the the registration form, then click on Create.
Your account should now get created, but will remain inactive until you verify the email address you provided in the registration form.
Check for a Confirmation Email in the email you used for account creation.
Missing? Check your Trash and Spam folders.
Click on the Email confirmation link to fully activate your account.
galaxy-info Delivery of the confimation email is blocked by your email provider or you mistyped the email address in the registration form?
Please do not register again, but follow the instructions to change the email address registered with your account! The confirmation email will be resent to your new address once you have changed it.
Trouble logging in later? Account email addresses and public names are caSe-sensiTive. Check your activation email for formats.
Depending on your Galaxy server, you may also be able to log in with your institutional or social account.
In the Galaxy login screen, you may find the option to log in with an institutional or other external account. Which options are offered depend on which Galaxy you are using.
What does Galaxy look like?
Hands On: Log in to Galaxy
Open your favourite browser (Chrome, Safari, Edge or Firefox as your browser, not Internet Explorer!)
Browse to your Galaxy instance
Log in or register
To create an account at any public Galaxy instance, choose your server from the available list of Galaxy Platforms.
Click on “Login or Register” in the masthead on the server.
On the login page, find the Register here link and click on it.
Fill in the the registration form, then click on Create.
Your account should now get created, but will remain inactive until you verify the email address you provided in the registration form.
Check for a Confirmation Email in the email you used for account creation.
Missing? Check your Trash and Spam folders.
Click on the Email confirmation link to fully activate your account.
galaxy-info Delivery of the confimation email is blocked by your email provider or you mistyped the email address in the registration form?
Please do not register again, but follow the instructions to change the email address registered with your account! The confirmation email will be resent to your new address once you have changed it.
Trouble logging in later? Account email addresses and public names are caSe-sensiTive. Check your activation email for formats.
Comment: Different Galaxy servers
This is an image of Galaxy Australia, located at usegalaxy.org.au
The particular Galaxy server that you are using may look slightly different and have a different web address.
You can also find more possible Galaxy servers at the top of this tutorial in Available on these Galaxies
The Galaxy homepage is divided into four sections (panels):
The Activity Bar on the left: This is where you will navigate to the resources in Galaxy (Tools, Workflows, Histories, etc.)
Currently active “Activity Panel” on the left: By default, the toolTools activity will be active and its panel will be expanded
Viewing panel in the middle: The main area for context for your analysis
History of analysis and files on the right: Shows your “current” history; i.e.: Where any new files for your analysis will be stored
Now that you are logged in to Galaxy, let’s start!
Collect: Data import
The collect stage in Galaxy usually consists of importing data into what we call your analysis history, this is your Galaxy working environment. Data can be uploaded from from your own machine, from a URL, or imported directly from various general-purpose or domain-specific databases that have been integrated into Galaxy. Before we start our analysis, let’s familiarize ourselves with the Galaxy history system.
The Galaxy History
Your “History” is in the panel at the right. This is where all the files you import or create will be shown. It is also a record of the actions you have taken. Galaxy tracks the provenance of all datasets: which tools, versions, and parameter settings were used to create them. Everything you need to write the methods section of your journal publication.
Before we begin, let’s name our history. It is recommended to create a new history for each analysis that you perform, and giving your histories good names will help keep your analyses organized.
Name your current history
Hands On: Name history
Go to the History panel (on the right)
Click galaxy-pencil (Edit) next to the history name (which by default is “Unnamed history”)
Type in a new name, for example, “Olympics Data Analysis”
Click Save
Comment: Renaming not an option?
If renaming does not work, it is possible you aren’t logged in, so try logging in to Galaxy first. Anonymous users are only permitted to have one history, and they cannot rename it.
Upload a dataset
Comment: Galaxy Data Import Options
There are various ways to get data into Galaxy
Uploading from your computer
Import from URL
Import directly from data repositories, e.g.
SRA/NCBI/EBI/Uniprot (Biological Sequence Data)
OMERO (Image database)
Copernicus (Climate Data)
CERN Open Data (Particle Physics)
many more (See “Get Data” section of the Tool panel in Galaxy)
Bring-your-own-data (e.g. Dropbox, Google Drive, OneData, eLabFTW)
Here, we are going to briefly explain how you can Bring-Your-Own-Data to Galaxy or export your dataset, results, or history to 3rd party repositories. In order to add a new repository to your account follow these steps:
Click on your Username on top right part of the website and then click on Preferences.
From the middle panel, click on the Manage Your Repositories (previously called Manage your remote file sources).
Click on the + Create button on top of the page. Here, you get multiple options to connect various repositories to your account.
For all of the possible repositories, you should fill the following fields:
In the Name section, give a name to your repository. This name will be used to choose the repository on Galaxy for importing or exporting datasets.
Optionally, you can provide a Description for this repository. This is a note for yourself.
Hands-on: Choose Your Own Tutorial
This is a 'Choose Your Own Tutorial' (CYOT) section (also known as 'Choose Your Own Analysis' (CYOA)), where you can select between multiple paths. Click one of the buttons below to select how you want to follow the tutorial
Select the repository you like to add to your Galaxy account.
If you have an Onedata account, you can use this repository to import and/or export your data directly from and to Onedata. The minimal supported Onezone version is 21.02.4. More information on Onedata can be found on Onedata’s website.
There are extensive tutorials for setting up and utilizing of OneData on Galaxy Training Network (GTN). At the moment, we have the following tutorials for Onedata on GTN:
In short, you can connect your Galaxy account to an Onedata repository as follows:
In the Onezone domain field, please fill in the address to your Onezone domain. It could be something like “datahub.egi.eu”.
Using the Writable? option you can decide whether to grant access to Galaxy to export (write) to your Onedata or not.
You should provide an Access Token to Galaxy so it can read (import) and write (export) data to your OneData. Read more on access tokens here. You can limit the access to read-only data access, unless you wish to export data to your repository (write permissions are needed then).
In case you want to disable validation of SSL certificates, you can use Disable tls certificate validation? option. However, we strongly recommend you to not use this option unless you know what your are doing.
Click on Create.
To connect an AWS private bucket to your Galaxy account, you need to submit the following information on the form:
Please fill in the Access Key ID (something like AKIAIOSFODNN7EXAMPLE) and Secret Access Key (similar to wJalrXUtnFEMI/K7MDENG/bPxRfiCYEXAMPLEKEY) in the corresponding fields on the Galaxy interface.
Please enter the URL to your Bucket (for example, https://amzn-s3-demo-bucket.s3.us-west-2.amazonaws.com) in the Bucket section.
Click on Create.
To connect anonymously to an AWS public bucket using your Galaxy account, you need to enter the Bucket address in the Bucket section. For more information about AWS Bucket, please read AWS documentaion. Click on Create.
To setup access to your Azure Blob Storage within the Galaxy, follow the steps:
Provide the name of your Azure Blob Storage account in the Container Name field. More information about container’s name could be found on the Microsoft documentation here.
Fill the Storage Account Name based on your account. More information is available on the Microsoft website.
Using the Hierarchical? option you can determine whether your storage is hierarchical or not. More information on Data Lake Storage namespaces can be found in the Azure Blob Storage documentation.
Please provide the account access key to your Azur Blob Storage account, using Account Key field. This is the documentation on Managing storage account access keys.
If you want to be able to export data to your Azure Blob Storage container, please set Writable? option to “Yes”.
Click on Create.
We recommend to first login to your Dropbox account.
On the Galaxy website, click on the Create button of the Dropbox section. You will be redirected to the Dropbox website for authentication.
You have to login there and grant access for the Galaxy.
Click on Create.
eLabFTW is a free and open source electronic lab notebook from Deltablot. Each lab can either host their own installation or go for Deltablot’s hosted solution. Using Galaxy, you can connect to an eLabFTW instance of your choice.
Provide a URL with the protocol (http or https) and the domain name in the eLabFTW instance endpoint (e.g. https://demo.elabftw.net) field.
If you want to let Galaxy to export data to your eLabFTW, please set the Allow Galaxy to export data to eLabFTW? to “Yes” to grant required access to Galaxy. Keep in mind that your API key must have matching permissions.
You should provide an API Key to your eLabFTW as well. To do so, navigate to the Settings page on your eLabFTW server and go to the API Keys tab to generate a new key. Choose “Read/Write” permissions to enable both importing and exporting data. “Read Only” API keys still work for importing data to Galaxy, but they will cause Galaxy to error out when exporting data to eLabFTW. You will receive a string (similar to 2-50dd721027f56a2e119b3bdbf64f4b8518b3f82b97e7876d56dad74109c8be73d8919b88097d3c9eb8952) and you should enter this in the API Key field of Galaxy interface.
Click on Create.
You can setup connections to FTP and FTPS servers to import and export files as follows:
Provide the address to your FTP server using the FTP Host field.
If you want to login with a specific user, provide the username in the FTP User field. Leave this blank to connect to the server anonymously (if allowed by the server).
If you want to export data to this FTP, you should set the Writable? option to “Yes”.
Please specify the port that Galaxy should use to connect to your FTP server using the FTP Port field.
In the FTP Password field provide the password to connect to the FTP server. Leave this blank to connect to the server anonymously (if allowed by the server).
Click on Create.
We recommend to login to your Google account first.
On the Galaxy website, click on Select button of Export to Google Drive. You will be redirected to the Google.
Pick the account that you want to connect to Galaxy for import and export. Grant the required permissions.
You will be back on the Galaxy portal and you can access your Google Drive for import and export (depending on your how you set up your accuont).
Click on Create.
InvenioRDM is a research data management platform that allows you to store, share, and publish research data. You can connect to an InvenioRDM instance of your choice by following these steps:
Please fill the address to your InvenioRDM in the following field: InvenioRDM instance endpoint (for example, https://inveniordm.web.cern.ch/). This should include the protocol (http or https).
Use the Allow Galaxy to export data to InvenioRDM? option to give permission to Galaxy to export data to your repository or not.
Click on Create.
You should fill Publication Name with a name as the “creator” metadata of the records. This could be a person or an organization. You can later modify this. If left blank, an anonymous user will be used as the creator.
You should also enter your Personal Access Token. You can get this information in your InvenioRDM instance. Navigate to Account Settings. Then, go to Applications to generate a new token. This will allow Galaxy to display your draft records and upload files to them.
Click on Create.
Using WebDAV you can connect various services that supports WebDAV protocol such as OwnCloud and NextCloud among others. The configuration of WebDAV is slightly variable from service to service but the general principles apply everywhere.
Provide the server address to this repository in the Server Domain field.
In the WebDAV server Path, you have to provide the path on this server to WebDAV.
In the Username field, you should write the username you use to login to this server.
You can grant write access for this repository using the Writable? (set to Yes) and therefore make it possible to export datasets, or histories to your connected repository.
Click on Create.
As an example, if I want to connect my nextCloud repository to my Galaxy account, I should login to my nextCloud server and find the information from File settings (bottom left of the page) under the WebDAV section to fill this template. It could be something like: https://server_address.com/remote.php/dav/files/username_or_text. Here, the Server Domain is https://server_address.com and WebDAV server Path is remote.php/dav/files/username_or_text.
In some cases, you may need to activate some features on your ownCloud or nextCloud to allow this integration. For example, some nextCloud servers require the user to use “App Passwords”. This can be done using the Settings > Security > Devices & sessions > Create new app password.
Zenodo is an open-access repository for research data, software, publications, and other digital artifacts. It is developed and maintained by CERN and funded by the European Commission as part of the OpenAIRE project. Zenodo provides a free platform for researchers to share and preserve their work, ensuring long-term access and reproducibility. Zenodo is widely used by researchers, institutions, and organizations to share scientific knowledge and comply with open-access mandates from funding agencies.
Using the Allow Galaxy to export data to Zenodo?, you can decide whether you like to give write access to Galaxy or not. Set it to “Yes” if you want to export data from Galaxy to Zenodo, set it to “No” if you only need to import data from Zenodo to Galaxy.
Provide a name for the “creator” metadata of your records on Zenodo using the Publication Name field. You can always change this value later by editing the records in Zenodo. If left blank, an anonymous user will be used as the creator.
You have to provide a Personal Access Token from your Zenodo account to Galaxy. To do so, you need to log into your account. Then, visit this site: https://zenodo.org/account/settings/applications/. Alternatively, you can click on your username on top right and then click on “Applications”. Here, you need to create a “Personal Access Token”. This will allow Galaxy to display your draft records and upload files to them. If you enabled the option to export data from Galaxy to Zenodo, make sure to enable the deposit:write scope when creating the token.
Click on Create.
Importing data to your Galaxy account
When you connect a repository to your Galaxy account, you can use it to import data to Galaxy. To do so, you can click on the Upload Icon on the left panel. In the poped up window, you can click on Choose from repository to select a repository that you have added to your account. Navigate to a file that you want to upload to your Galaxy account, check the box of the file, and click on Select. You can determine the format of the file, give it a name, and then click on Start to upload the file to your Galaxy account.
Exporting histories, datasets, and results to connected repositories
If you have given Galaxy the permission to write to your repository, you can export your histories, datasets and reulsts in the history to that repository.
Histories
If you want to export a history, you should click on the History Options icon (galaxy-history-options) on the right panel. Then, you can click on Export History to File. Next, you can click on to repository on the middle panel. If you click on the Click to select directory, there will be a pop up window. Here, you can pick a repository that you have added to your account and when you are in that repository, click on Select. You can give a Name to your exported history, so you can find it easier in your connected repository. Finally, click on Export to write the history to your repository. Similarly, you can use to RDM repository or to Zenodo instead of the to repository option in the middle panel to export your history to connected RDM repositories or Zenodo.
To have more options on exporting your history, you can click on Show advanced export options on top of the middle panel. This provides further control over the format and datasets that will be included in your exported history.
Datasets
If you are interested to export a single dataset or results to a connected repository, you can use a tool called Export datasets.
Select the desired option from What would you like to export?.
Using the Directory URI option, you can Select a connected repository. You can also give it a directory name here.
We recommend to export the metadata with your datasets and results using the Include metadata files in export?.
Connections to your LIMS system
This section will guide you through generating external links to your data stored in the Sierra LIMS system to be downloaded directly into Galaxy.
Click on the Sample ID of the sample you want to download data from.
Click on the Edit Sample Details button.
At the bottom of the page there will be an input box for creating a link, enter a description for the link in the Reason for link section, and click Create link. This will reload the page and add a new link to the sample under Authorised links to this sample.
Go back to the sample page or click on the hyperlink called link to take you back.
In the Results section select the lane you want to access your data from.
The bottom of the page, under the Links section, will now contain a list of wget commands with links for accessing all the files within that sample/lane.
Since this list is for wget commands, you need to extract out the links from the command. You can copy the link in the first set of double quotes for each line and galaxy-wf-editPaste/Fetch Data them directly into Galaxy to download the files.
For this tutorial, we will import datasets from the general-purpose FAIR data repository Zenodo.
Hands On: Upload a file from URL
At the top of the Activity Bar, click the galaxy-uploadUpload activity
Your uploaded file is now in your current history.
When the file has been uploaded to Galaxy, it will turn green.
Comment
After this, you will see your first history item (called a “dataset”) in Galaxy’s right panel. It will go through
the grey (preparing/queued) and yellow (running) states to become green (success).
What is this file?
Hands On: View the dataset content
Click the galaxy-eye (eye) icon next to the dataset name, to look at the file content
The contents of the file will be displayed in the central Galaxy panel. If the dataset is large, you will see a warning message which explains that only the first megabyte is shown.
This file contains a table listing all athletes who competed in the 2010 Winter Olympics in Oslo.
Figure 1: Preview of the dataset in Galaxy. Each row corresponds to an athlete, and each column provides further information about this athlete, including birth year, weight, and medals.
Question: Explore the dataset
How many athletes participated in these Olympics?
What was the location of these Olympic Games?
4402 athletes. Each row signifies an athlete; there are 4403 rows, one of which is the header row.
Vancouver. This information is given in column 12.
Dataset attributes (metadata)
Let’s have a look at the metadata that Galaxy tracks for your datasets.
Hands On: Explore metadata
Expand the item in your history by clicking on its name
Here you will see a peek of the contents, some basic file attributes such as the format, number of lines, and number of columns
Click on the “Dataset Details”details button
Here you can see further metadata such as file size, creation date, hash, format, original URL, and more
Scrolling down, you will also see details of the upload job that performed the import. We will look more closely at this later.
Rename the file to include the city of the Olympics. You can do this by editing the dataset attributes
This can be done by clicking on the Edit tab at the top of your screen, or the pencil icon galaxy-pencil on the expanded dataset.
For example, rename it to 2010 Winter Olympics Vancouver
Click on the galaxy-pencilpencil icon for the dataset to edit its attributes
In the central panel, change the Name field
Click the Save button
Process: Data preparation and QC
The process phase of the research life cycle involves preparing your data for analysis. This includes steps such as data cleaning, data transformation, and quality control.
Galaxy offers many tools that can help prepare your data for analysis, such as format conversions and data manipulation tools.
Use a tool
Recall that our research question in this tutorial is “What is the age distribution of Olympic athletes?”
Looking at the dataset, you will see that we do not have an “age” column in our table. We do, however, have a column with the birth year
of each athlete, and a column containing the year of the Olympics. Let’s prepare our data for analysis by calculating a new age column
based on these two existing columns.
Hands On: Find a tool
Search for the tool Compute - on rows ( Galaxy version 2.1)
Click on Toolstool in the Activity bar on the left
Enter “Compute” in the search bar
Open the tool by clicking on it
You will see the tool form in the center panel of Galaxy
Scroll down to the Help section and read about the tool
Here you will always find usage information about the tool, including citations and links to tutorials describing the tool.
How could we use this tool to add an age column to our dataset?
We can use this tool to compute an age column for our dataset, but first, we must ask ourselves some questions:
Question: Explore the dataset
Which column contains the birth year information
Which column contains the year of the Olympics?
How can we compute the age of the athlete from these columns?
column 4 (c4)
column 10 (c10)
we subtract the columns, c10-c4
We now have what we need to add an age column to our dataset, let’s do it:
Hands On: Use a tool
Compute - on a row ( Galaxy version 2.1) with the following parameters
param-file“Input file”: 2010 Winter Olympics Vancouver
“Input has a header line with column names?”: Yes
“Expressions”
plus Insert Expressions
“Add expression”: c10-c4
“Mode of the operation”: Append
“The new column name”: age
Runworkflow-run the tool
This tool will run, and a new output dataset will appear at the top of your history panel.
Hands On: Check the results
Viewgalaxy-eye the resulting file
make sure the new column was successfully added, and the column header is “age”
Question:
What column number is our new “age” column?
What age is the first Olympian in our file, Muhammad Abbas?
The column was added at the end, column 16.
Age 23.
Tools are frequently updated to new versions. Your Galaxy may have multiple versions of the same tool available. By default, you will be shown the latest version of the tool. This may NOT be the same tool used in the tutorial you are accessing. Furthermore, if you use a newer tool in one step, and try using an older tool in the next step… this may fail! To ensure you use the same tool versions of a given tutorial, use the Tutorial mode feature.
Open your Galaxy server
Click on the curriculum icon on the top menu, this will open the GTN inside Galaxy.
Navigate to your tutorial
Tool names in tutorials will be blue buttons that open the correct tool for you
Note: this does not work for all tutorials (yet)
You can click anywhere in the grey-ed out area outside of the tutorial box to return back to the Galaxy analytical interface
Warning: Not all browsers work!
We’ve had some issues with Tutorial mode on Safari for Mac users.
Try a different browser if you aren’t seeing the button.
Tool provenance
We already examined the attributes for the file we uploaded. For datasets that result from running tools, Galaxy tracks even more provenance.
Let’s look at this now.
Hands On: Explore metadata
Expand the item in your history by clicking on its name
Click on the “Dataset Details”details button
Here you will see all the metadata that Galaxy keeps track of. It has all the same basic information as we saw with the uploaded file.
In addition, it shows which tool produced this output, complete with exact parameter settings and tool version.
Figure 4: Parameters of the job (tool run) that produced this datasetOpen image in new tab
Figure 5: Job information of our tool run.
Question: Examine the Job metadata
What was the version of the tool that produced your dataset?
What was the command that was run behind the scenes?
Version 2.1. This can be found under “Job Information -> Galaxy Tool ID”, where the last part is the version. E.g. toolshed.g2.bx.psu.edu/repos/devteam/column_maker/Add_a_column1/2.1. Note that this may be different for you if a newer version has been released since writing this tutorial.
The command that is run can be found under “Job Information -> Command Line”. It will be something like:
Figure 6: screenshot of the resulting boxplot. Hovering your mouse over the plot shows you the labels
Question
What age range were our athletes?
Based on the box plot, it looks like our youngest athlete was 15, and our oldest was 51. The mean age was 25.
Click on the Savecloud-upload icon at the top-right
In the Activity bar, click on Visualization
Click on Saved Visualizations at the top of the panel
Here you will find your saved visualisations
Here you can view, adjust, and rename your previously saved visualisaions
Re-run a tool
Our file only contained information for a single Olympics, let’s have a look at a second Olympics as well.
We will import another file from Zenodo, but in a slightly different way. Instead of providing the download URL for the dataset, we can also browse Zenodo repositories (and many other data repositories) directly from the Galaxy upload menu.
Hands On: Upload a second dataset
Option 1: Choose from Repository
Open the Upload window
At the bottom, click on “Choose from Repository”
Search for “Zenodo” at the top
If you do not find anything, this is not supported on your Galaxy yet, please skip to option 2 below
Search for the repository with the same name as this tutorial “Introduction to Galaxy as an RDM platform”
Click galaxy-uploadUpload at the top of the activity panel
Select galaxy-wf-editPaste/Fetch Data
Paste the link(s) into the text field
Press Start
Close the window
Question: Examine the file
Which Olympics is this file for? Which city was it held in?
This file is from the 2008 Summer Olympics in Beijing.
Now that we have a second dataset, we want to run the same Computetool tool on this data so that we get an age column.
We could open the tool again and reconfigure all the settings, but there is an easier way to repeat what we did before.
Hands On: Re-run a tool
Click the Re-rundataset-rerun button on the output from the Compute tool
You will see the tool form with the exact same settings we used before
Because Galaxy tracks all the parameter settings, it is easy to repeat a tool on new data, without having to choose all the parameters again.
Change the input datasetparam-file to the summer olympics file we just uploaded
Runworkflow-run the tool
Question: How did it go?
What do you see?
If all went well, something went wrong in this step. That is, your dataset turned red instead of green. Not to worry, we will show you how to troubleshoot errors next.
Oh no! The dataset turned red! This means something went wrong. In the next section, we will show you how you can troubleshoot errors in Galaxy.
Troubleshooting errors
So something went wrong with one of your tools. This will happen now and then, and can have different causes. It might be something you can fix yourself (e.g. a problem with the input dataset), or it might be something that needs to be fixed in Galaxy (e.g. a bug in the tool). Next, we will see how you can find more information about the error and submit a bug report if you think it might be a problem with the tool.
Hands On: Troubleshoot a failed tool
Click on the bug icongalaxy-bug on the failed (red) dataset
You will now see details about the error in the center panel:
Figure 7: the error tab of the dataset details page. This page shows us the error message (stderr) and other tool logs (stdout). It also has a form to submit a bug report at the bottom.
The error messages can sometimes be a bit cryptic, but the more you use the tools, the easier it will get. If you do not know how to fix the error yourself, you can submit a bug report at the bottom of this page. This will be sent to the administrators of the Galaxy you are using.
Question: Examine the Error message
Can you guess what went wrong based on the error message?
Is this something we can fix? How?
The error message says could not convert string to float: 'NA'. This suggests there is a line in the input file that contains an unexpected value (NA). This is a common way to denote a missing value, but if we assume this column to be a number and use it in our calculation
things can go wrong.
Failed to convert some of the columns in line #1859 to their expected types.
The error was: "could not convert string to float: 'NA'" for the line:
"19504	Cha Yong-Hwa	F	NA	145	39	North Korea	PRK	2008 Summer	2008
 Summer	Beijing	Gymnastics	Gymnastics Women's Individual All-Around	NA"
Apparently, no birth year was known for this athlete from North Korea
Yes, since the problem is with our input file, this is something we can fix ourselves.
One solution could be to remove all lines that contain NA in the birth year column.
Another would be to replace all NA values with nan (not a number), which is the appropriate way to indicate missing values in numeric columns
In our case, there is an easier option: we can tell the Computetool tool how to deal with such cases.
The error is caused because Galaxy is trying to interpret the birthyear column as a number, but it cannot do this for columns
containing an “NA” (Not Available) value.
So now that we know what caused the error, let’s fix it by re-running our tool once more, with different error-handling settings.
We can tell the Computetool tool to stop autodetecting the column type, and instruct it what
to do with “NA” values.
Hands On: Re-run the tool with error handling parameters
Re-rundataset-rerun the failed (red) dataset
Expand the Error Handling section at the bottom of the tool form
param-toggle“Autodetect column types”: No
“If an expression cannot be computed for a row”: Skip the row
Change the “Expression” parameter to: int(c10)-int(c4)
the int() part tells the tool to turn the value into an integer (whole number). Since we told the tool not to autodetect anymore, we need to tell it how to interpret the values in the column.
Question:
What age is the first Olympian in this file, Ragnhild Margrethe Aamodt?
Age 27. The age column is the last one.
If this solution seemed a bit cryptic, don’t worry too much; there are always multiple ways to solve the problem. The important thing is that you ran into a problem, looked at the error, and then solved it.
If you get an error message that you don’t understand or don’t know how to solve, you can always ask for help in one of our support channels.
If you need support for using Galaxy, running your analysis or completing a tutorial, please try one of the following options:
Galaxy Help Forum: You can also have a look at the Galaxy Help Forum. Your question may already have been answered here before. If not, you can post your question here.
Since Galaxy has so many tools to choose from, once you find one that is useful for you, you will likely want to use it more often.
To make it easier to find your favourite tools, you can star them.
Hands On: Star/Favourite a tool
Stargalaxy-star the Computetool tool
Galaxy servers can have a lot of tools available, which can make it challenging to find the tool you are looking for. To help find your favourite tools, you can:
Keep a list of your favourite tools to find them back easily later.
Adding tools to your favourites
Open a tool
Click on the star icongalaxy-star next to the tool name to add it to your favourites
Viewing your favourite tools
Click on the star icongalaxy-star at the top of the Galaxy tool panel (above the tool search bar)
This will filter the toolbox to show all your starred tools
Change the tool panel view
Click on the galaxy-panelview icon at the top of the Galaxy tool panel (above the tool search bar)
Here you can view the tools by EDAM ontology terms
EDAM Topics (e.g. biology, ecology)
EDAM Operations (e.g. quality control, variant analysis)
You can always get back to the default view by choosing “Full Tool Panel”
You can access your favourite tools by clicking on the galaxy-star icon at the top of the Tool Panel
this will filter the tool panel for the tools you have starred and your most-used tools
Keeping your history clean
If you have failed items in your history, you might want to delete them. This helps keep your history organized.
Hands On: Delete failed dataset
Click on the trashcan icongalaxy-delete on the failed (red) dataset
Did you accidentally delete a dataset you didn’t mean to delete? Not to worry, your data is not gone yet.
You can show these deleted datasets in your history, and undelete them.
Click on include deletedgalaxy-delete at the top of your history
so not on the dataset, but at the top of the history panel
you will see the deleted dataset appear in your history again
- if you expand the deleted dataset, the delete icon has turned into an undelete icon
Your dataset is now gone from your history. But deleting it does not remove it completely yet. So if you delete something by accident, you can still view it and undelete it.
You can also delete datasets in bulk:
Deleting datasets individually
To delete datasets individually simply click the galaxy-delete button with dataset’s box. That’s it! This action is reversible: datasets can be undeleted.
Deleting datasets in bulk
To delete multiple datasets at once:
Click history-select-multiple icon at the top of the history pane;
Select datasets you want to delete;
Click the dropdown that would appear at the top of the history;
Select “Delete” option.
This action is also reversible: datasets can be undeleted.
Deleting datasets permanentlywarningDanger zone!
Warning: Permanent is ... PERMANENT!
Datasets deleted in this fashion CANNOT be undeleted!
To delete multiple datasets PERMANENTLY:
Click history-select-multiple icon at the top of the history pane;
Select datasets you want to delete;
Click the dropdown that would appear at the top of the history;
Select “Delete (permanently)” option.
Storage Quota
Sometimes you really want to permanently delete a dataset, for example, to free up your storage quota. By default, you get 250 GB storage (exact number may depend on your Galaxy instance), and more can usually be requested on a temporary basis. If you are running out of storage space, you can purge (permanently delete) datasets as well. This cannot be undone.
All account Datasets can be reviewed under User > Datasets.
To permanently delete: use the link from within the dataset, or use the Operations on Multiple Datasets functions, or use the Purge Deleted Datasets option in the History menu.
Notes:
Within a History, deleted/permanently deleted Datasets can be reviewed by toggling the deleted link at the top of the History panel, found immediately under the History name.
Both active (shown by default) and hidden (the other toggle link, next to the deleted link) datasets can be reviewed the same way.
Click on the far right “X” to delete a dataset.
Datasets in a deleted state are still part of your quota usage.
Datasets must be purged (permanently deleted) to not count toward quota.
Download Datasets as individual files or entire Histories as an archive. Then purge them from the public server.
Transfer/MoveDatasets or Histories to another Galaxy server, including your own Galaxy. Then purge.
Copy your most important Datasets into a new/other History (inputs, results), then purge the original full History.
Extract a Workflow from the History, then purge it.
Back-up your work. It is a best practice to download an archive of your FULL original Histories periodically, even those still in use, as a backup.
Resources Much discussion about all of the above options can be found at the Galaxy Help forum.
We recommend always keeping your history clean and deleting any failed steps.
Further learning about data preprocessing in Galaxy
Galaxy offers a wide range of basic file manipulation tools that are very helpful for data cleaning.
Operations such as file transformations, filtering, sorting, grouping, joining, splitting, etc., are all possible inside Galaxy.
Galaxy also offers various Interactive Tools. For example, we could have performed this preprocessing with OpenRefine as well.
Or if we know a bit of programming in R or Python, we could have done these steps using RStudio or Jupyter Notebooks.
All of these have been integrated into Galaxy as Interactive Tools.
Using these interactive tools is not quite as reproducible as using standard Galaxy tools, but it is great for the exploratory analysis phase of research, especially if you are already familiar with these tools.
In this optional section, we will show you how to use such an interactive tool. Here we will use OpenRefine, a powerful free, open source tool for working with messy data: cleaning it, transforming it from one format into another. We will use OpenRefine to perform the same task of adding an age column to our dataset.
Hands On: Launch OpenRefine
Click on Interactive Tools in the Activity Bar
Search for OpenRefine
You will see a tool form where you can select files to open
“Input file in tabular format”: 2010 Winter Olympics Vancouver
Runworkflow-run the tool
Click on Interactive Tools in the Activity Bar again
It may take a little time to start
Once it has started, click on the name to open it
Clicking on the external-link icon will open it in a new tab
Click on Open Project on the left panel of OpenRefine
Click on Galaxy File
You will see our Olympics dataset loaded in OpenRefine:
Next, let’s create the same age column in OpenRefine as we did earlier with regular tools.
Hands On: Edit dataset in OpenRefine
First, we tell OpenRefine to interpret the birthyear column as a number
Click on the dropdown dropdown icon next to the birthyear column name
birthyear dropdown –> Edit Cells –> Common Transforms –> To number
The values in the column turned green
Click on column birthyear dropdown –> Edit Column –> Add column based on this column
Fill in the form
“New column name”: age
“Expression”: 2010-value
You should now see a new column named “age”
Now that we have transformed our dataset as needed, we want to export this table back to our Galaxy history so that we can continue working on it.
Hands On: Save OpenRefine dataset to Galaxy History
Click on the Export button in the top-right corner of OpenRefine
Select Galaxy Exporter from the dropdown
You will get a message that your dataset has been exported to Galaxy
Check your history and view the exported file
You can now stopstop your Interactive tool again
Go to Interactive Tools on the Activity Bar on the left
Click on the stop button stop next to OpenRefine
Interactive tools can be a powerful addition to your Galaxy analysis.
If you are interested in using R or Python programming in Galaxy, we recommend
you have a look at the Foundations of Data Science topic in
GTN for comprehensive tutorials.
Scaling up
Now that we have preprocessed our data, we can continue our analysis, but before we do that, let’s explore some more
Galaxy RDM features that can help you manage your research data and analyses.
Multiple histories
You can have multiple histories in Galaxy to organize your different analyses. We will now start a second history,
and show you how you can switch between histories and move data from one history to another.
Hands On: Create a second History
Create a new History
To create a new history simply click the new-history icon at the top of the history panel:
Namegalaxy-pencil your history
call it Multi-Olympics Data Analysis
You have now created a new, empty history.
To avoid re-uploading our Olympics dataset and duplicating that data, we can simply copy the files from our previous history
Hands On: Copy datasets from another history
View your histories side by side. Instructions are in the tip box below:
You can view multiple Galaxy histories at once. This allows to better understand your analyses and also makes it possible to drag datasets between histories. This is called “History multiview”. The multiview can be enabled either view History menu or via the Activity Bar:
Option 1: Enabling Multiview via History menu is done by first clicking on the galaxy-history-options “History options” drop-down and selecting galaxy-multihistory “Show Histories Side-by-Side option”:
Option 2: Clicking the galaxy-multihistory “History Multiview” button within the Activity Bar:
Drag-and-drop datasets between histories
drag the Winter Olympics file to the new history
do the same for the Summer Olympics file
We now have both our datasets in our new history. By doing it this way, rather than re-uploading the files, we do not increase our storage usage.
Comment: The Galaxy History System
Galaxy allows you to have as many histories as you like. Some tips and tricks for using histories:
Use a different history for each analysis
Always give your histories a good name. This makes it easy to find your histories later.
You can easily switch back and forth between histories as needed
To switch to an existing history simply click the switch-histories icon at the top of the history panel. This opens a list of histories existing in a given Galaxy account in the middle part of the interface.
And you can search your histories
To review all histories in your account, go to Historiesgalaxy-histories-activity in the Activity Bar (on the left).
There you will find 4 tabs with histories:
My Histories
Historires Shared with Me
Public Histories
Archived Histories
At the top of each tab is a search bar
Click Advanced Searchgalaxy-advanced-search at the right of the search bar for more search options
Searching by taggalaxy-tags
Filtering by state (e.g. published, deleted, purged)
Histories in all states are listed for registered accounts. Meaning one will always find their data here if it ever appears to be “lost”.
Note: Permanently deleted (purged) Histories may be fully removed from the server at any time. The data content inside the History is always removed at the time of purging (by a double-confirmed user action), but the purged History artifact may still be in the listing. Purged data content cannot be restored, even by an administrator.
We will continue our analysis in this second history and use collections and dataset tags to analyze multiple datasets simultaneously,
and keeping our data organized.
Warning: Proceed with the correct history
Important! We will now continue the rest of this tutorial in this new history (named Multi-Olympics Data Analysis)
If this is not your active history, please switch to it now (see the box below for instructions)
To switch to an existing history simply click the switch-histories icon at the top of the history panel. This opens a list of histories existing in a given Galaxy account in the middle part of the interface.
Your history should contain two datasets, and look something like this:
Dataset tags
You may have noticed in our first history that the results from the Computetool tool were named Compute on dataset 1 and Compute on dataset 3. To make it a bit clearer for ourselves which dataset was generated from which input file, we can add dataset tagsgalaxy-tags
Hands On: Add dataset tags
Add two dataset tagsgalaxy-tags to the Winter Olympics file
Make sure all tags start with a hashtag (#), then they will also be added to any datasets derived from it during analysis.
tag 1: #winter
tag 2: #Vancouver
tag 3: #2010
Datasets can be tagged. This simplifies the tracking of datasets across the Galaxy interface. Tags can contain any combination of letters or numbers but cannot contain spaces.
To tag a dataset:
Click on the dataset to expand it
Click on Add Tagsgalaxy-tags
Add tag text. Tags starting with # will be automatically propagated to the outputs of tools using this dataset (see below).
Press Enter
Check that the tag appears below the dataset name
Tags beginning with # are special!
They are called Name tags. The unique feature of these tags is that they propagate: if a dataset is labelled with a name tag, all derivatives (children) of this dataset will automatically inherit this tag (see below). The figure below explains why this is so useful. Consider the following analysis (numbers in parenthesis correspond to dataset numbers in the figure below):
a set of forward and reverse reads (datasets 1 and 2) is mapped against a reference using Bowtie2 generating dataset 3;
dataset 3 is used to calculate read coverage using BedTools Genome Coverageseparately for + and - strands. This generates two datasets (4 and 5 for plus and minus, respectively);
datasets 4 and 5 are used as inputs to Macs2 broadCall datasets generating datasets 6 and 8;
datasets 6 and 8 are intersected with coordinates of genes (dataset 9) using BedTools Intersect generating datasets 10 and 11.
Now consider that this analysis is done without name tags. This is shown on the left side of the figure. It is hard to trace which datasets contain “plus” data versus “minus” data. For example, does dataset 10 contain “plus” data or “minus” data? Probably “minus” but are you sure? In the case of a small history like the one shown here, it is possible to trace this manually but as the size of a history grows it will become very challenging.
The right side of the figure shows exactly the same analysis, but using name tags. When the analysis was conducted datasets 4 and 5 were tagged with #plus and #minus, respectively. When they were used as inputs to Macs2 resulting datasets 6 and 8 automatically inherited them and so on… As a result it is straightforward to trace both branches (plus and minus) of this analysis.
In order to easily run analysis on multiple datasets at once, we can create dataset collections in Galaxy:
Hands On: Create a collection
Create a collectionparam-collection out of our two Olympic datasets:
Click on Select Itemsparam-check (checkbox icon) at top-left of the history panel
Check the box in front of both our datasets
At the top, click on All 2 Selecteddropdown
Choose the option Auto Build List
Name your Collection
for example “Olympics Dataset”
Click Build
Click on galaxy-selectorSelect Items at the top of the history panel (letter a)
Check all the datasets in your history you would like to include (letter b)
Click n of N selected (see letter b below) and choose Auto build List
Enter a name for your collection (letter c)
Turn off Remove file extension (letter d)
Click Build to build your collection (letter e)
Click on the checkmark icon at the top of your history again (first letter a)
Once the collection is created, all files turn green. You can limit visible files using the eye icons in the history panel.
Your history now has a single item in it
It tells you what is inside “a list with 2 tabular datasets”
Click on the collection to see the files inside it
Return to the regular history view by clicking the link at the top of the history panel
The link will be called something like “« History: Multi-Olympics Data Analysis”
We can now treat this collection the same way as a single dataset. If we use a collection as input to a tool, that tool will be run multiple times, once on each of the datasets inside the collection.
The output of the tool will again be a collection, this time with all the result files.
Run a tool on a collection
Now that we have set up our inputs as a collection with tags, let’s see how to run the Computetool tool on both datasets in the collection at once.
Remember that you starred galaxy-star the compute tool, so you can use that to easily find it again now!
Hands On: Run a tool on a collection
Compute - on rows ( Galaxy version 2.1) with the following parameters
In front of this parameter, click on the param-collection icon to switch to collection input
“Input has a header line with column names?”: Yes
“Expressions”
plus Insert Expressions
“Add expression”: int(c10)-int(c4)
“Mode of the operation”: Append
“The new column name”: age
Expand the Error Handling section at the bottom of the tool form
param-toggle“Autodetect column types”: No
“If an expression cannot be computed for a row”: Skip the row
Click on param-collectionDataset collection in front of the input parameter you want to supply the collection to.
Select the collection you want to use from the list
Viewgalaxy-eye the results
Question: What is our output?
How many outputs were created? Are the files the same as before?
What happened with the tags?
One output collection was created, with two files inside. The files themselves are the same as before.
The tags from our input datasets were also added to the results
Collections allow you to easily run tools on multiple datasets at once. We have 2 datasets in our collection, but you can have as many as
you like, even hundreds or thousands.
Now that we have everything in Galaxy set up for analysis, and our data pre-processed to the right format, we can start to
answer our research question, “What is the age distribution of Olympic athletes?”.
Analyse: Calculate results
The Analyse phase of the research life cycle is where you extract knowledge from your data in order to answer your research questions.
The details of this phase vary greatly depending on your domain, but Galaxy is a cross-domain platform and has a wide range of analysis
tools available for any scientific domain.
Comment: Domain-specific analysis tools
Because this is an intro tutorial, our “analysis” will be quite basic. But Galaxy offers thousands of tools covering
a wide range of scientific domains. From life sciences to ecology, climate, astronomy, digital humanities, and many more.
Galaxy has a lot of computational power behind it, so whether you need a simple calculation or a complex algorithm requiring a supercomputer,
Galaxy can handle it.
If you are interested in a specific domain, have a look at the following resources:
Recall that our research question in this tutorial is “What is the age distribution of Olympic athletes?”
Question: What to do?
How would you approach answering our research question?
Can you find tools in Galaxy that might help you do this?
There are several things we might like to compute in order to answer our question, perhaps
What is the average age of our Olympians?
What is the standard deviation?
What ages are the oldest and youngest Olympians?
What does the histogram look like for the age distribution?
Create a boxplot for the age distribution
If you already know the name of the tool you want to use, you can simply enter this in the search bar. But often you might not know the name of the tool, then just search for some related keywords
Which of these two Olympics game had the youngest contestants on average?
What was the age of the oldest contestant in each Olympics?
The 2008 Summer Olympics. Compare the mean of each output. For the 2010 Winter Games, this was 26.1243, and for the 2008 Summer Games, it was 25.7341
The value of the 100th percentile indicates the highest value encountered. For 2008, this was 67 years, for 2010, it was 51.
This is great, we know some summary statistics for the age distribution of the Olympics. Let’s see if we can also create a visual representation.
Create a histogram
A picture is worth a 1000 words, so let’s see if we can plot the age distribution as well.
We already created a boxplot before; let’s try a histogram this time. We will also use a tool rather than a Galaxy visualisation,
so that we get an output file with the plot in our history.
The tool we are going to use for this is Histogram with ggplot2tool. This tool will plot every compatible column in the
input dataset. Since we are only interested in the age column, we will extract this column first, and then plot it.
Hands On: Create a Histogram Plot
Remove columns - by heading ( Galaxy version 1.0) with the following parameters:
param-collection“Tabular file”: output from Computetool (remember to switch to collectionparam-collection input again)
“Header name”: age
param-toggle“Keep named columns”: Yes
Click on Run
Viewgalaxy-eye the outputs
Make sure the output is as expected
You should have a collection with two files
Each file should contain only 1 column, the age column
Histogram with ggplot2 ( Galaxy version 3.5.1+galaxy1) with the following parameters:
“Input”: The output from Remove columnstool (This is a collection inputparam-collection)
“Plot title”: enter a good title, e.g. Age distribution of athletes
“Label for x axis”: Age
“Label for y axis”: Count
“Bin width for plotting”: 1
Viewgalaxy-eye the resulting plots side by side using the Window Managergalaxy-scratchbook
If you would like to view two or more datasets at once, you can use the Window Manager feature in Galaxy:
Click on the Window Manager icon galaxy-scratchbook on the top menu bar.
You should see a little checkmark on the icon now
Viewgalaxy-eye a dataset by clicking on the eye icon galaxy-eye to view the output
You should see the output in a window overlayed over Galaxy
You can resize this window by dragging the bottom-right corner
Viewgalaxy-eye a second dataset from your history
You should now see a second window with the new dataset
This makes it easier to compare the two outputs
Repeat this for as many files as you would like to compare
You can turn off the Window Managergalaxy-scratchbook by clicking on the icon again
The Window Manager is an easy way to quickly compare two datasets.
But this doesn’t scale to a large number of datasets. So, as the final step of our analysis, let’s create a montage of our histograms.
Hands On: Create a montage of plots
Image Montage - with ImageMagick ( Galaxy version 7.1.2-2+galaxy1) with the following parameters
param-collection“Image”: Output from Histogramtool
”# of images wide”: 2
“Add a Title to the image”: Age distribution of athletes in Olympic Games
“Add the name of the files as image labels.”: Yes
“Point size of the labels and/or title”: 60
Awesome, we now have a pretty good answer to our question. We have some basic summary statistics for each Olympics, and a montage of histogram plots.
Next, we would like to repeat all this for all Olympic games.
Note that we chose a 2-image-wide montage because we only had 2, but when we run it on more datasets at once, we might want to change this. We will do this later.
Extract workflow from our history
To make it easy to repeat this entire analysis without a lot of clicking, we will create a workflow based on our analysis history.
Hands On: Extract workflow from history
Clean up your history
Remove any failed (red) jobs from your history by clicking the galaxy-delete button.
This will make creating the workflow easier.
Click galaxy-history-options (History options) at the top of your history panel and select Extract workflow.
The central panel will show the content of the history in reverse order (oldest on top), and you will be able to choose which steps to include in the workflow.
Replace the Workflow name with something more descriptive, for example: Olympic Age distribution.
Here you can also uncheck any steps you forgot to delete when you cleaned up your history
Click the Create Workflow button near the top.
You will get a message that the workflow was created.
Next, let’s view our workflow in the workflow editor
Hands On: View the workflow in the editor
Click galaxy-workflows-activityWorkflows in the Activity bar.
Here you have a list of all your workflows (the My Workflows tab is active by default).
You can see all available actions for the workflow on the workflow card, e.g. copy, download, share, edit and run
Click the galaxy-wf-edit (Edit) button on the bottom right of the workflow card.
Play around with the editor
You can move boxes around
You can add tools and make connections between tools
You can click on a tool and change parameters
We will only make 1 change: since we will have many more histograms, let’s make the montage image 4 plots wide
Click on the Montage tool
A panel with the tool’s configuration will open on the right.
Change the value for ”# of images wide” to 4.
Savedataset-save the workflow via the dataset-save icon at the top right.
Exit the editor by clicking on the Home button (Galaxy logo) at the left of the top menu bar.
Next, we will run this workflow on all Olympic games.
If your workflow looks very different than the one pictured above, it may be that you missed a step
or continued in the wrong history. This is ok and won’t affect the rest of the tutorial too much
(though you may have to make some adjustments in the next step where we run the workflow)
If you would like to see the workflow as intended, you can follow the steps below to import the example workflow
to your account so you can start using it:
Hands On: Importing the example workflow for this tutorial
Every tutorial in the GTN has a workflow, you can always find the link to this in the overview box at the start of a tutorial
Click on Olympic Age Distribution
You should see the following page
Click the “Run Workflow in Galaxy button at the top of the page
Select your Galaxy from the dropdown
Click on Import workflow
You will now see this workflow under Workflowsgalaxy-workflows-activity in the Activity Bar
Run workflow on all Olympics
First, we will create a new history and upload our data.
Hands On: New history
Create a new history
To create a new history simply click the new-history icon at the top of the history panel:
Renamegalaxy-pencil your history, e.g. “All Olympics”
Click on galaxy-pencil (Edit) next to the history name (which by default is “Unnamed history”)
Type the new name
Click on Save
To cancel renaming, click the galaxy-undo “Cancel” button
If you do not have the galaxy-pencil (Edit) next to the history name (which can be the case if you are using an older version of Galaxy) do the following:
Click on Unnamed history (or the current name of the history) (Click to rename history) at the top of your history panel
Type the new name
Press Enter
Upload the zip file with all Olympic datasets from Zenodo
Click galaxy-uploadUpload at the top of the activity panel
Select galaxy-wf-editPaste/Fetch Data
Paste the link(s) into the text field
Press Start
Close the window
Unzip - a file ( Galaxy version 6.0+galaxy3) with the following parameters:
param-file“Input file”: olympics-all.zip
Question:
How many Olympic Games do we have data for?
Our collection contains 51 datasets, one per Olympics
Now it’s time to run our workflow
Hands On: Run the workflow
Click galaxy-workflows-activityWorkflows in the Activity bar.
Click the workflow-run (Run workflow) button on the bottom right of the workflow card.
The central panel will change to allow you to configure and launch the workflow.
Make sure the input of the workflow is our collection of 51 datasets.
Click Run Workflowworkflow-run at top right.
You will now see the workflow invocation screen
Here you can see the progress of the workflow
You can find all your previous workflow runs (invocations) in the Activity bar under Workflow Invocationsgalaxy-panelview
Our analysis will now be run on all 51 Olympics files. This may take a bit of time (~5-10 minutes or more, depending on how busy Galaxy is at the moment), so now is a good time to grab a coffee. You can also already proceed to the next section while you wait.
Once your workflow is finished, you should get a final montage image with 51 histograms.
Figure 8: Montage of histograms for all 51 Olympic games in our dataset
Question
What was the youngest athlete in the 1896 Olympics?
Look in the Summary statistics output, the 0th percentile is 10 years old
Well done! You have created your first Galaxy workflow and rerun it on a collection of datasets.
The next step is often preserving your work. Whether you want to publish your findings and methods in a journal article, or share it with colleagues, or simply have a detailed record for yourself. The next sections deal with exporting and sharing everything you created in Galaxy for your research.
Preserve: Export data, history, and workflow
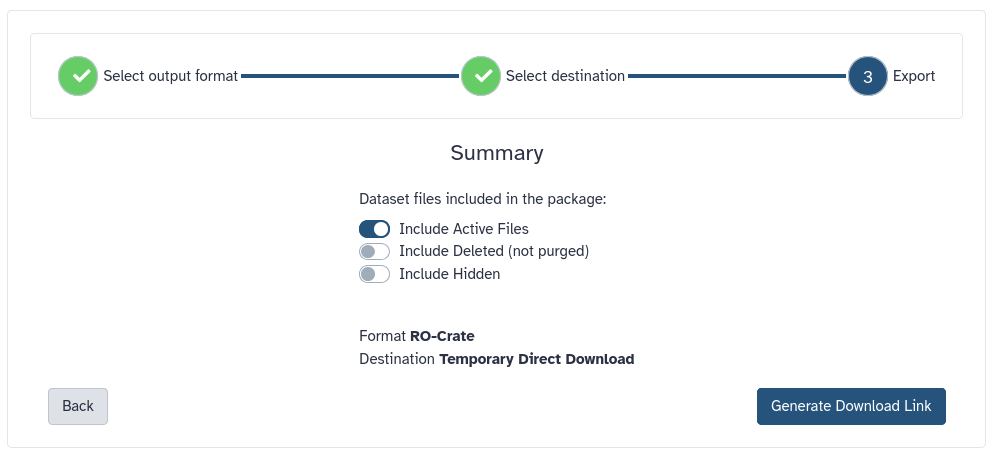
The preserve phase of the research life cycle consists of ensuring that our data, results and the details of our analysis are preserved and remain accessible long-term. For instance so that we can share our work with colleagues at our institute, or with the wider world via e.g. a journal publication. Everything you do in Galaxy, can be exported so that you can share it with others or archive it in specialized data repositories.
Downloading your history
Individual datasets can be downloaded via the savesave icon on the expanded dataset in history, or via the command line.
Click on the dataset in your history to expand it
Click on the Download icon galaxy-save to save the dataset to your computer.
From the terminal window on your computer, you can use wget or curl.
Make sure you have wget or curl installed.
Click on the Dataset name, then click on the copy link icon galaxy-link. This is the direct-downloadable dataset link.
Once you have the link, use any of the following commands:
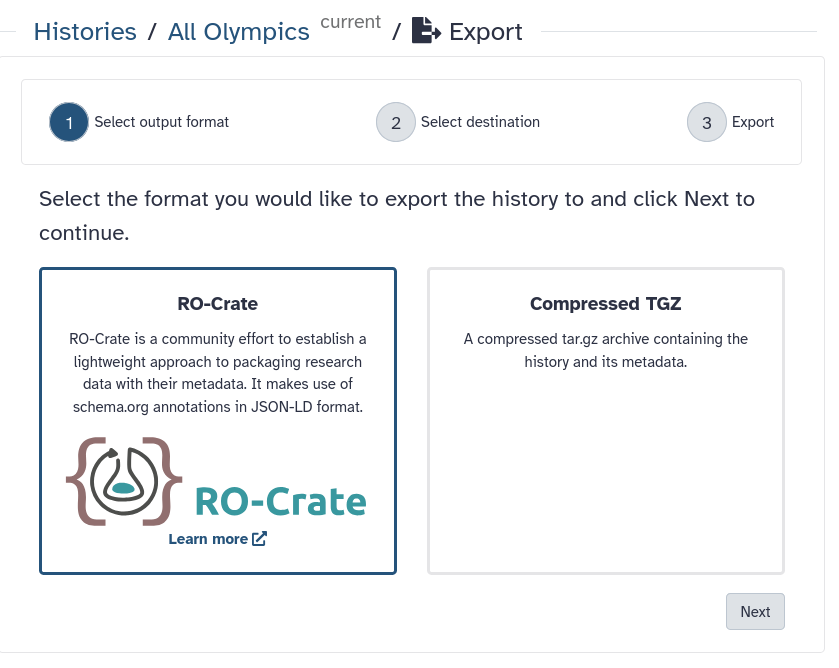
But we can also download our entire history at once, including all metadata. You can download your history in two formats
Compressed folder
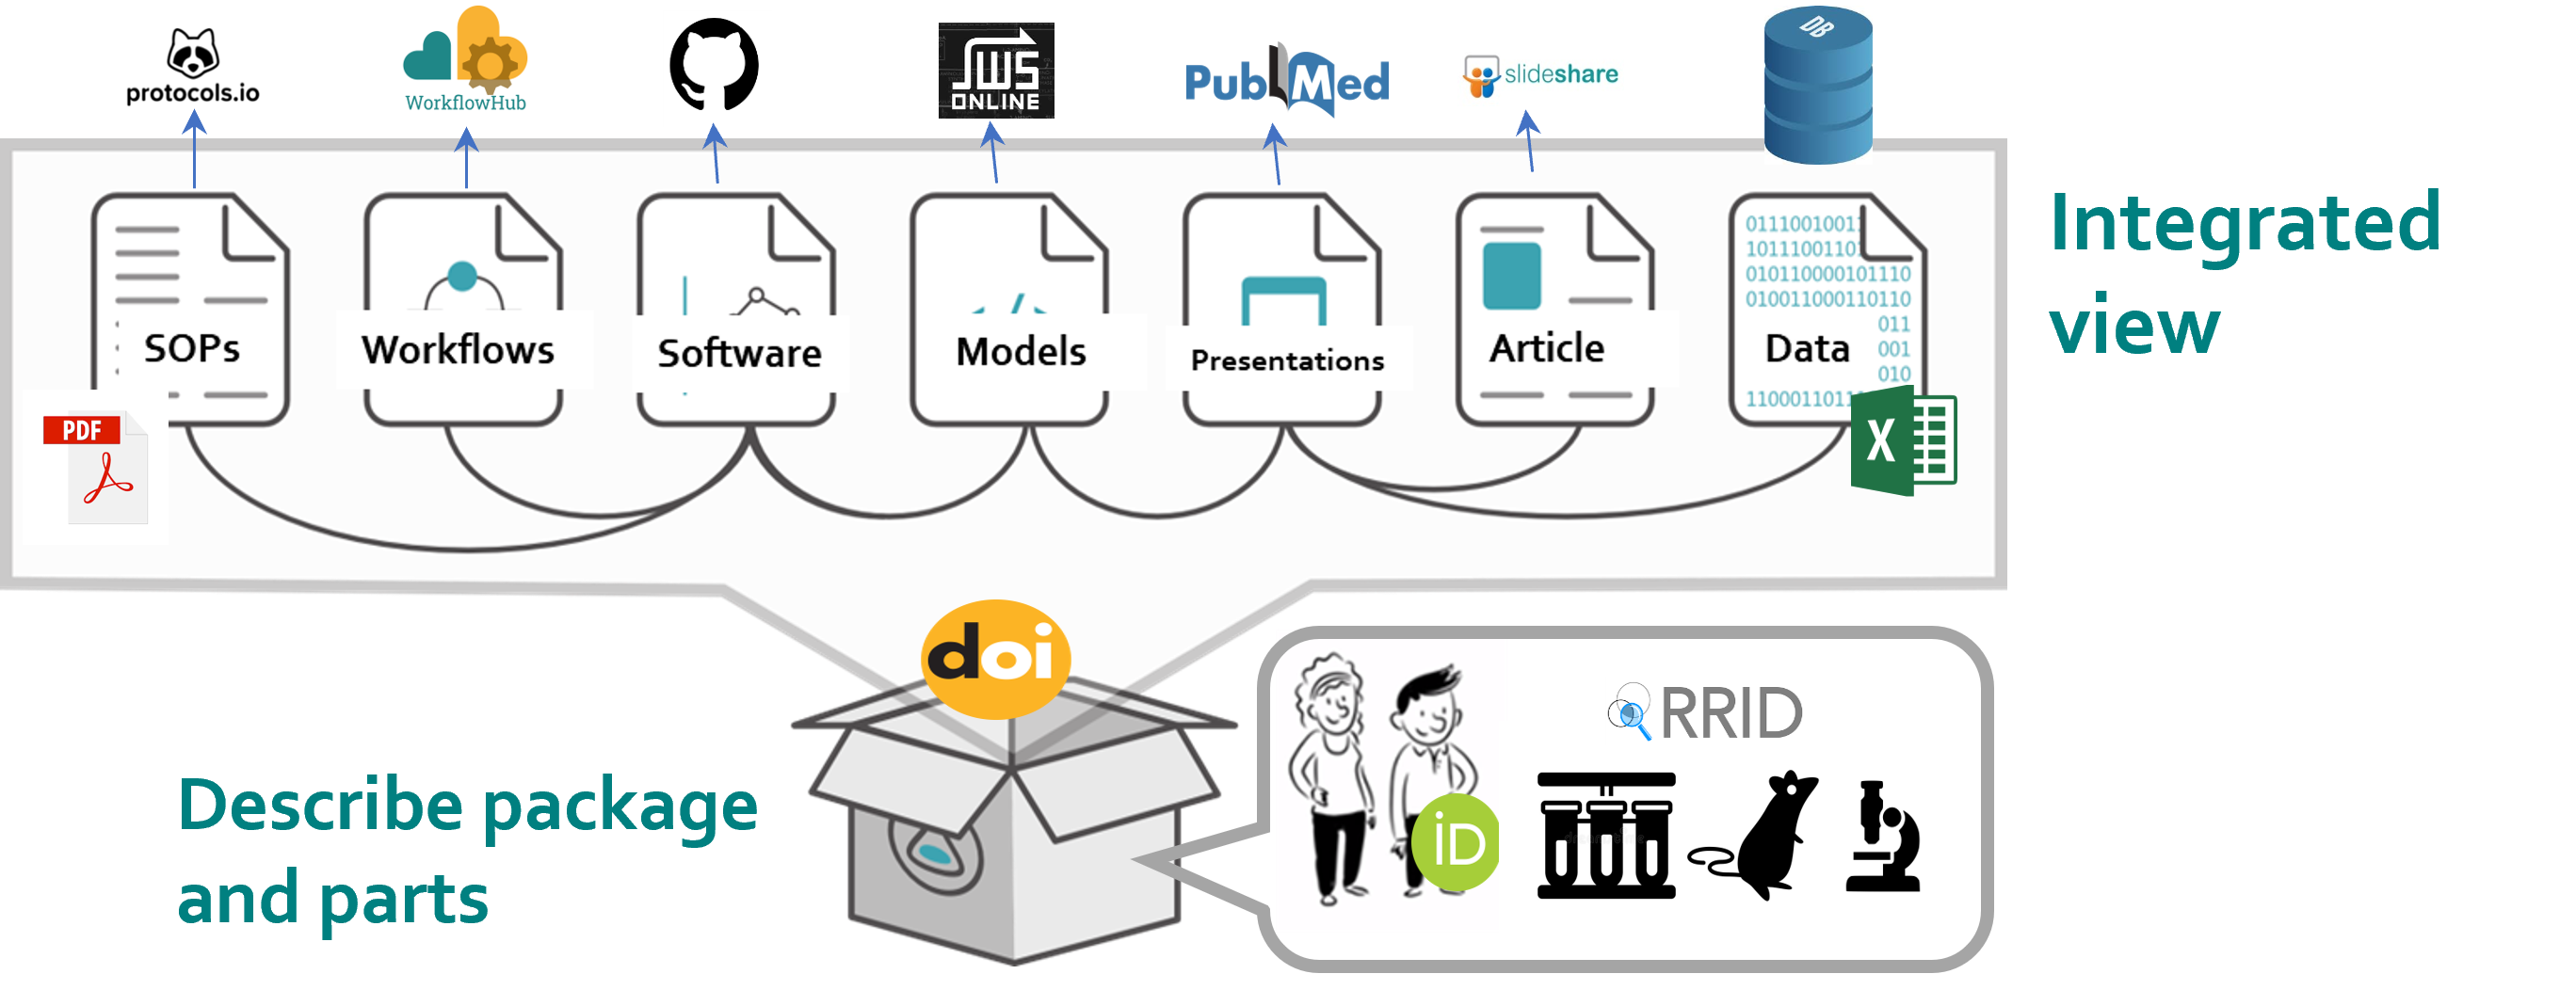
RO-crate (Research Object crates), a community standard for bundling research (meta)data and analysis.
An RO-Crate is an integrated view through which you can see an entire Research Object; the methods, the data, the output and the outcomes of a project or a piece of work. Linking all this together enables the sharing of research outputs with their context, as a coherent whole.
RO-Crates link data and metadata no matter where they are stored – so that from a paper, you can find the data, and from the data, you can find its authors, and so on.
For example, an RO Crate won’t just contain an author’s name. It would also contain their ORCID, which in turn is connected to their affiliations, their funding, and their other publications.
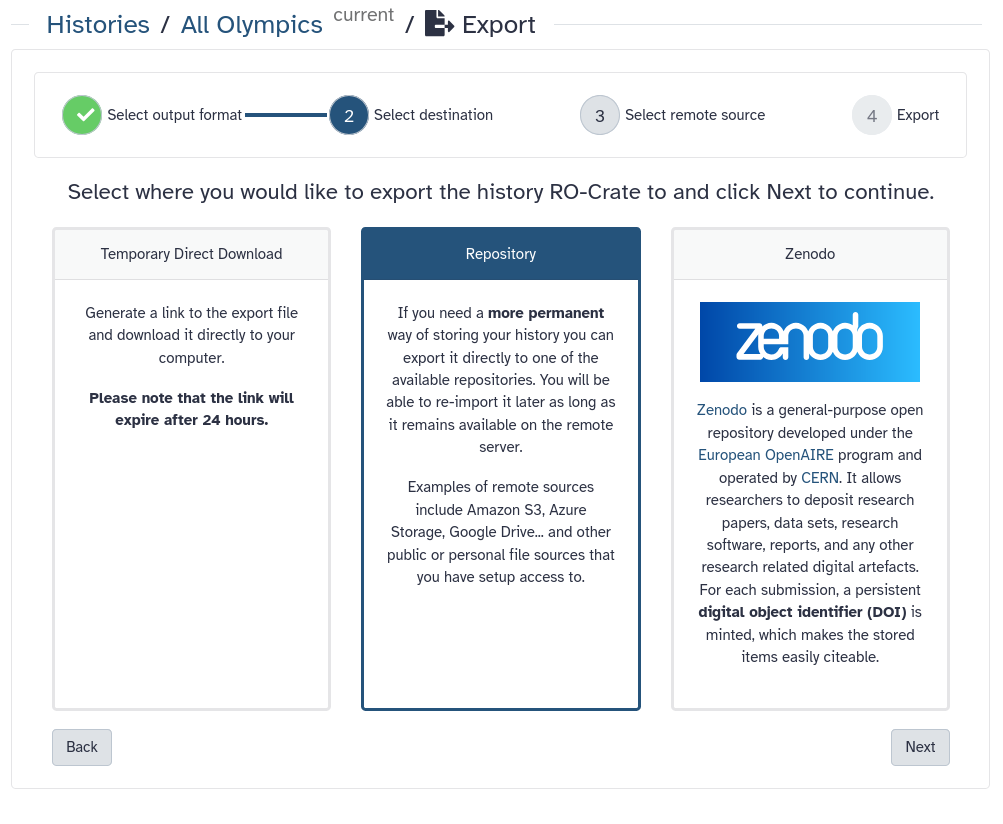
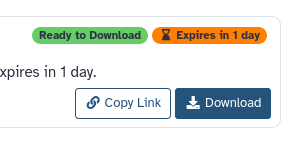
You will get a Download button and a Download link
You now have your full history available outside of Galaxy. This is useful if you want to continue your analysis on your local machine,
or simply want a backup of your work.
This exported history can also be imported into a different Galaxy.
Open the link to the shared history
Click on the Import this history button on the top left
Enter a title for the new history
Click on Copy History
If you want to share your history with another Galaxy user, there are more direct ways to do that, which we will cover in the share section next.
Exporting your history to a repository
You can also directly export Galaxy datasets to external repositories such as Zenodo, Google Drive, OneData, and many more.
In order to do this, you will first need to configure one of these repositories in your Galaxy account settings.
Hands On: Manage your repositories
Configure a repository in your Galaxy account by following the instructions in the box below
Pick a repository you already have an account for. E.g. Google Drive may be a good option.
If you do not have accounts on any of these systems, you can skip this and watch the video below this hands-on box.
Here, we are going to briefly explain how you can Bring-Your-Own-Data to Galaxy or export your dataset, results, or history to 3rd party repositories. In order to add a new repository to your account follow these steps:
Click on your Username on top right part of the website and then click on Preferences.
From the middle panel, click on the Manage Your Repositories (previously called Manage your remote file sources).
Click on the + Create button on top of the page. Here, you get multiple options to connect various repositories to your account.
For all of the possible repositories, you should fill the following fields:
In the Name section, give a name to your repository. This name will be used to choose the repository on Galaxy for importing or exporting datasets.
Optionally, you can provide a Description for this repository. This is a note for yourself.
Hands-on: Choose Your Own Tutorial
This is a 'Choose Your Own Tutorial' (CYOT) section (also known as 'Choose Your Own Analysis' (CYOA)), where you can select between multiple paths. Click one of the buttons below to select how you want to follow the tutorial
Select the repository you like to add to your Galaxy account.
If you have an Onedata account, you can use this repository to import and/or export your data directly from and to Onedata. The minimal supported Onezone version is 21.02.4. More information on Onedata can be found on Onedata’s website.
There are extensive tutorials for setting up and utilizing of OneData on Galaxy Training Network (GTN). At the moment, we have the following tutorials for Onedata on GTN:
In short, you can connect your Galaxy account to an Onedata repository as follows:
In the Onezone domain field, please fill in the address to your Onezone domain. It could be something like “datahub.egi.eu”.
Using the Writable? option you can decide whether to grant access to Galaxy to export (write) to your Onedata or not.
You should provide an Access Token to Galaxy so it can read (import) and write (export) data to your OneData. Read more on access tokens here. You can limit the access to read-only data access, unless you wish to export data to your repository (write permissions are needed then).
In case you want to disable validation of SSL certificates, you can use Disable tls certificate validation? option. However, we strongly recommend you to not use this option unless you know what your are doing.
Click on Create.
To connect an AWS private bucket to your Galaxy account, you need to submit the following information on the form:
Please fill in the Access Key ID (something like AKIAIOSFODNN7EXAMPLE) and Secret Access Key (similar to wJalrXUtnFEMI/K7MDENG/bPxRfiCYEXAMPLEKEY) in the corresponding fields on the Galaxy interface.
Please enter the URL to your Bucket (for example, https://amzn-s3-demo-bucket.s3.us-west-2.amazonaws.com) in the Bucket section.
Click on Create.
To connect anonymously to an AWS public bucket using your Galaxy account, you need to enter the Bucket address in the Bucket section. For more information about AWS Bucket, please read AWS documentaion. Click on Create.
To setup access to your Azure Blob Storage within the Galaxy, follow the steps:
Provide the name of your Azure Blob Storage account in the Container Name field. More information about container’s name could be found on the Microsoft documentation here.
Fill the Storage Account Name based on your account. More information is available on the Microsoft website.
Using the Hierarchical? option you can determine whether your storage is hierarchical or not. More information on Data Lake Storage namespaces can be found in the Azure Blob Storage documentation.
Please provide the account access key to your Azur Blob Storage account, using Account Key field. This is the documentation on Managing storage account access keys.
If you want to be able to export data to your Azure Blob Storage container, please set Writable? option to “Yes”.
Click on Create.
We recommend to first login to your Dropbox account.
On the Galaxy website, click on the Create button of the Dropbox section. You will be redirected to the Dropbox website for authentication.
You have to login there and grant access for the Galaxy.
Click on Create.
eLabFTW is a free and open source electronic lab notebook from Deltablot. Each lab can either host their own installation or go for Deltablot’s hosted solution. Using Galaxy, you can connect to an eLabFTW instance of your choice.
Provide a URL with the protocol (http or https) and the domain name in the eLabFTW instance endpoint (e.g. https://demo.elabftw.net) field.
If you want to let Galaxy to export data to your eLabFTW, please set the Allow Galaxy to export data to eLabFTW? to “Yes” to grant required access to Galaxy. Keep in mind that your API key must have matching permissions.
You should provide an API Key to your eLabFTW as well. To do so, navigate to the Settings page on your eLabFTW server and go to the API Keys tab to generate a new key. Choose “Read/Write” permissions to enable both importing and exporting data. “Read Only” API keys still work for importing data to Galaxy, but they will cause Galaxy to error out when exporting data to eLabFTW. You will receive a string (similar to 2-50dd721027f56a2e119b3bdbf64f4b8518b3f82b97e7876d56dad74109c8be73d8919b88097d3c9eb8952) and you should enter this in the API Key field of Galaxy interface.
Click on Create.
You can setup connections to FTP and FTPS servers to import and export files as follows:
Provide the address to your FTP server using the FTP Host field.
If you want to login with a specific user, provide the username in the FTP User field. Leave this blank to connect to the server anonymously (if allowed by the server).
If you want to export data to this FTP, you should set the Writable? option to “Yes”.
Please specify the port that Galaxy should use to connect to your FTP server using the FTP Port field.
In the FTP Password field provide the password to connect to the FTP server. Leave this blank to connect to the server anonymously (if allowed by the server).
Click on Create.
We recommend to login to your Google account first.
On the Galaxy website, click on Select button of Export to Google Drive. You will be redirected to the Google.
Pick the account that you want to connect to Galaxy for import and export. Grant the required permissions.
You will be back on the Galaxy portal and you can access your Google Drive for import and export (depending on your how you set up your accuont).
Click on Create.
InvenioRDM is a research data management platform that allows you to store, share, and publish research data. You can connect to an InvenioRDM instance of your choice by following these steps:
Please fill the address to your InvenioRDM in the following field: InvenioRDM instance endpoint (for example, https://inveniordm.web.cern.ch/). This should include the protocol (http or https).
Use the Allow Galaxy to export data to InvenioRDM? option to give permission to Galaxy to export data to your repository or not.
Click on Create.
You should fill Publication Name with a name as the “creator” metadata of the records. This could be a person or an organization. You can later modify this. If left blank, an anonymous user will be used as the creator.
You should also enter your Personal Access Token. You can get this information in your InvenioRDM instance. Navigate to Account Settings. Then, go to Applications to generate a new token. This will allow Galaxy to display your draft records and upload files to them.
Click on Create.
Using WebDAV you can connect various services that supports WebDAV protocol such as OwnCloud and NextCloud among others. The configuration of WebDAV is slightly variable from service to service but the general principles apply everywhere.
Provide the server address to this repository in the Server Domain field.
In the WebDAV server Path, you have to provide the path on this server to WebDAV.
In the Username field, you should write the username you use to login to this server.
You can grant write access for this repository using the Writable? (set to Yes) and therefore make it possible to export datasets, or histories to your connected repository.
Click on Create.
As an example, if I want to connect my nextCloud repository to my Galaxy account, I should login to my nextCloud server and find the information from File settings (bottom left of the page) under the WebDAV section to fill this template. It could be something like: https://server_address.com/remote.php/dav/files/username_or_text. Here, the Server Domain is https://server_address.com and WebDAV server Path is remote.php/dav/files/username_or_text.
In some cases, you may need to activate some features on your ownCloud or nextCloud to allow this integration. For example, some nextCloud servers require the user to use “App Passwords”. This can be done using the Settings > Security > Devices & sessions > Create new app password.
Zenodo is an open-access repository for research data, software, publications, and other digital artifacts. It is developed and maintained by CERN and funded by the European Commission as part of the OpenAIRE project. Zenodo provides a free platform for researchers to share and preserve their work, ensuring long-term access and reproducibility. Zenodo is widely used by researchers, institutions, and organizations to share scientific knowledge and comply with open-access mandates from funding agencies.
Using the Allow Galaxy to export data to Zenodo?, you can decide whether you like to give write access to Galaxy or not. Set it to “Yes” if you want to export data from Galaxy to Zenodo, set it to “No” if you only need to import data from Zenodo to Galaxy.
Provide a name for the “creator” metadata of your records on Zenodo using the Publication Name field. You can always change this value later by editing the records in Zenodo. If left blank, an anonymous user will be used as the creator.
You have to provide a Personal Access Token from your Zenodo account to Galaxy. To do so, you need to log into your account. Then, visit this site: https://zenodo.org/account/settings/applications/. Alternatively, you can click on your username on top right and then click on “Applications”. Here, you need to create a “Personal Access Token”. This will allow Galaxy to display your draft records and upload files to them. If you enabled the option to export data from Galaxy to Zenodo, make sure to enable the deposit:write scope when creating the token.
Click on Create.
Importing data to your Galaxy account
When you connect a repository to your Galaxy account, you can use it to import data to Galaxy. To do so, you can click on the Upload Icon on the left panel. In the poped up window, you can click on Choose from repository to select a repository that you have added to your account. Navigate to a file that you want to upload to your Galaxy account, check the box of the file, and click on Select. You can determine the format of the file, give it a name, and then click on Start to upload the file to your Galaxy account.
Exporting histories, datasets, and results to connected repositories
If you have given Galaxy the permission to write to your repository, you can export your histories, datasets and reulsts in the history to that repository.
Histories
If you want to export a history, you should click on the History Options icon (galaxy-history-options) on the right panel. Then, you can click on Export History to File. Next, you can click on to repository on the middle panel. If you click on the Click to select directory, there will be a pop up window. Here, you can pick a repository that you have added to your account and when you are in that repository, click on Select. You can give a Name to your exported history, so you can find it easier in your connected repository. Finally, click on Export to write the history to your repository. Similarly, you can use to RDM repository or to Zenodo instead of the to repository option in the middle panel to export your history to connected RDM repositories or Zenodo.
To have more options on exporting your history, you can click on Show advanced export options on top of the middle panel. This provides further control over the format and datasets that will be included in your exported history.
Datasets
If you are interested to export a single dataset or results to a connected repository, you can use a tool called Export datasets.
Select the desired option from What would you like to export?.
Using the Directory URI option, you can Select a connected repository. You can also give it a directory name here.
We recommend to export the metadata with your datasets and results using the Include metadata files in export?.
Export datasets - to repositories with the following parameters
“Choose your dataset”: the montage output from Galaxy
“Directory URI”: the repository you configured in the previous step
Go to your repository and view the file there.
Below is a video showing this feature in action:
Video: Example of importing and exporting datasets between Galaxy and Zenodo
Now that you have configured a data repository in your Galaxy account, you can also use it to import data from repositories into Galaxy for analysis.
As an alternative to uploading the data from a URL or your computer, the files may also have been made available from a Choose from repositories:
Click on Upload Data on the top of the left panel
Click on Choose from repository and scroll down to find your repository or type the repository name in the search box on the top.
Select the datasets you want to import
click on OK
Click on Start
Click on Close
You can find the dataset has begun loading in you history.
Exporting tool citations
When you publish your analysis, you will have to cite the tools you used. Galaxy makes this easy for you:
Hands On: Export Tool Citations
Click on History optionsgalaxy-history-options
Select Export Tool References
Here you will find all known citations for the tools used in your current history
They are provided in 2 formats, References (APA) and Bibtex
Exporting your workflows
Any workflows you have created can also be exported. For example, to share them when you publish your analysis.
Click on Workflowsgalaxy-workflows-activity in the Galaxy Activity Bar.
You will see a list of all your workflows
Click on the Downloaddownload button of the workflow you would like to download
Your exported Galaxy workflow will be a file with a .ga extension. This file can be imported into Galaxy easily by others.
Click on galaxy-workflows-activityWorkflows in the Galaxy activity bar (on the left side of the screen, or in the top menu bar of older Galaxy instances). You will see a list of all your workflows
Click on galaxy-uploadImport at the top-right of the screen
Provide your workflow
Option 1: Paste the URL of the workflow into the box labelled “Archived Workflow URL”
Option 2: Upload the workflow file in the box labelled “Archived Workflow File”
Click the Import workflow button
Below is a short video demonstrating how to import a workflow from GitHub using this procedure:
Video: Importing a workflow from URL
Share: Share or publish data and workflow
The share phase of the research life cycle consist of making the data and metadata you preserved FAIR (findable, accessible, interoperable, reusable) so that others may benefit from your work (and cite you!).
As a first sharing step, you can share your work without exporting it out of Galaxy, by providing others access to your Galaxy datasets, histories, workflows, and visualisations. This makes it very easy to collaborate with others on Galaxy.
Galaxy objects can be shared in different ways:
With specific users on the same Galaxy
With Galaxy users via a share link (anybody with the link can access)
Publicly visible to everybody (published on Galaxy)
Let’s see how we can share our work in Galaxy.
Hands On: Share your work
Share your history with another Galaxy user.
If you do not know other Galaxy users, publish it for everybody to see.
Sharing your history allows others to import and access the datasets, parameters, and steps of your history.
Access the history sharing menu via the History Options dropdown (galaxy-history-options), and clicking “history-share Share or Publish”
Share via link
Open the History Optionsgalaxy-history-options menu at the top of your history panel and select “history-share Share or Publish”
galaxy-toggleMake History accessible
A Share Link will appear that you give to others
Anybody who has this link can view and copy your history
Publish your history
galaxy-toggleMake History publicly available in Published Histories
Anybody on this Galaxy server will see your history listed under the Published Histories tab opened via the galaxy-histories-activityHistories activity
Share only with another user.
Enter an email address for the user you want to share with in the Please specify user email input below Share History with Individual Users
Your history will be shared only with this user.
Finding histories others have shared with me
Click on the galaxy-histories-activityHistories activity in the activity bar on the left
Click the Shared with me tab
Here you will see all the histories others have shared with you directly
Note: If you want to make changes to your history without affecting the shared version, make a copy by going to History Optionsgalaxy-history-options icon in your history and clicking Copy this History
[If possible] Have somebody else share a history with you.
Find histories shared with you
If nobody shared a history with you, choose a public history
To find shared histories
Select Histories from the Activity Bar
Click on the Histories shared with me tab
Published workflows are available from the Public Histories tab
To work with shared histories:
Click on viewgalaxy-eye on the history item.
Preview the history to make sure it is the one you want
Click on Import this history button at the top to make a copy under your own account
Note: Shared Histories (when copied into your account or not) do count in portion toward your total account data quota usage. More details on histories shared concerning account quota usage can be found in this link.
Import this history into your own account to start working with it.
You now have your own copy of this history in your account. Any changes you make will not affect the original history.
This is a quick and easy way to collaborate with your colleagues on Galaxy.
Workflows can be shared or published in a similar way.
Click on galaxy-workflows-activityWorkflows in the Galaxy activity bar (on the left side of the screen, or in the top menu bar of older Galaxy instances). You will see a list of all your workflows
Click on the history-shareShare button of the workflow you would like to publish
Go to Share Workflow with Individual Users
Enter the email address of the user you want to share the workflow with.
They will be able to find and import your workflow under Workflows shared with me tab in the Workflows section of the Activity bar
Click on galaxy-workflows-activityWorkflows in the Galaxy activity bar (on the left side of the screen, or in the top menu bar of older Galaxy instances). You will see a list of all your workflows
Click on the history-shareShare button of the workflow you would like to publish
Click on Make Workflow accessible. This makes the workflow publicly accessible but unlisted.
To also list the workflow for all users on the Public workflows tab of the galaxy-workflows-activityWorkflows page, click Make Workflow publicly available in Published Workflows
When you publish a paper about your research, we recommend always publishing your workflow and history (e.g. as an RO-crate) with your journal article for optimal FAIRness.
Workflows can be shared in dedicated workflow repositories such as WorkflowHub for increased visibility.
Similarly, you can publish your exported history to repositories such as Zenodo or other data repositories.
Sharing every aspect of your research, from data to metadata and workflows, enables other researchers to reuse your work (and cite you!) and build on top of it. Teamwork makes the (science) dream work!
Reuse: Find and run workflows shared by others
The ultimate goal of preserving and sharing your research data and analyses is to enable others to repeat your analysis and reuse your work.
To illustrate this, we will now show you how you can find and reuse shared Galaxy workflows.
Where to find Galaxy Workflows
There are various places where you can find Galaxy workflows to reuse:
From Wikipedia: In mathematics, a Voronoi diagram is a partition of a plane into regions close to each of a given set of objects. It can also be classified as a tessellation. In the simplest case, these objects are just finitely many points in the plane (called seeds, sites, or generators). For each seed, there is a corresponding region, called a Voronoi cell, consisting of all points of the plane closer to that seed than to any other.
For more information about this workflow and a full walkthrough of all its steps, see also the full GTN tutorial
Import the Workflow
We start by importing this workflow into Galaxy.
Hands-on: Choose Your Own Tutorial
This is a 'Choose Your Own Tutorial' (CYOT) section (also known as 'Choose Your Own Analysis' (CYOA)), where you can select between multiple paths. Click one of the buttons below to select how you want to follow the tutorial
If you are working on GalaxyEU (usegalaxy.eu), the next step can be made a bit quicker. If that is the case, choose the corresponding button below
Download the .ga file OR copy the URL to it (via the “Raw” button)
In Galaxy, click on Workflows in the Activity Bar
Import the Voronoi workflow to Galaxy via URL or file upload
Click on galaxy-workflows-activityWorkflows in the Galaxy activity bar (on the left side of the screen, or in the top menu bar of older Galaxy instances). You will see a list of all your workflows
Click on galaxy-uploadImport at the top-right of the screen
Provide your workflow
Option 1: Paste the URL of the workflow into the box labelled “Archived Workflow URL”
Option 2: Upload the workflow file in the box labelled “Archived Workflow File”
Click the Import workflow button
Below is a short video demonstrating how to import a workflow from GitHub using this procedure:
Video: Importing a workflow from URL
Run the workflow
Hands On
Create a new history, and give it a good name
To create a new history simply click the new-history icon at the top of the history panel:
Click galaxy-uploadUpload at the top of the activity panel
Select galaxy-wf-editPaste/Fetch Data
Paste the link(s) into the text field
Press Start
Close the window
Run the Voronoi workflow with the following inputs:
Image: tree-image.tiff
Seeds: tree-seeds.tiff
Click on Workflows on the Activity Bar on the left.
At the top of the resulting page you will have the option to switch between the My workflows, Workflows shared with me and Public workflows tabs.
Select the tab you want to see all workflows in that category
Search for your desired workflow.
Click on the workflow name: a pop-up window opens with a preview of the workflow.
To run it directly: click Run (top-right).
Recommended: click Import (left of Run) to make your own local copy under Workflows / My Workflows.
After the workflows are completed (~5-10 minutes), you can explore the outputs
The details of this workflow are out of scope for this tutorial; the important thing is that you have seen how to find and import workflows shared by others.
Showcase 2: IWC
All the workflows from IWC are reviewed and maintained by a group of Galaxy experts.
All IWC workflows are available from the [IWC Workflow Library]((https://iwc.galaxyproject.org/). The IWC workflow library makes it even easier to try out workflows by providing example data preconfigured with the workflow.
On the workflow page, look at the options at the bottom right
Select your Galaxy from the dropdown
Click Try with Example Data
Your workflow will now be imported to your account, and the workflow run menu will be opened, preconfigured with example inputs
Simply click Run Workflow to start it (top-right)
Once the workflow is completed, you can explore the outputs
If you picked the Segmentation workflow, one of the outputs is this image, a microscope image analysed to detect objects (cells in this case), count them and label them:
This is a great way to evaluate a workflow without requiring the effort of finding good example datasets.
Conclusion
Congratulations! You have now completed this introduction to Galaxy and seen how Galaxy can support you in every phase of the research data life cycle.
You've Finished the Tutorial
Please also consider filling out the Feedback Form as well!
Key points
Galaxy is a powerful platform throughout the research life cycle
You can easily scale up analyses to a large number of datasets
Galaxy aims to ensure the FAIRness of your research
Frequently Asked Questions
Have questions about this tutorial? Have a look at the available FAQ pages and support channels
Did you use this material as an instructor? Feel free to give us feedback on how it went.
Did you use this material as a learner or student? Click the form below to leave feedback.
Hiltemann, Saskia, Rasche, Helena et al., 2023 Galaxy Training: A Powerful Framework for Teaching! PLOS Computational Biology 10.1371/journal.pcbi.1010752
Batut et al., 2018 Community-Driven Data Analysis Training for Biology Cell Systems 10.1016/j.cels.2018.05.012
@misc{introduction-galaxy-intro-rdm,
author = "Saskia Hiltemann",
	title = "Introduction to Galaxy as an RDM platform (Galaxy Training Materials)",
	year = "",
	month = "",
	day = "",
	url = "\url{https://training.galaxyproject.org/training-material/topics/introduction/tutorials/galaxy-intro-rdm/tutorial.html}",
	note = "[Online; accessed TODAY]"
}
@article{Hiltemann_2023,
	doi = {10.1371/journal.pcbi.1010752},
	url = {https://doi.org/10.1371%2Fjournal.pcbi.1010752},
	year = 2023,
	month = {jan},
	publisher = {Public Library of Science ({PLoS})},
	volume = {19},
	number = {1},
	pages = {e1010752},
	author = {Saskia Hiltemann and Helena Rasche and Simon Gladman and Hans-Rudolf Hotz and Delphine Larivi{\`{e}}re and Daniel Blankenberg and Pratik D. Jagtap and Thomas Wollmann and Anthony Bretaudeau and Nadia Gou{\'{e}} and Timothy J. Griffin and Coline Royaux and Yvan Le Bras and Subina Mehta and Anna Syme and Frederik Coppens and Bert Droesbeke and Nicola Soranzo and Wendi Bacon and Fotis Psomopoulos and Crist{\'{o}}bal Gallardo-Alba and John Davis and Melanie Christine Föll and Matthias Fahrner and Maria A. Doyle and Beatriz Serrano-Solano and Anne Claire Fouilloux and Peter van Heusden and Wolfgang Maier and Dave Clements and Florian Heyl and Björn Grüning and B{\'{e}}r{\'{e}}nice Batut and},
	editor = {Francis Ouellette},
	title = {Galaxy Training: A powerful framework for teaching!},
	journal = {PLoS Comput Biol}
}
Funding
These individuals or organisations provided funding support for the development of this resource
Questions:
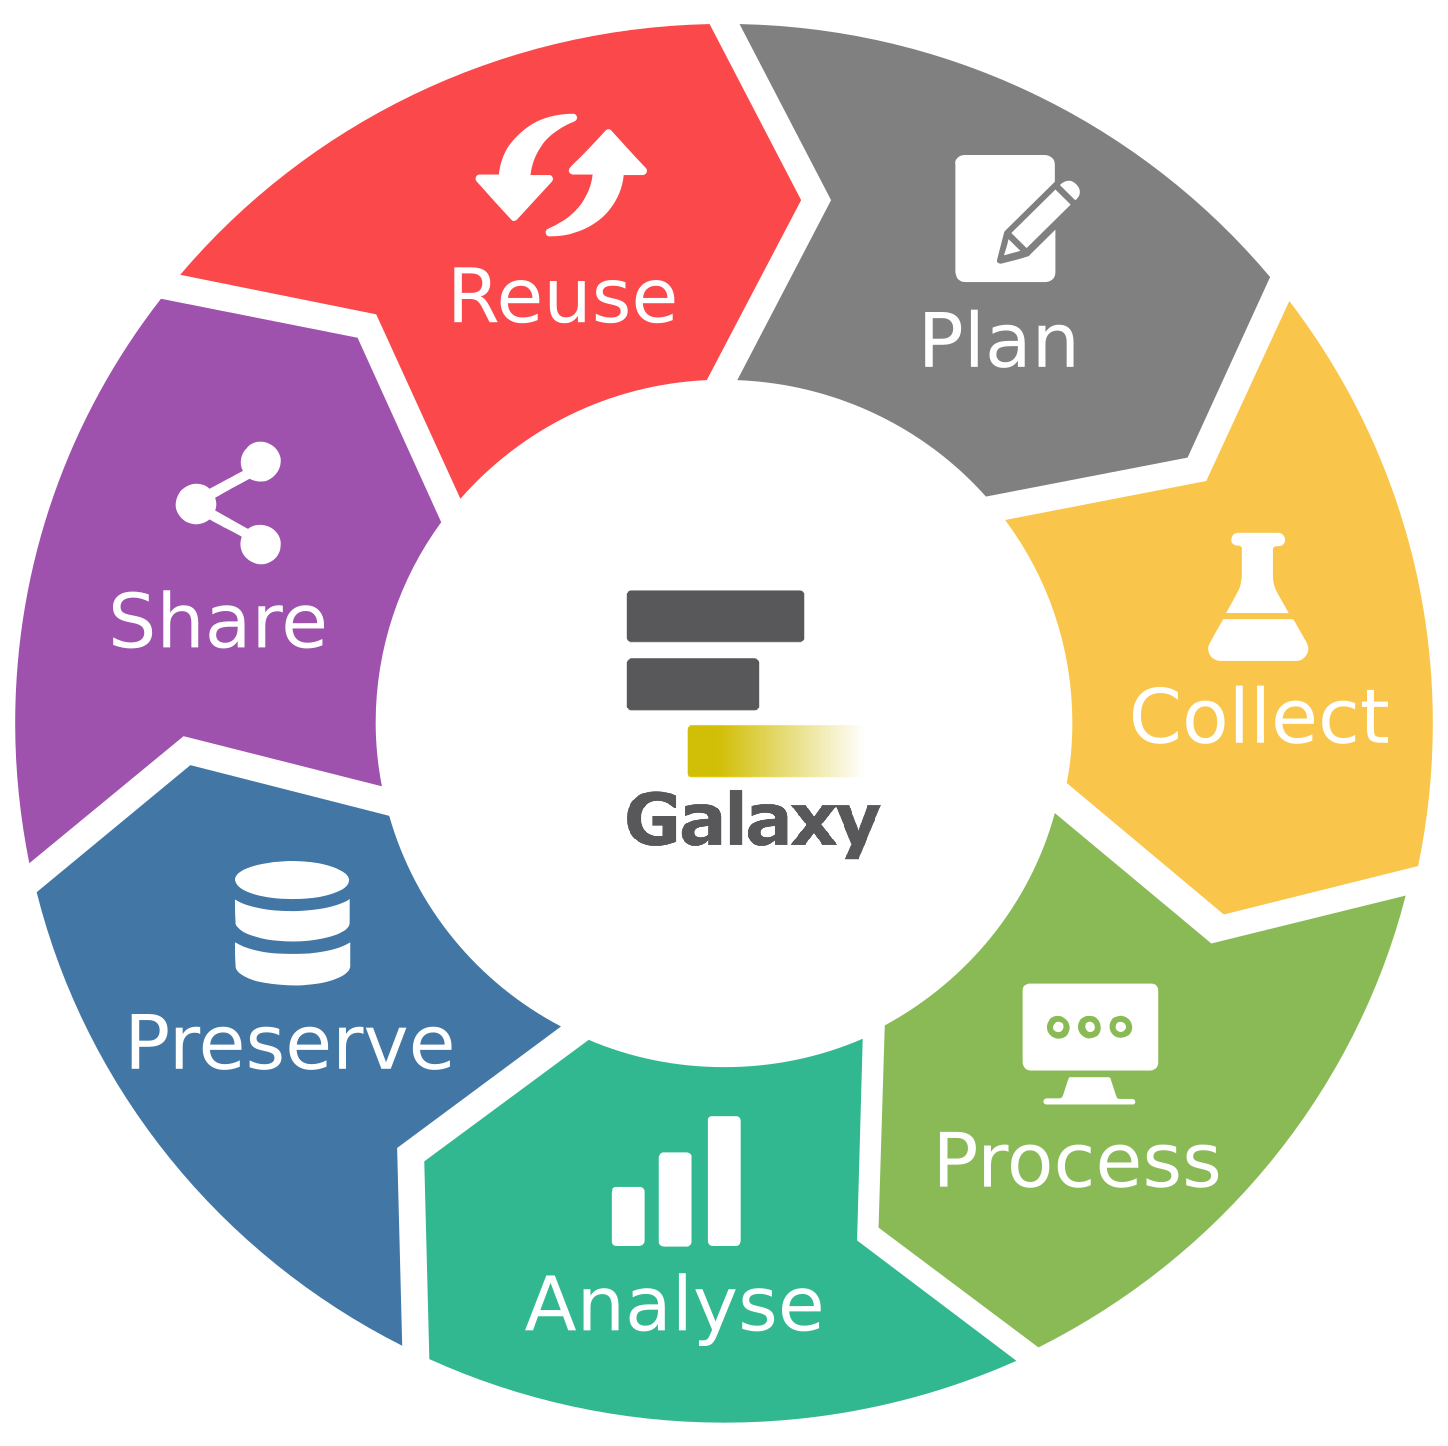
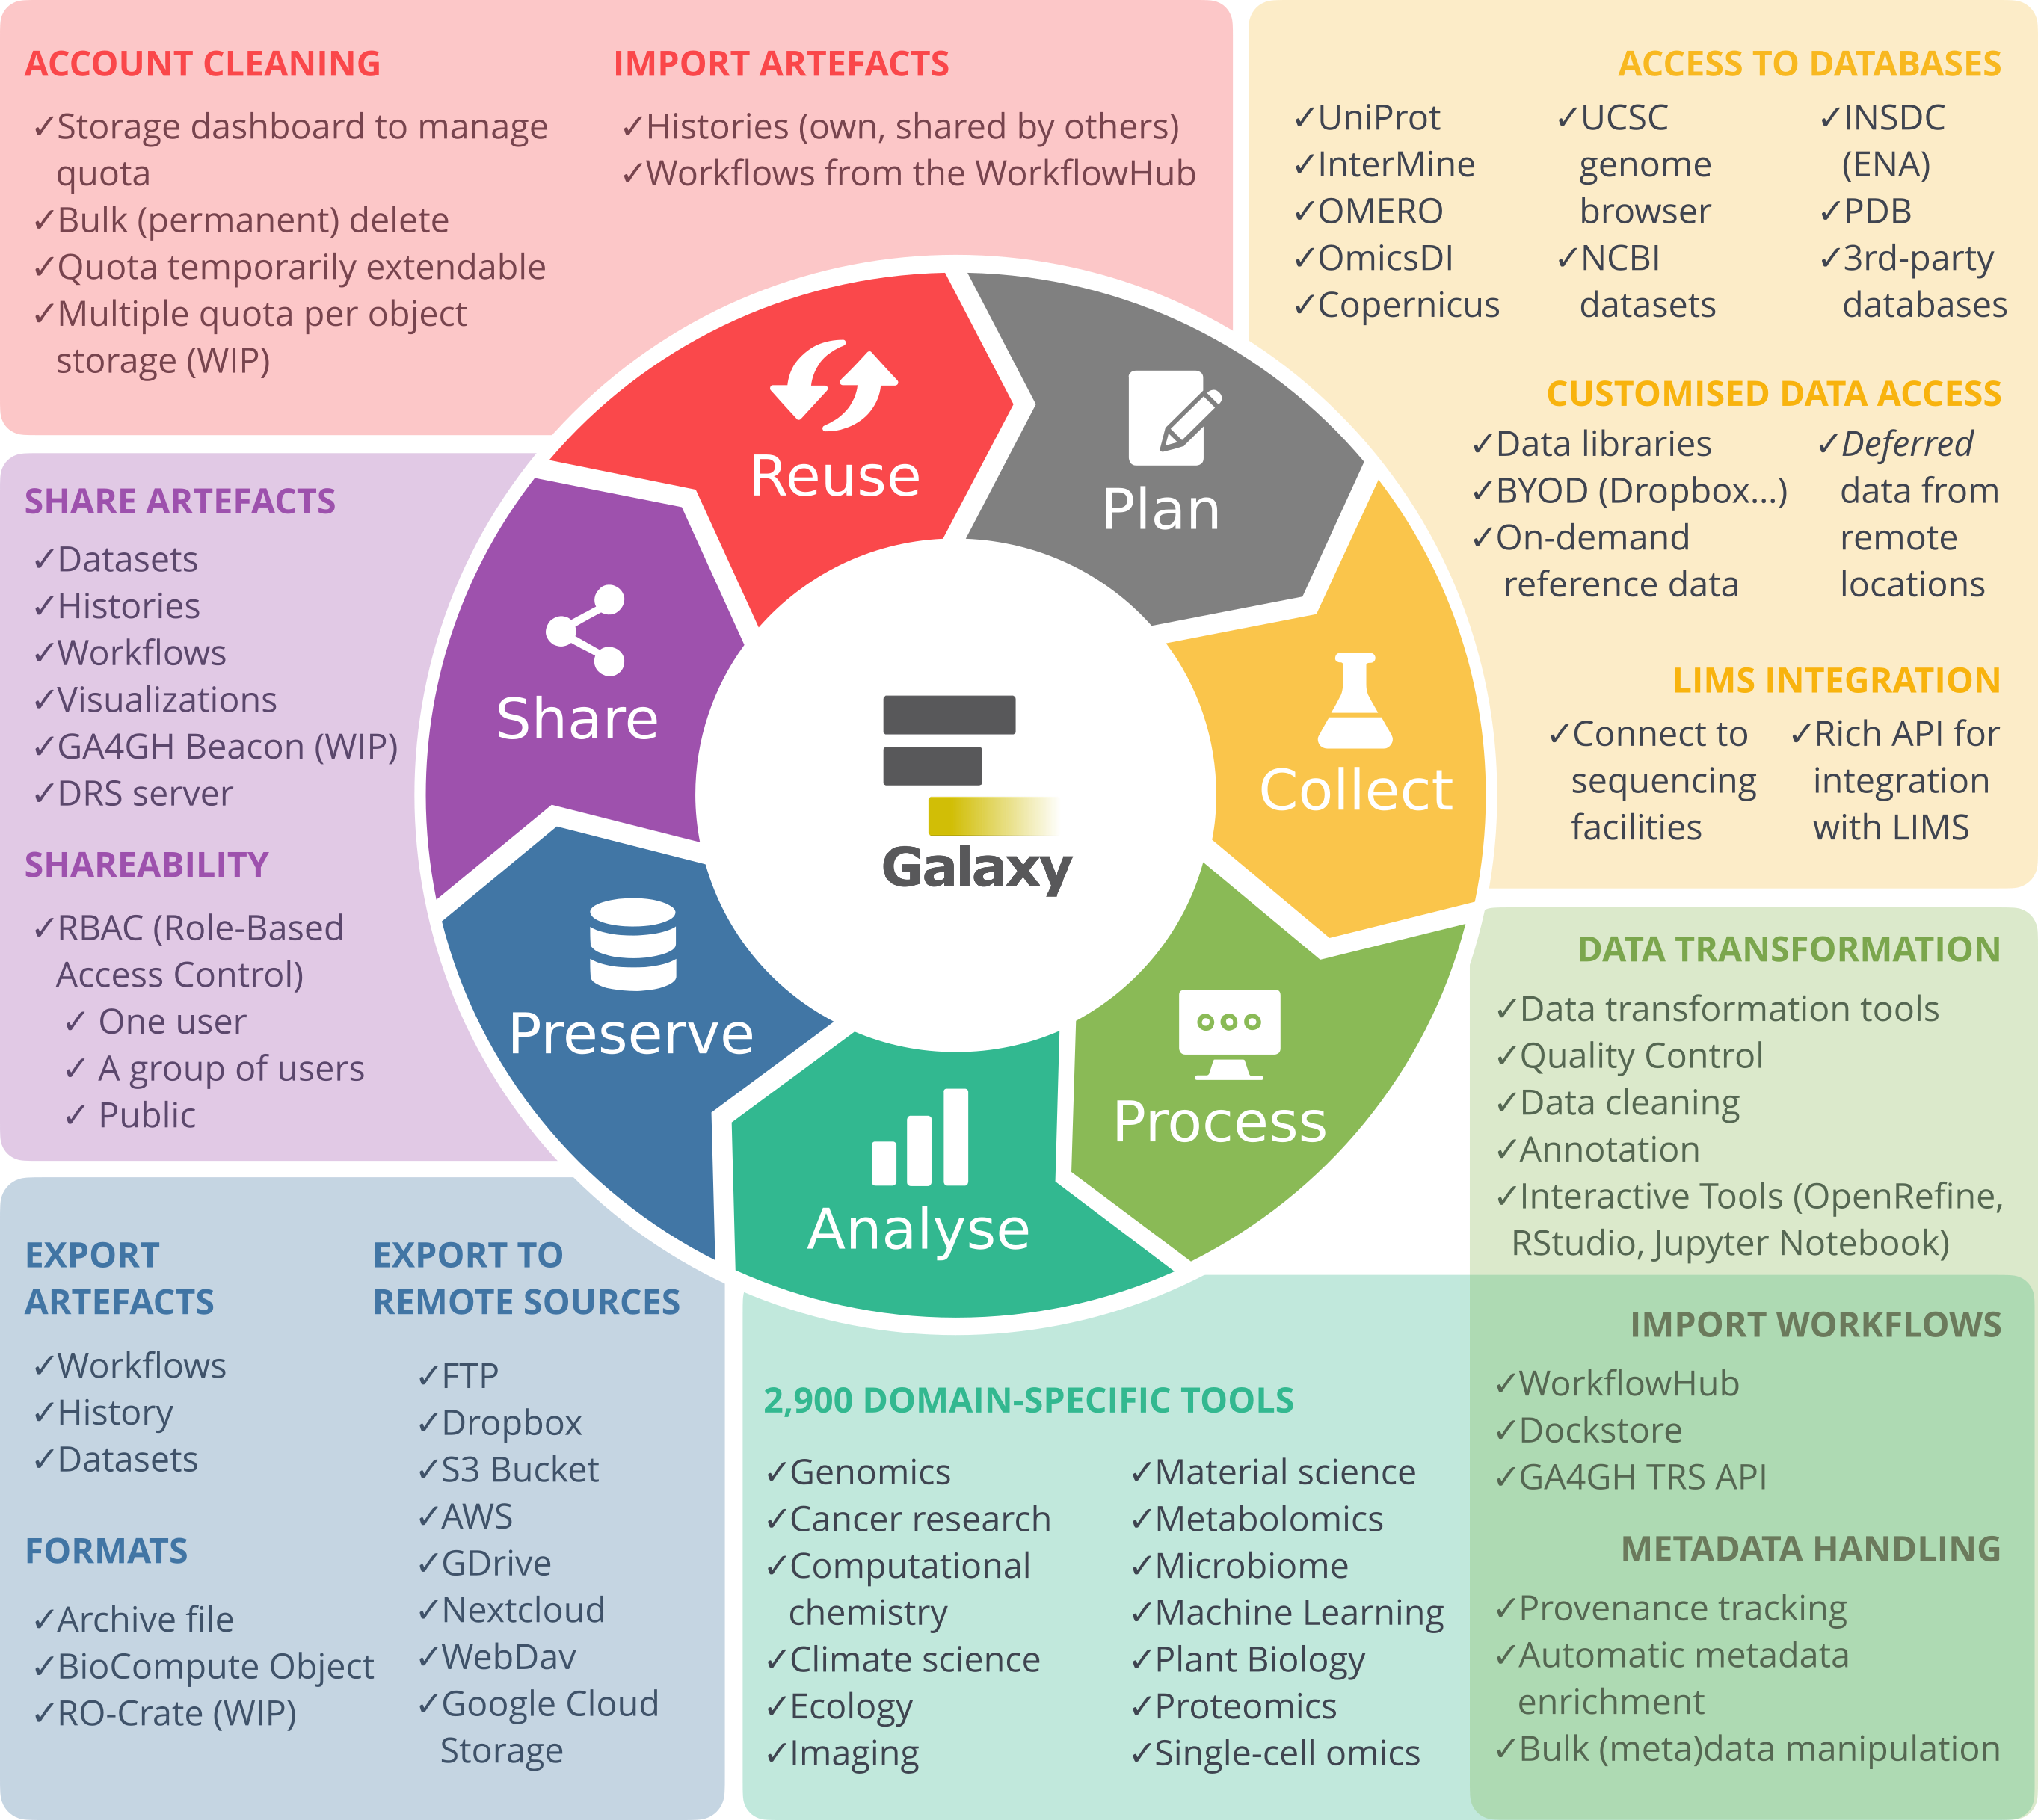


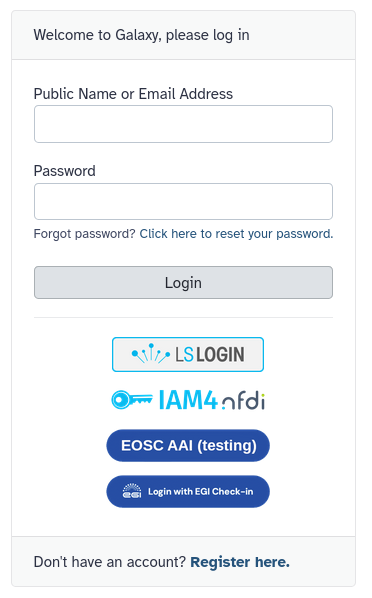
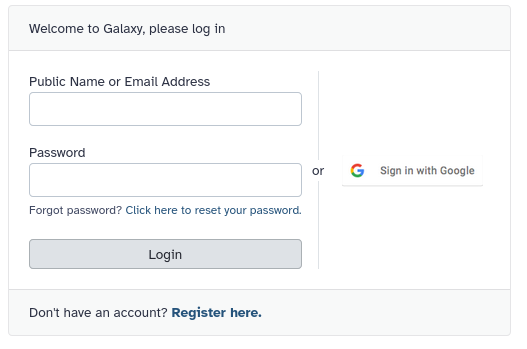
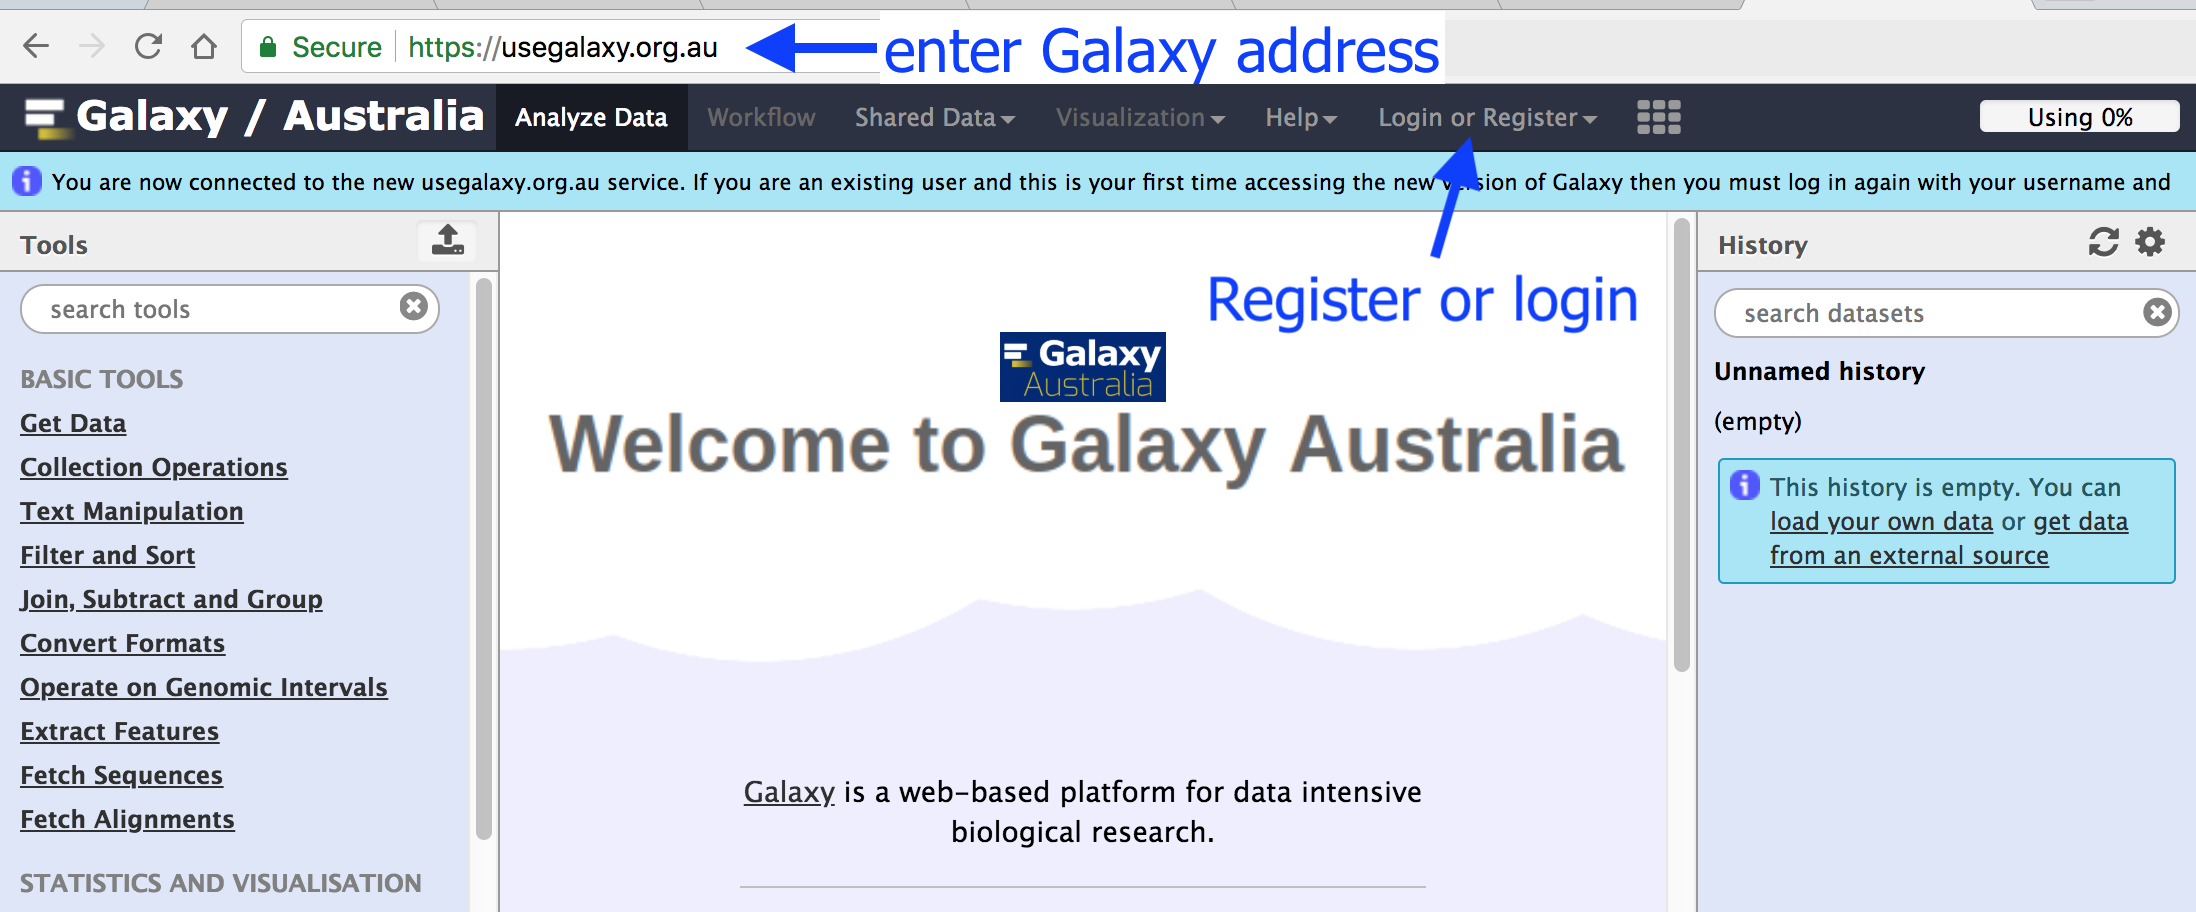
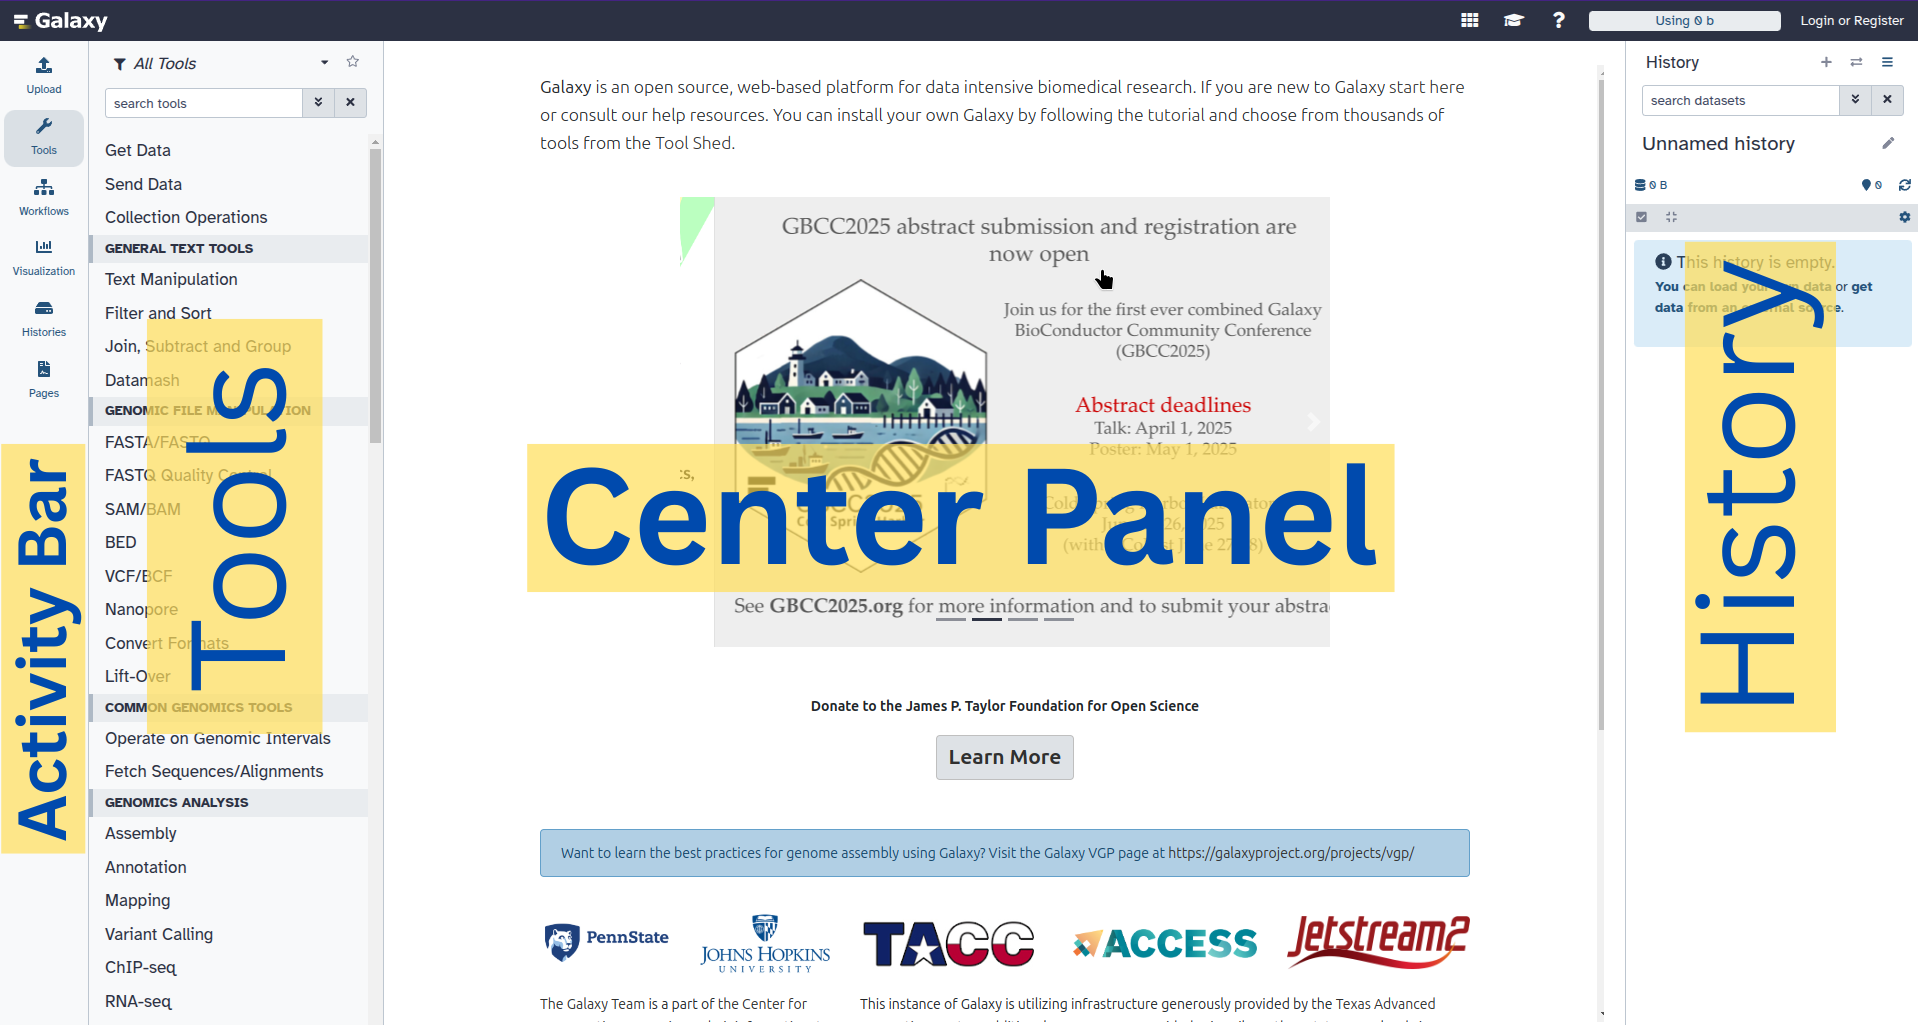
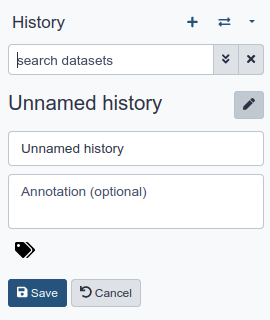
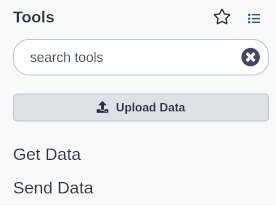
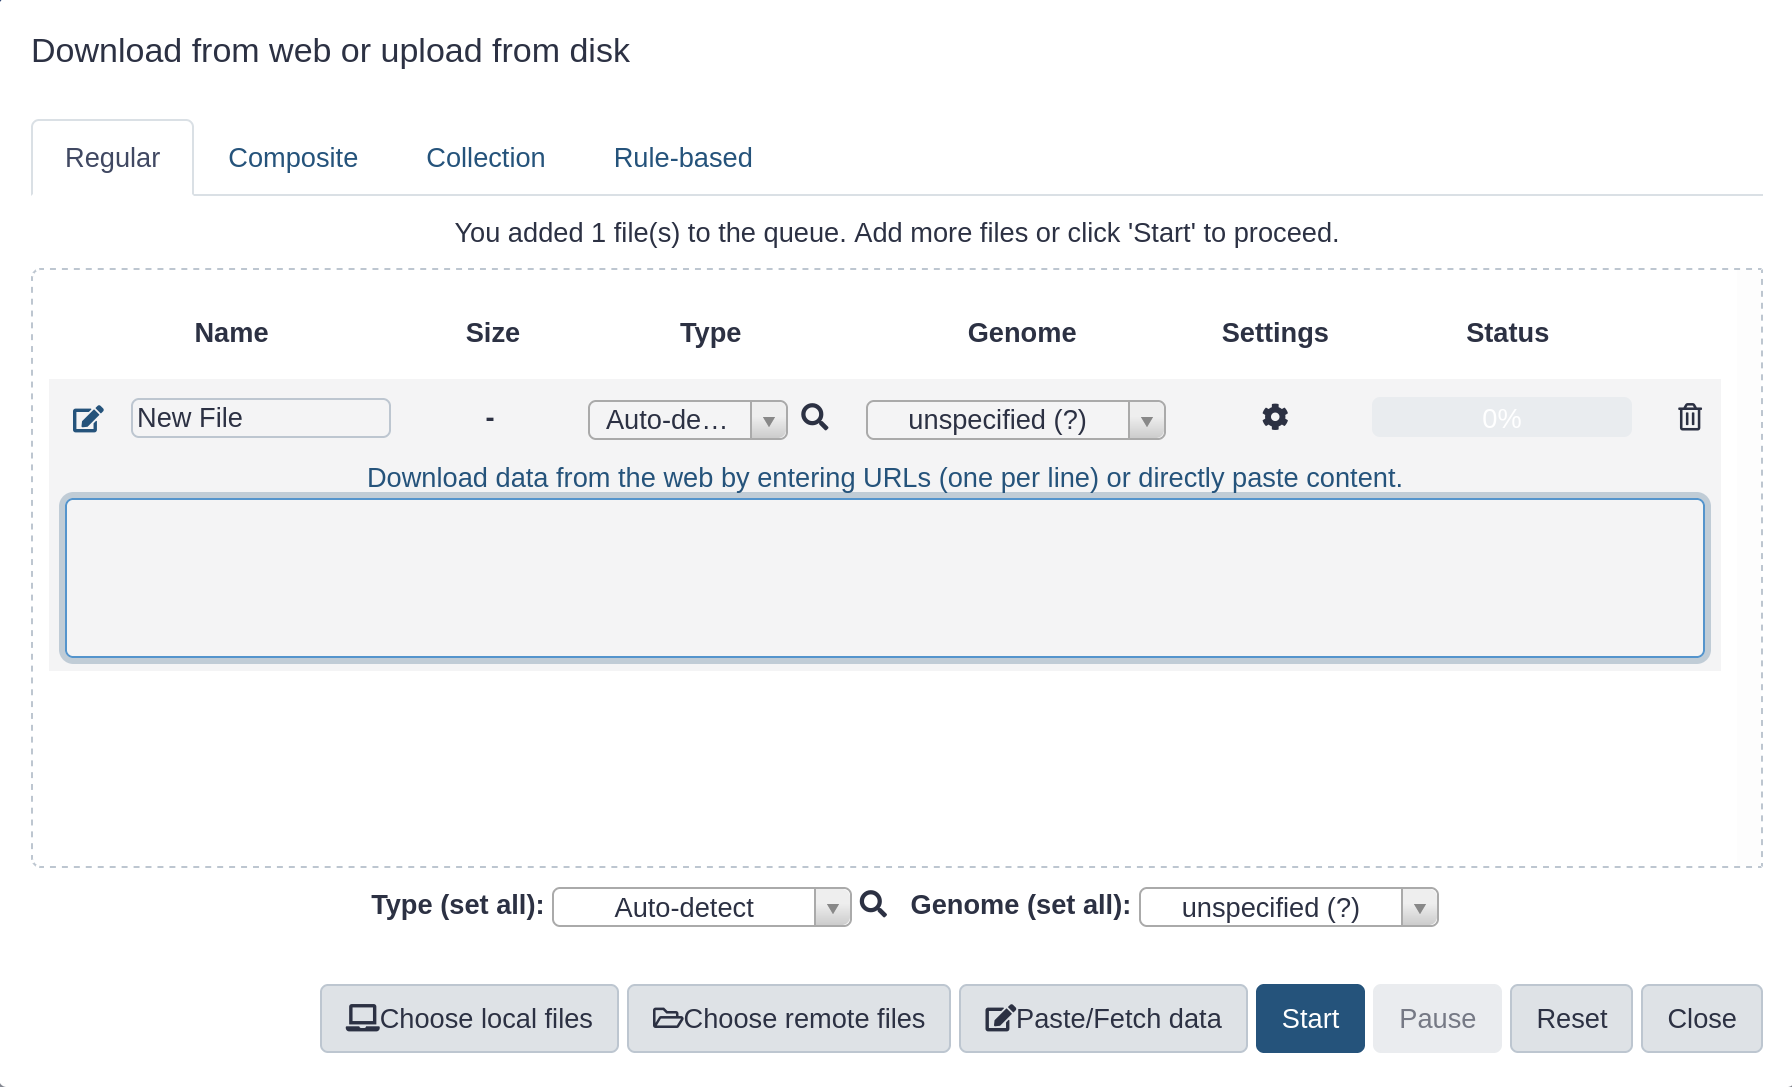
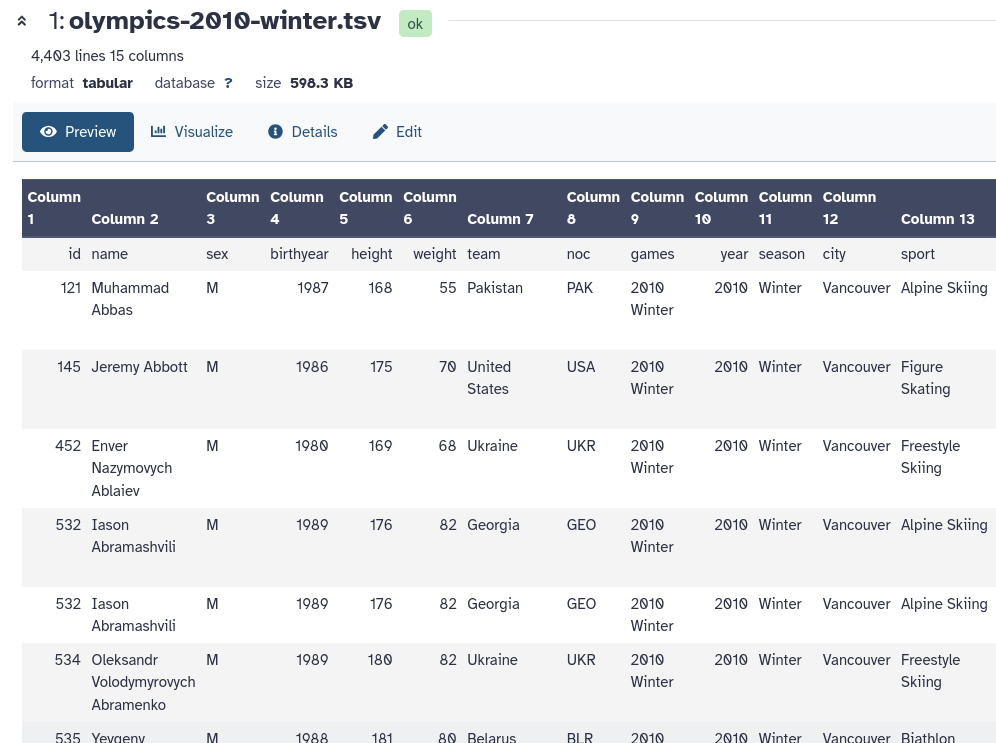 Open image in new tab
Open image in new tab

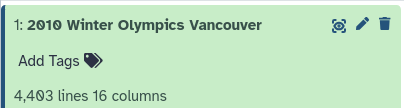
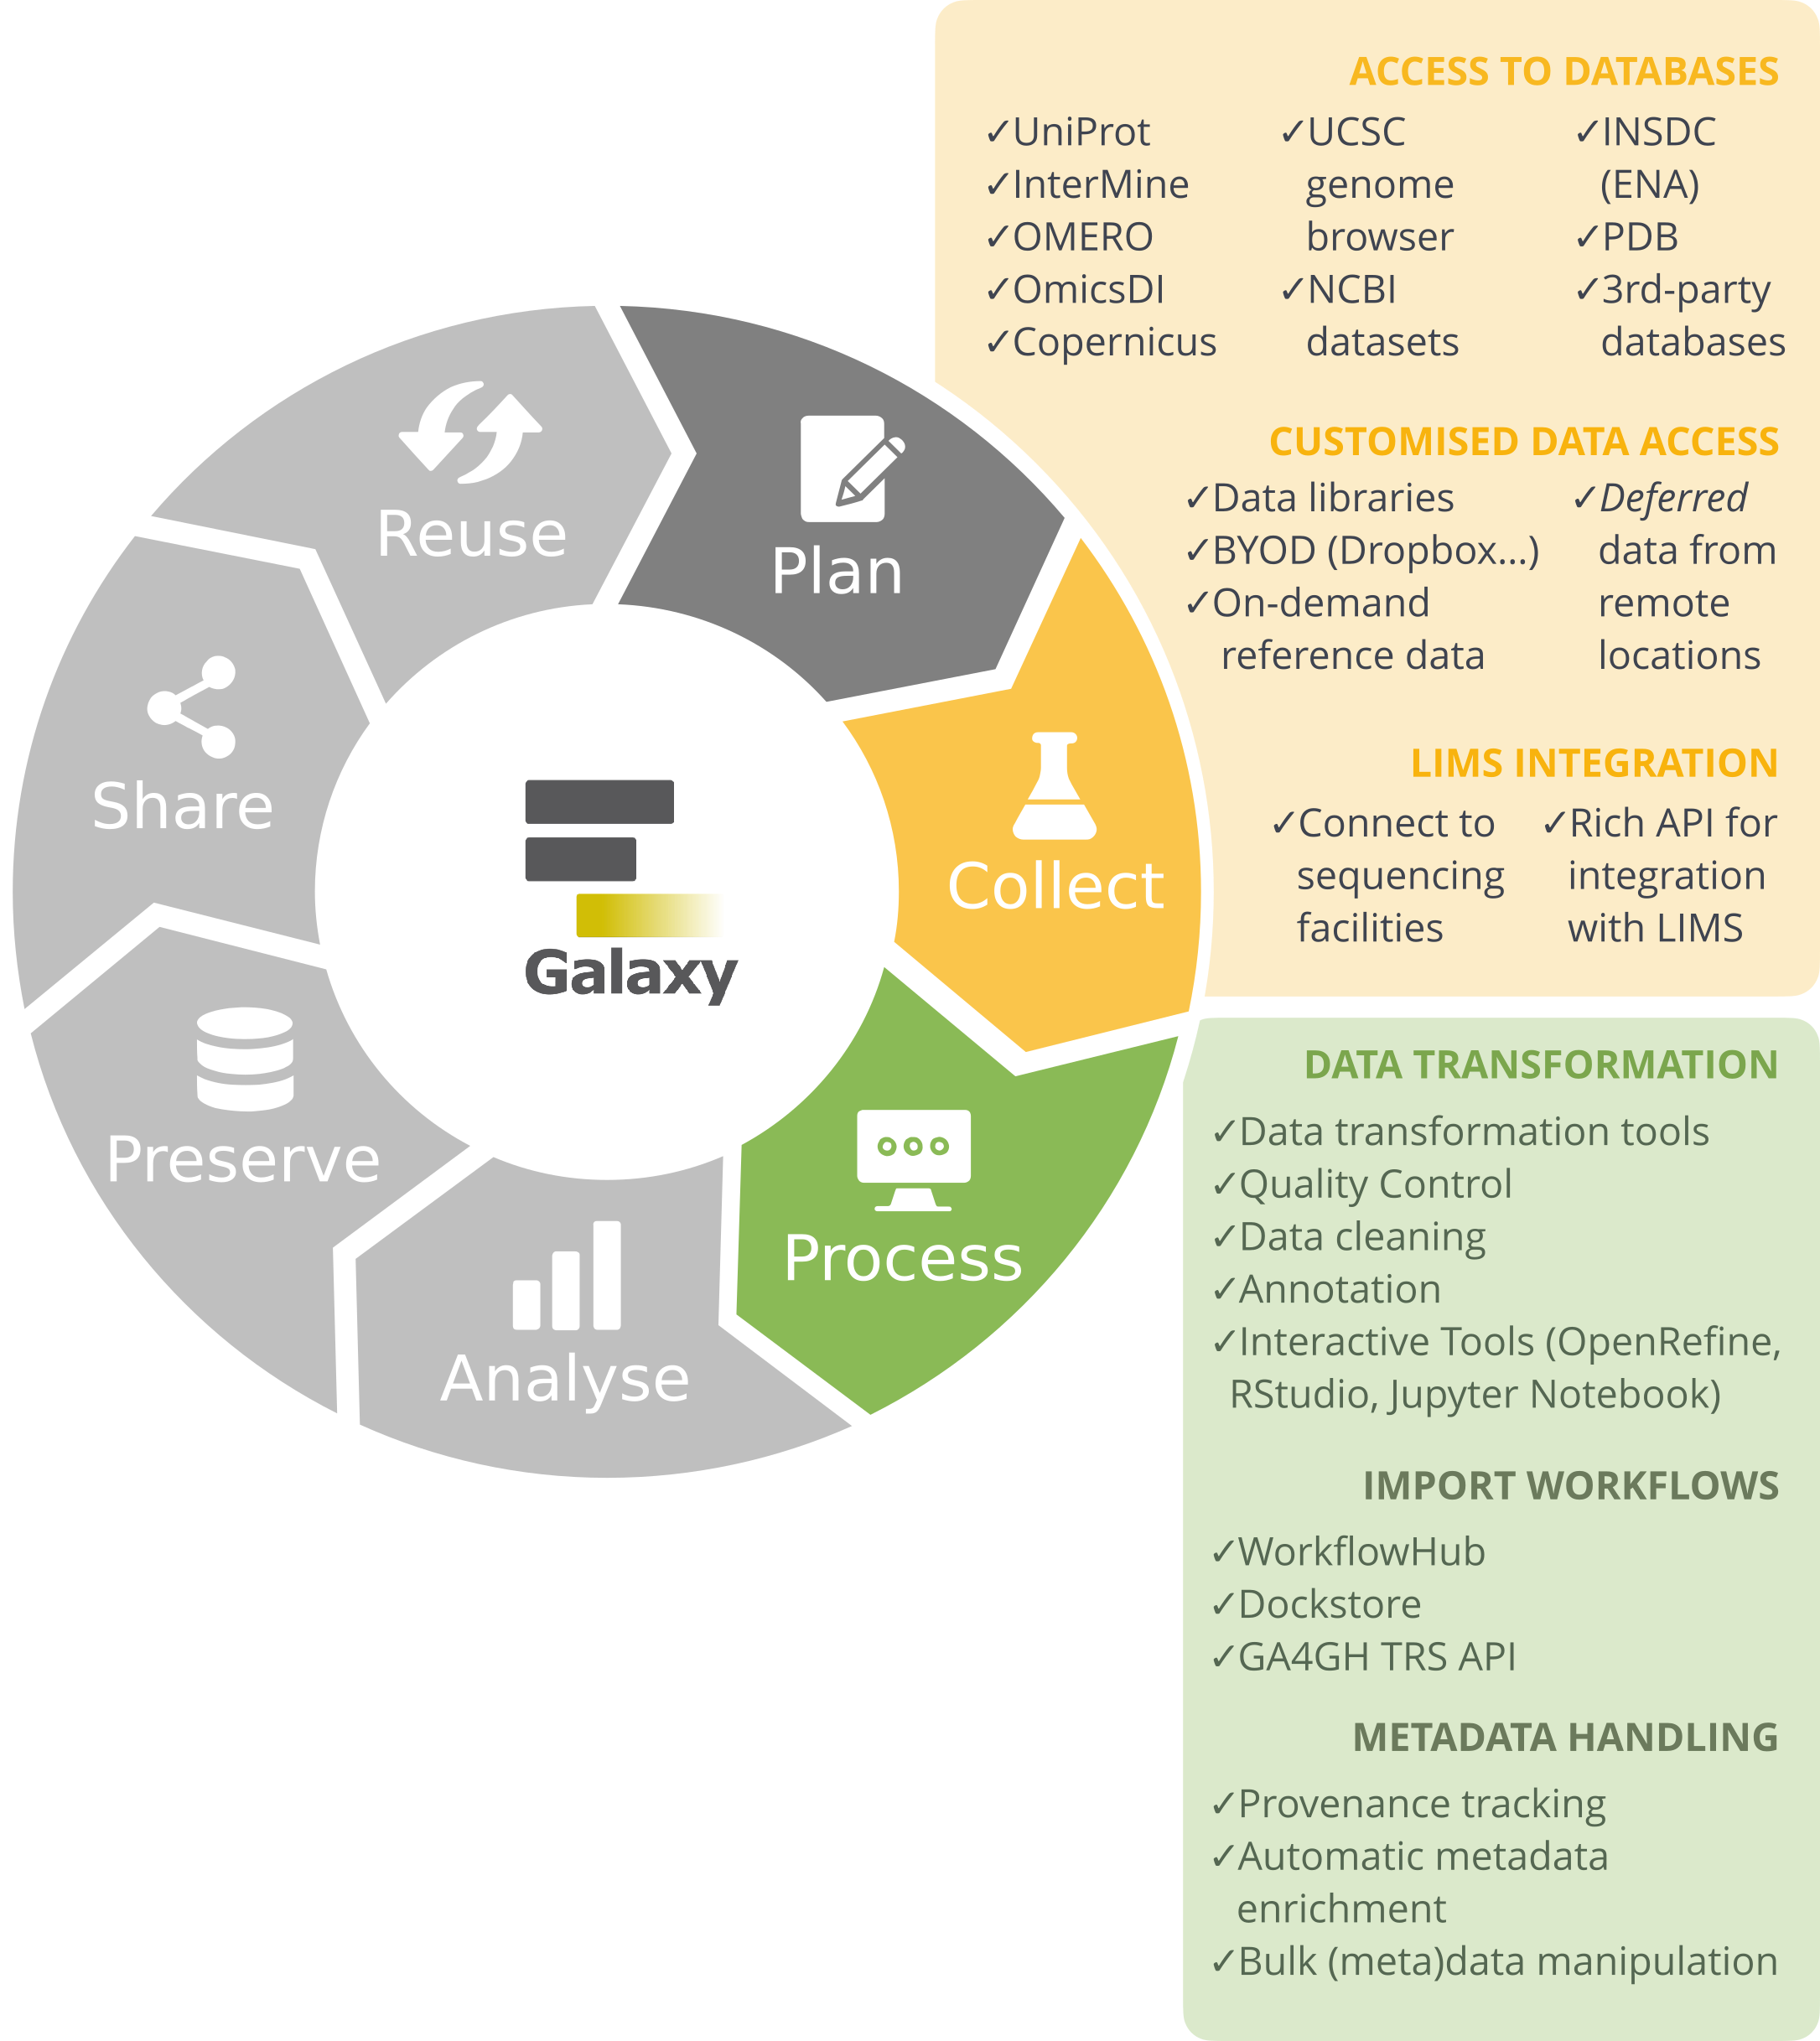
Open image in new tab
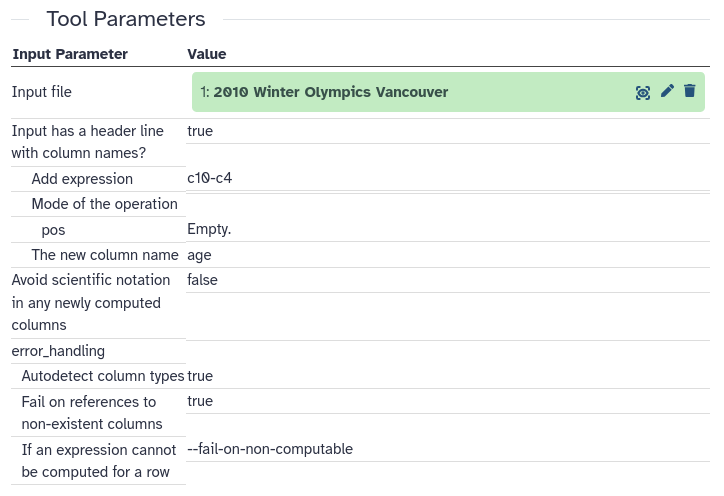 Open image in new tab
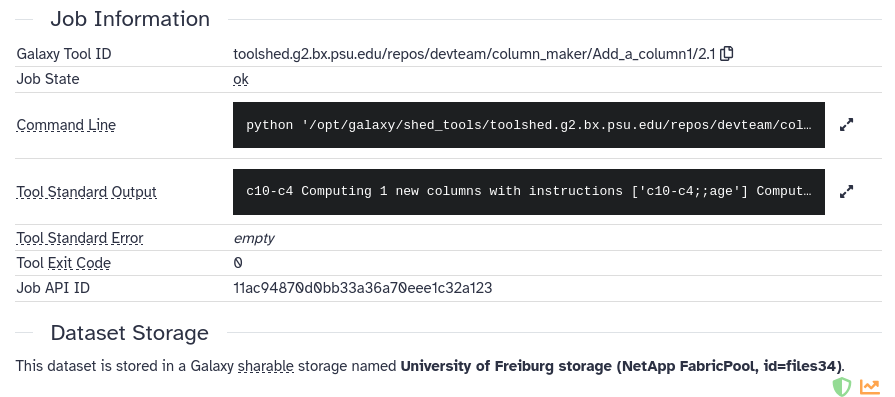 Open image in new tab
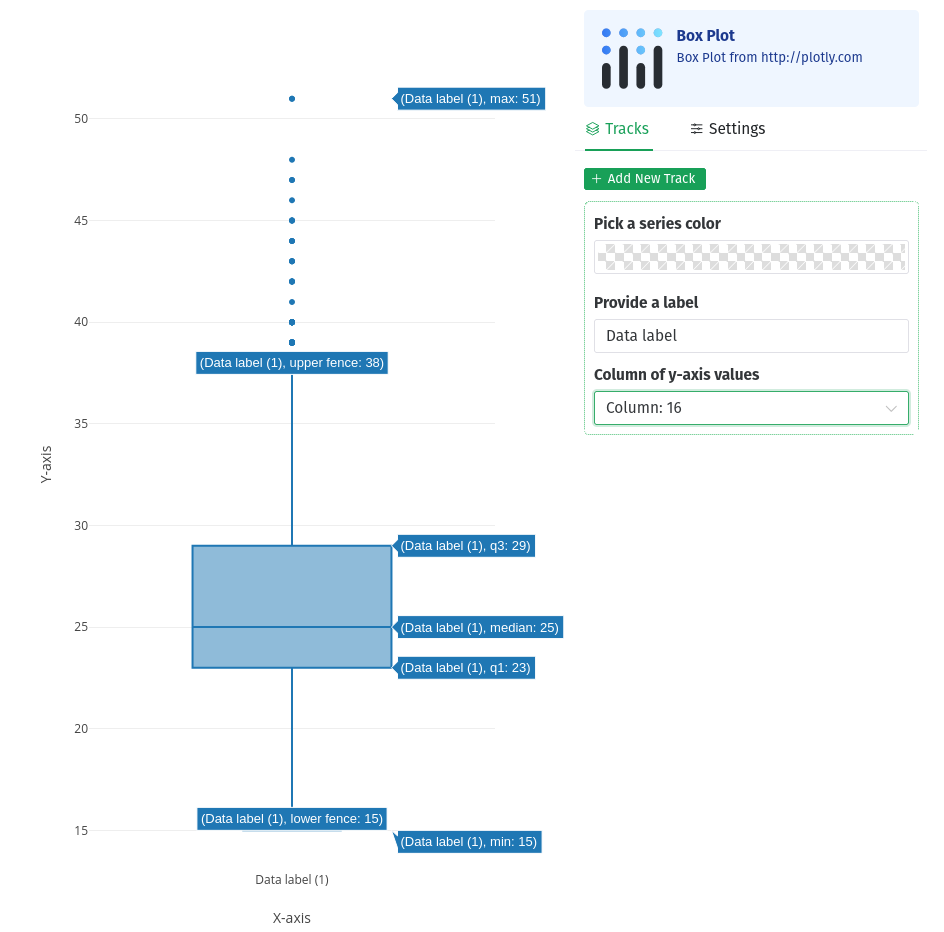 Open image in new tab
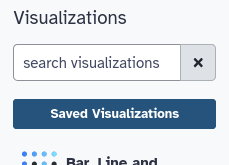
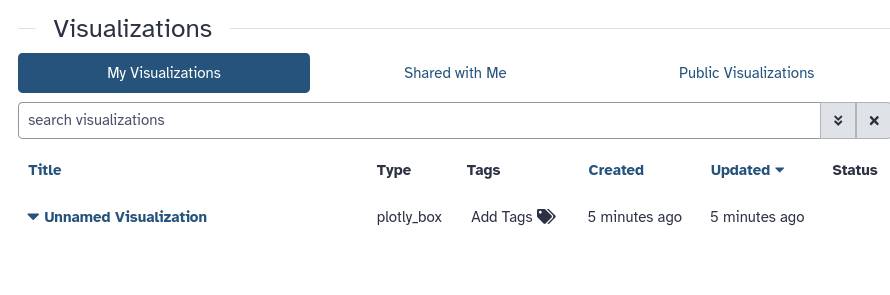
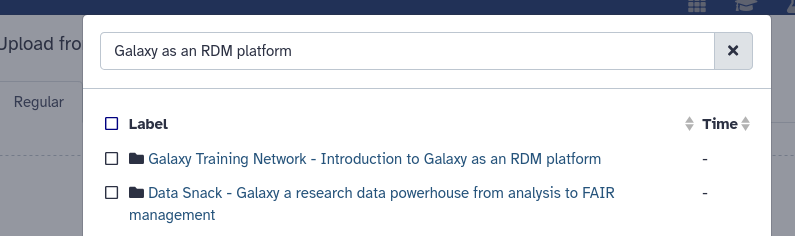
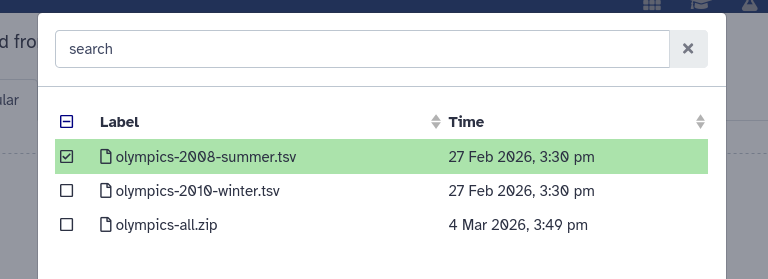
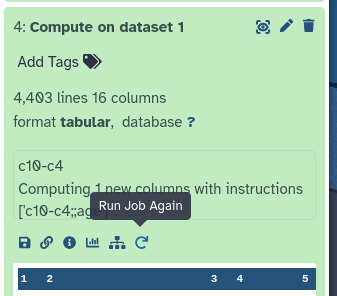
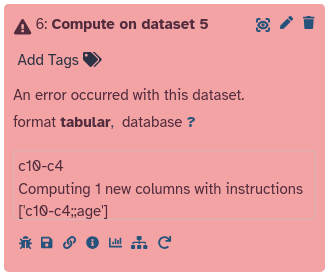
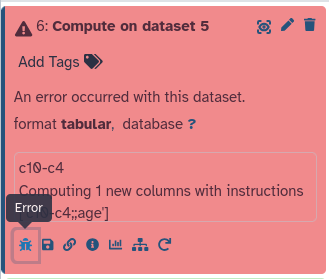
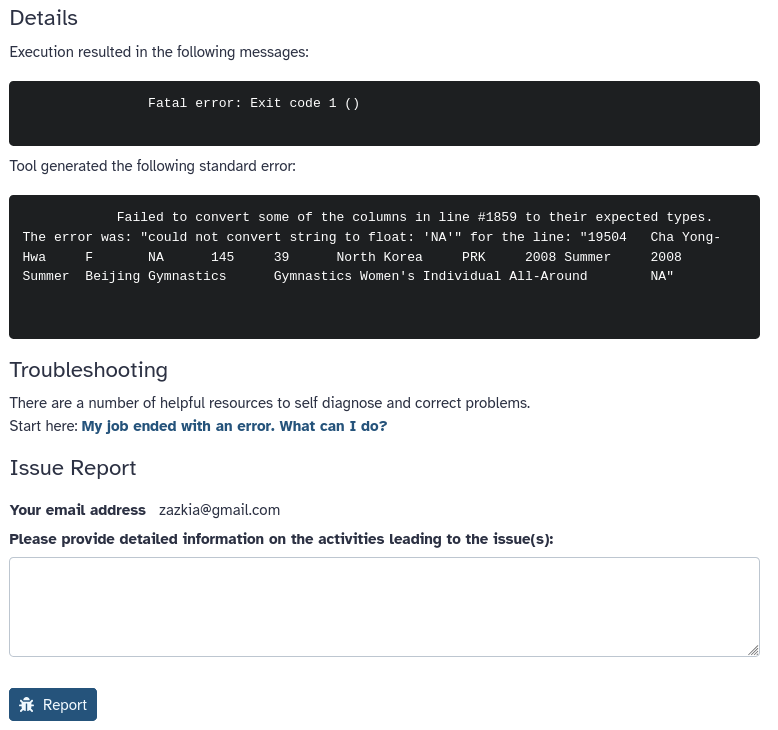 Open image in new tab
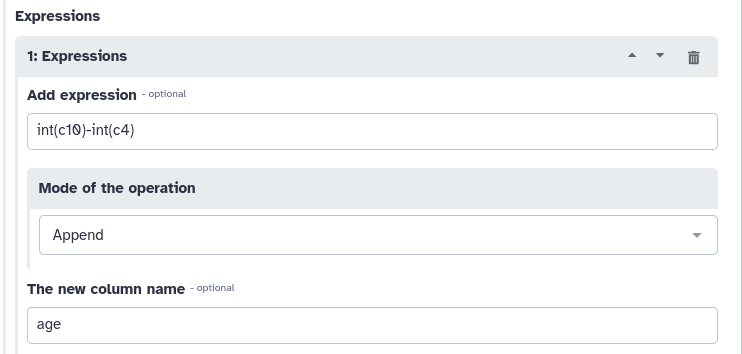
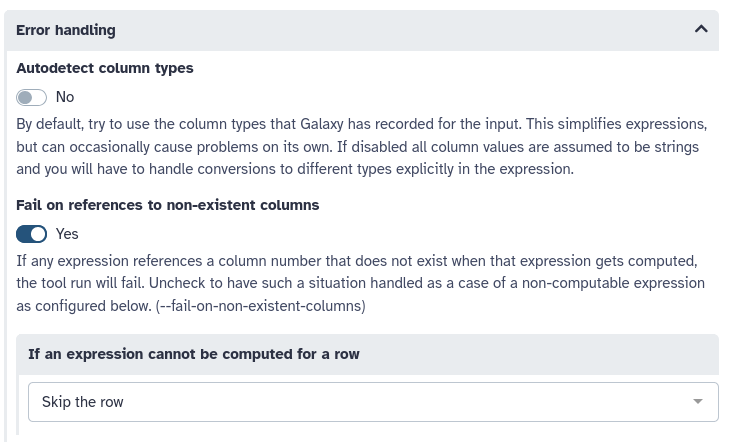
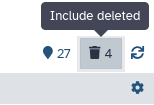
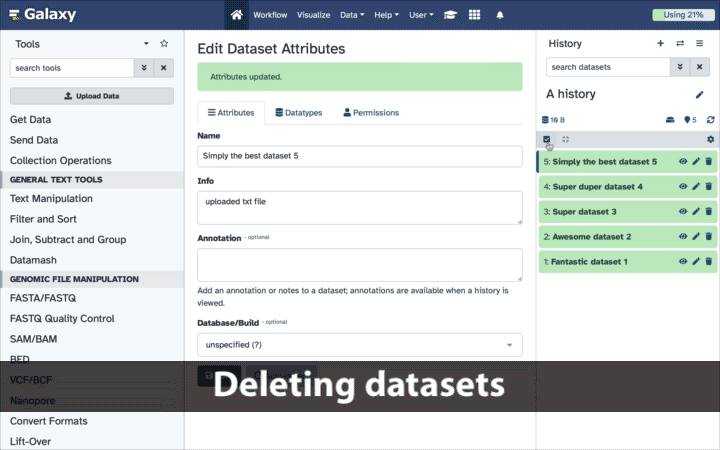
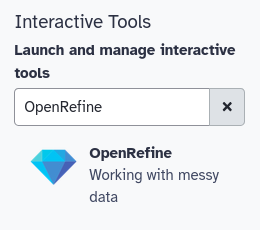
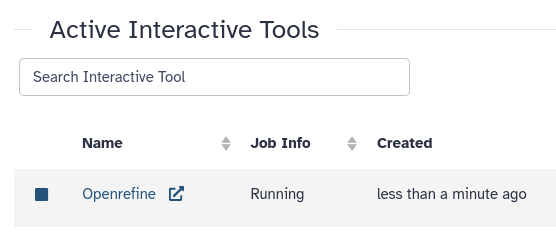

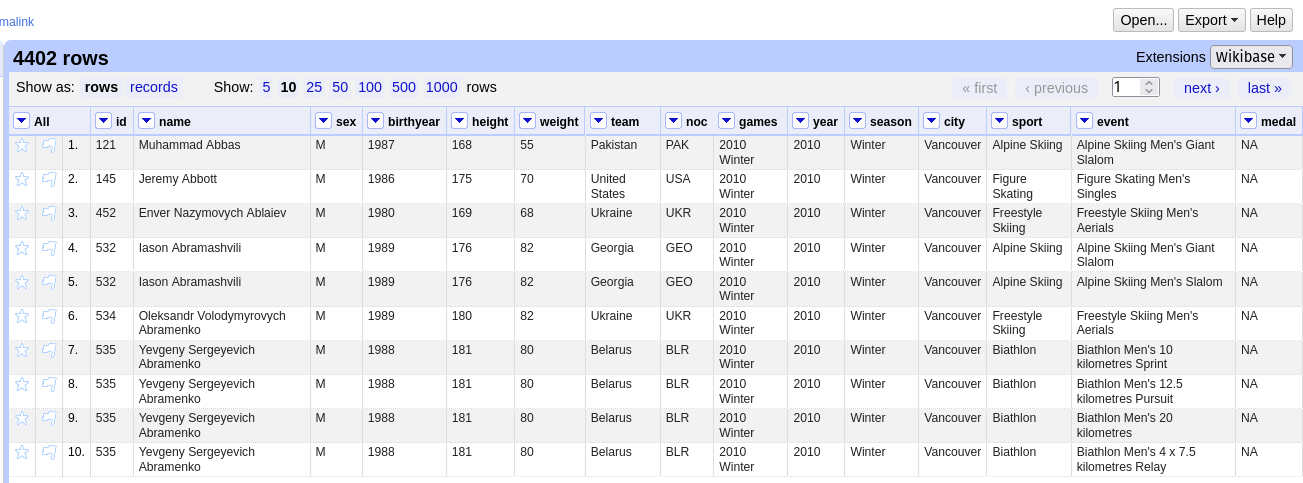

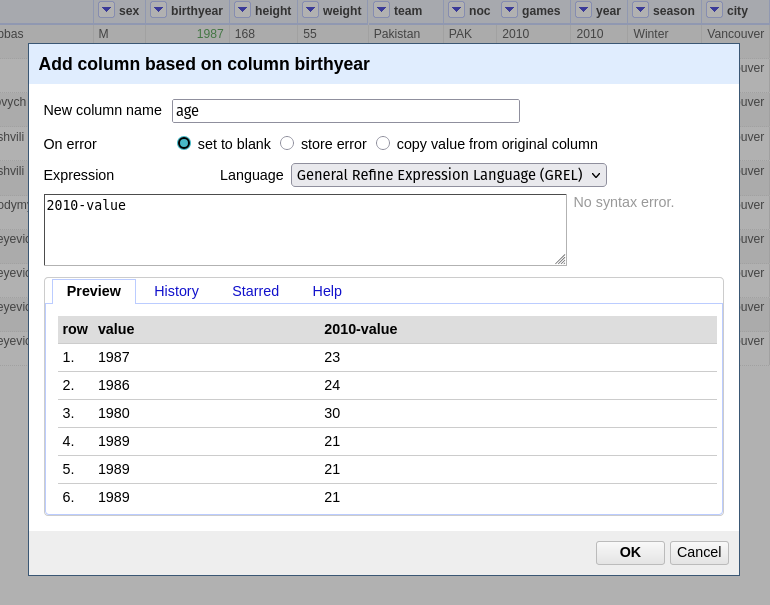
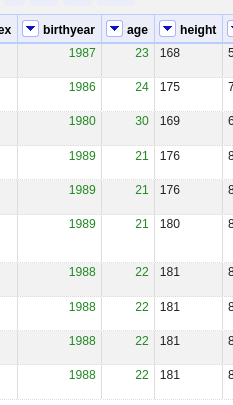


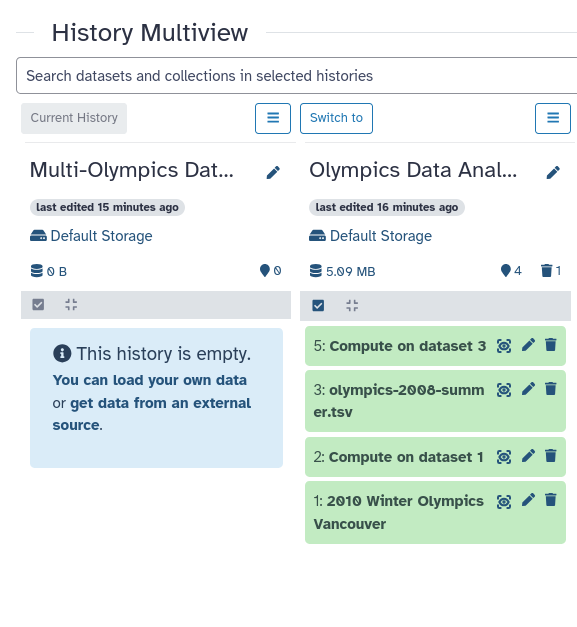

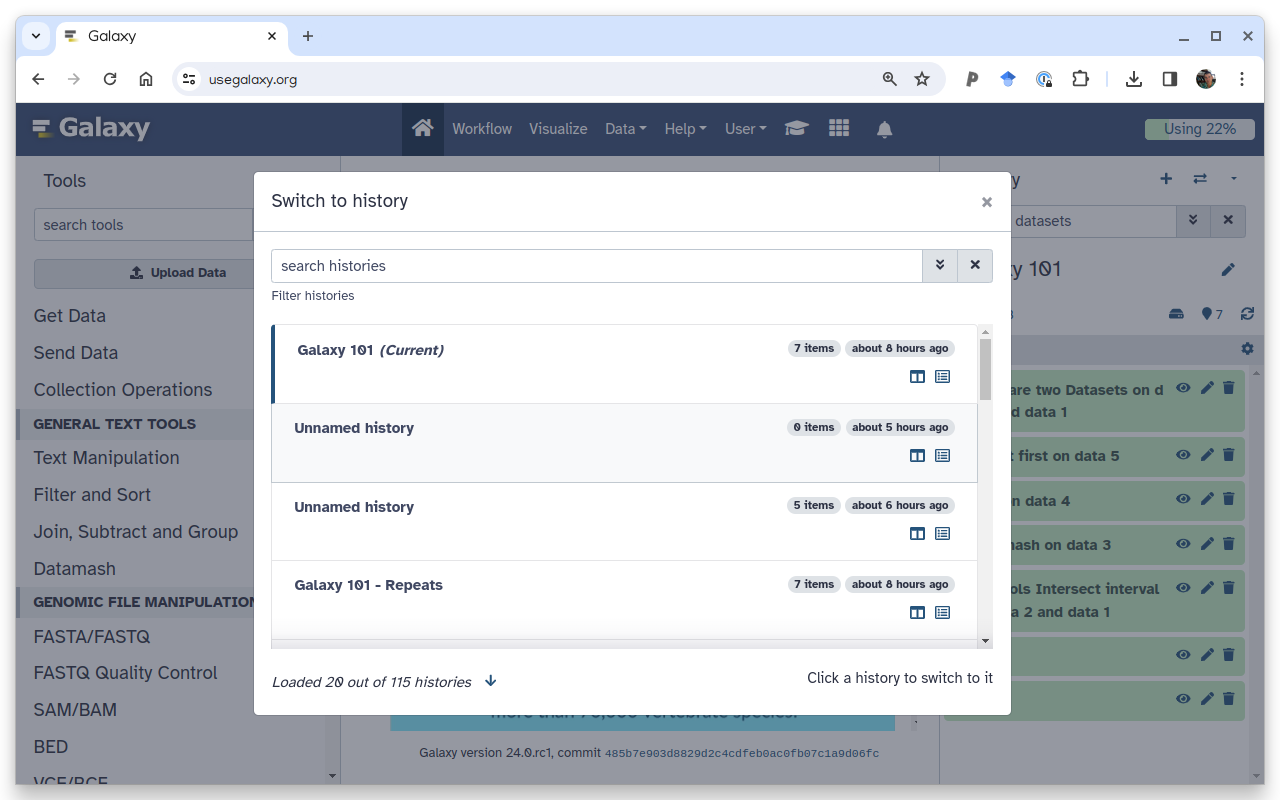
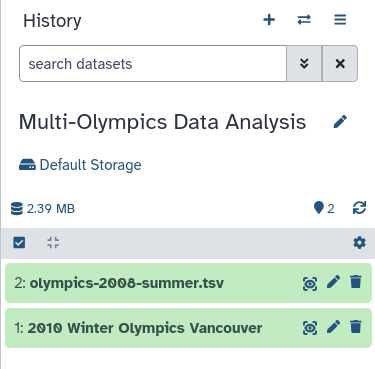

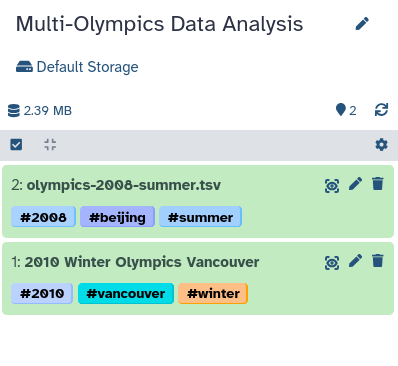
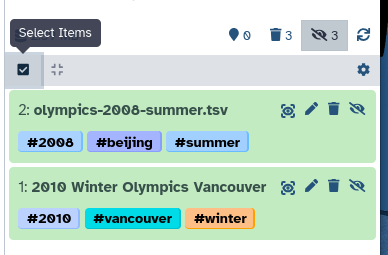

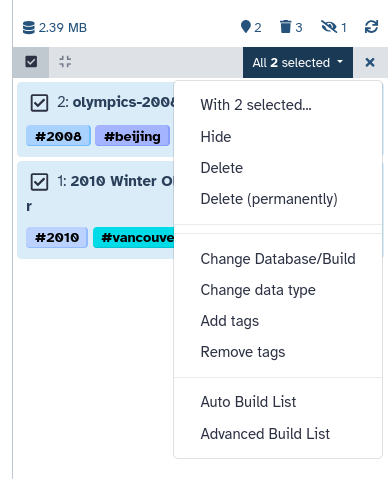
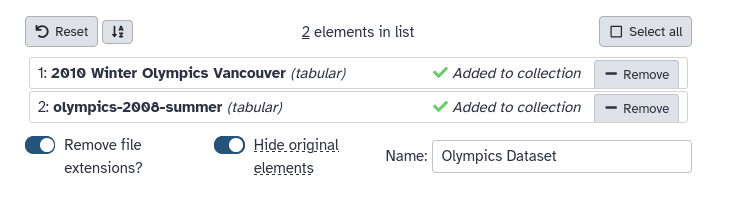

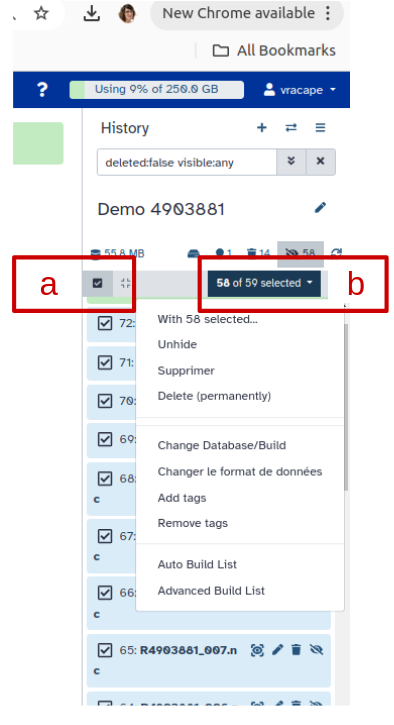
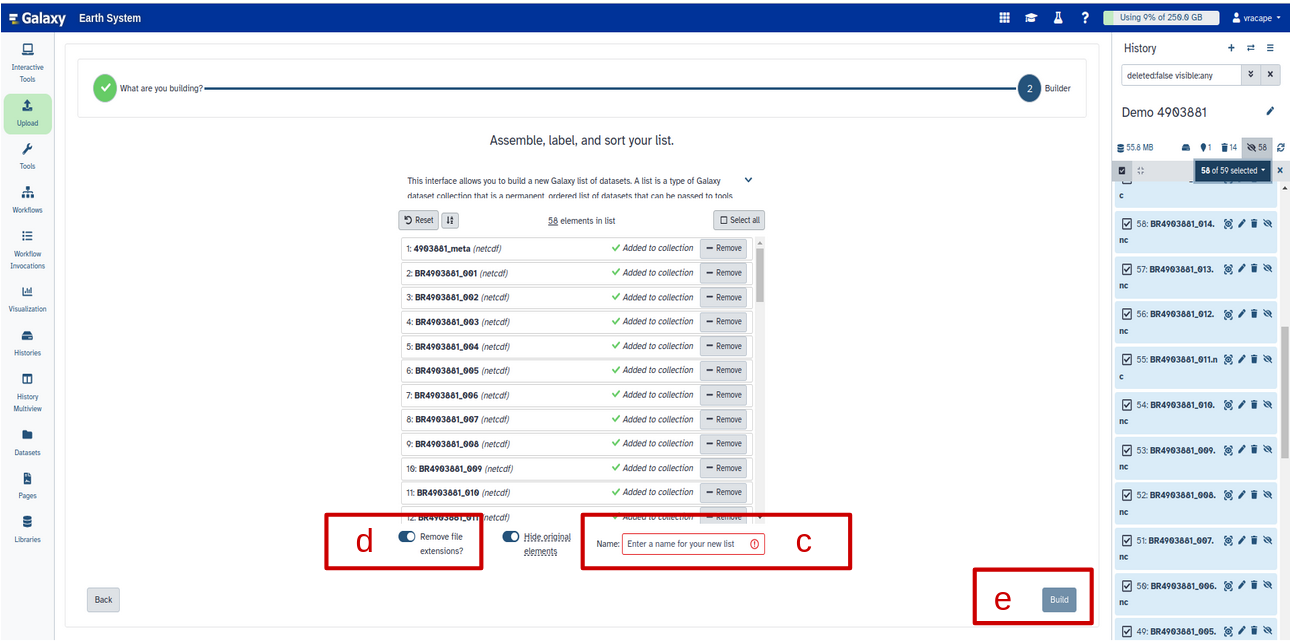
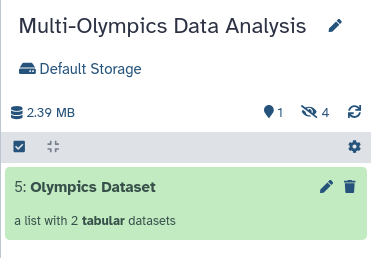
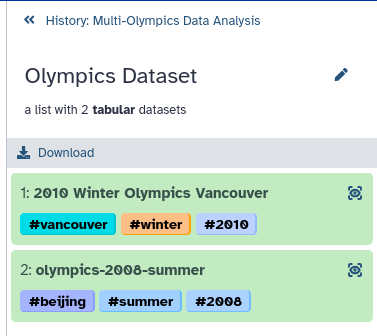
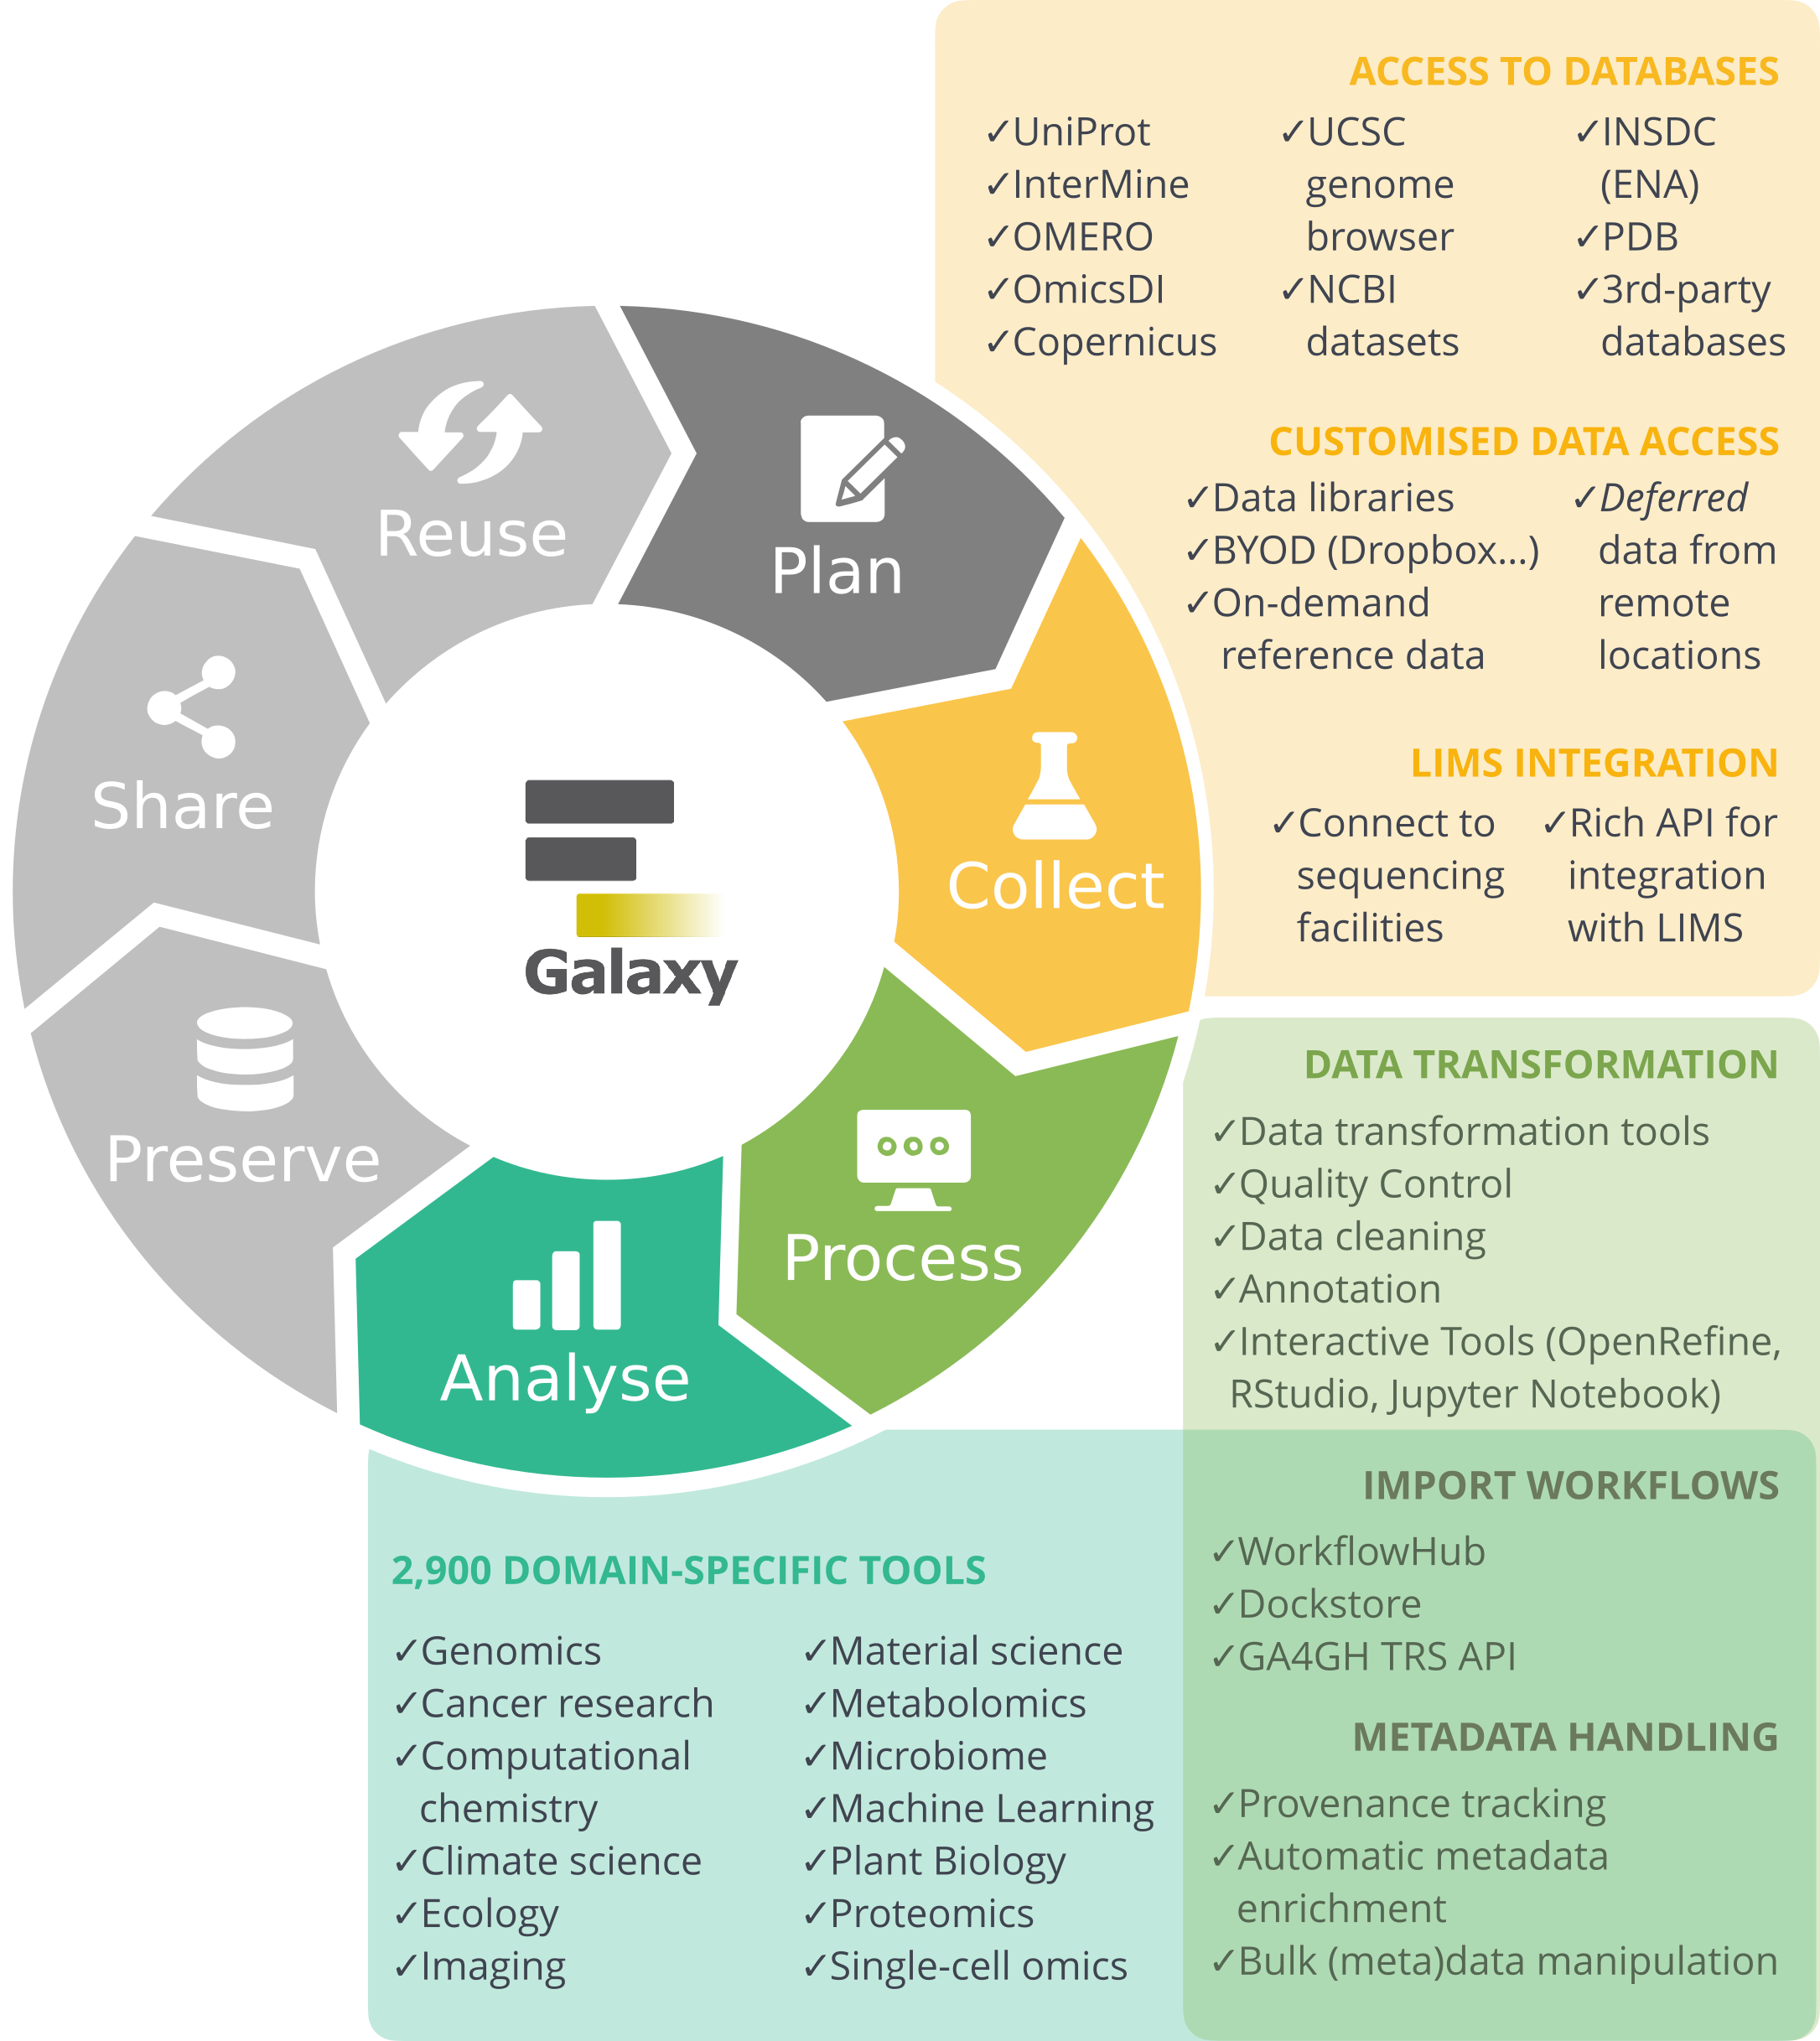

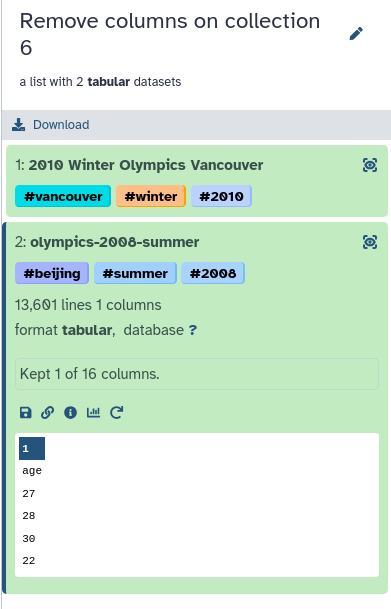
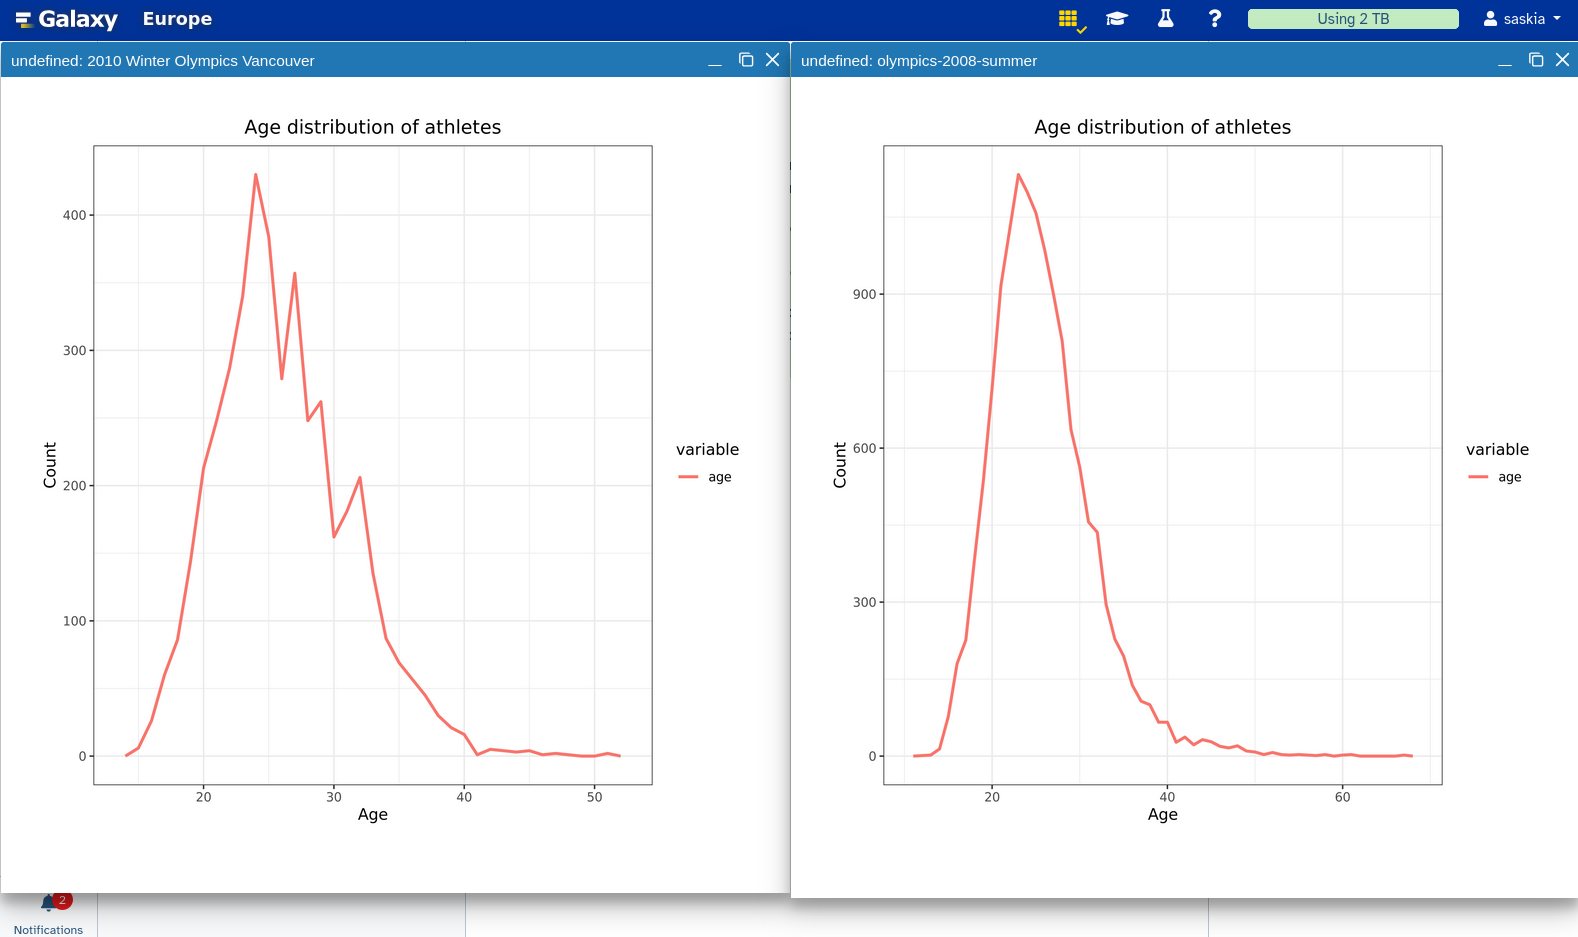
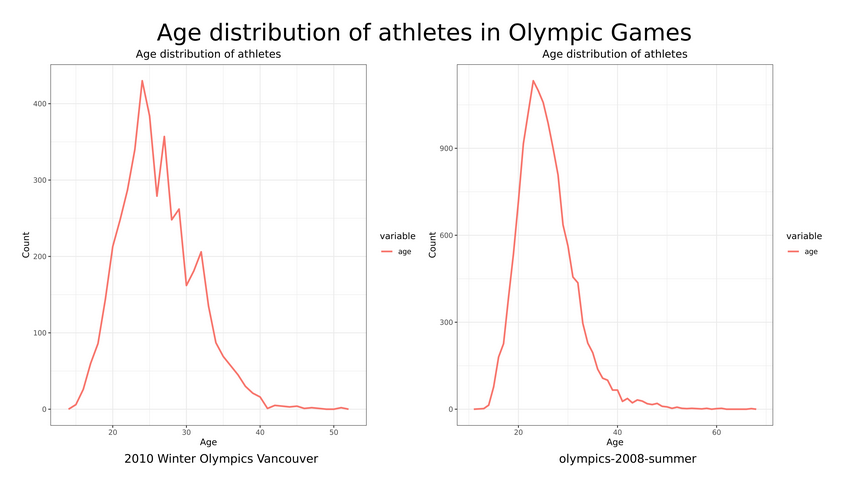
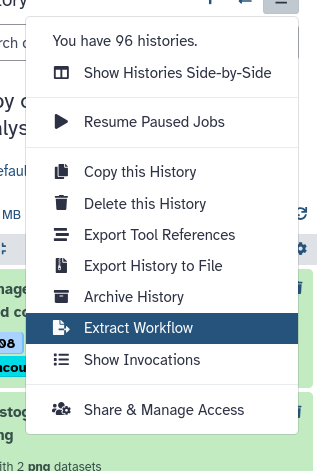
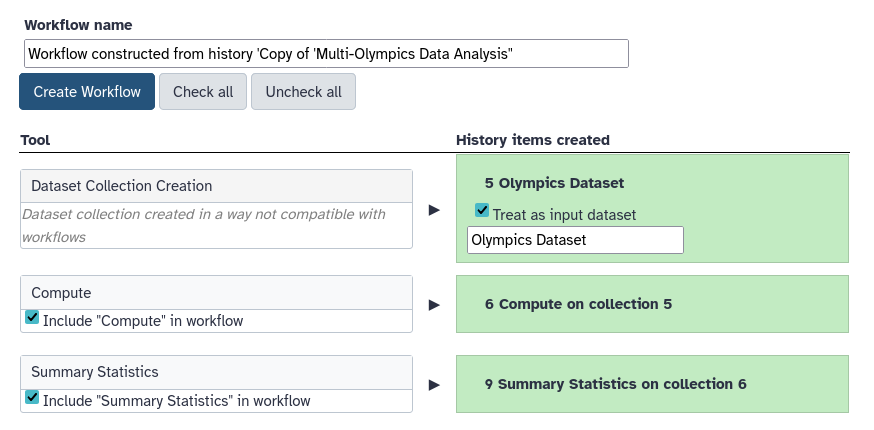
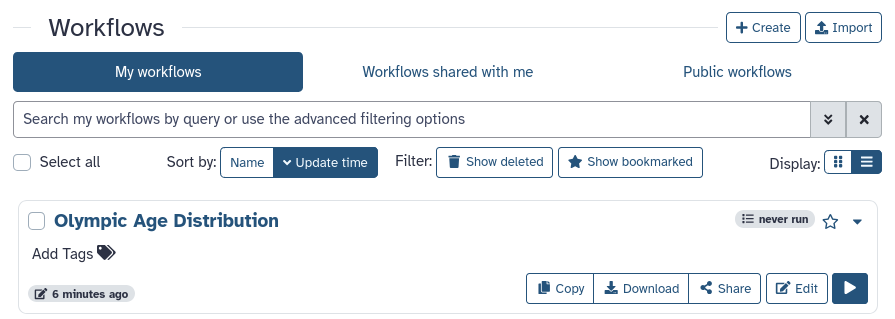
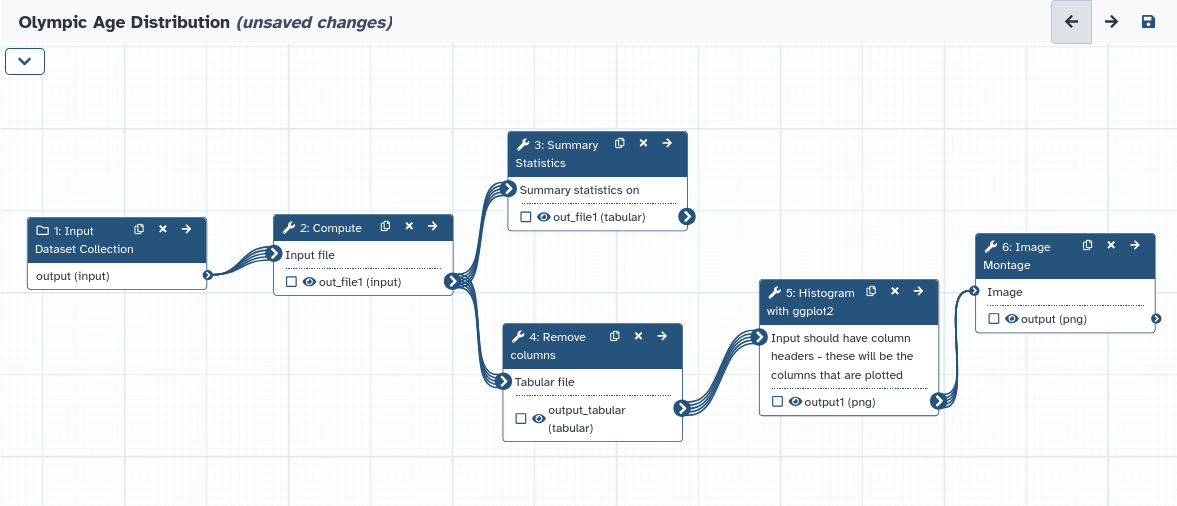
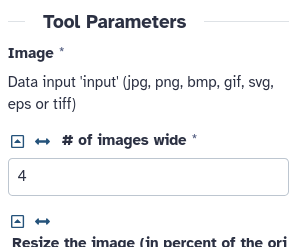
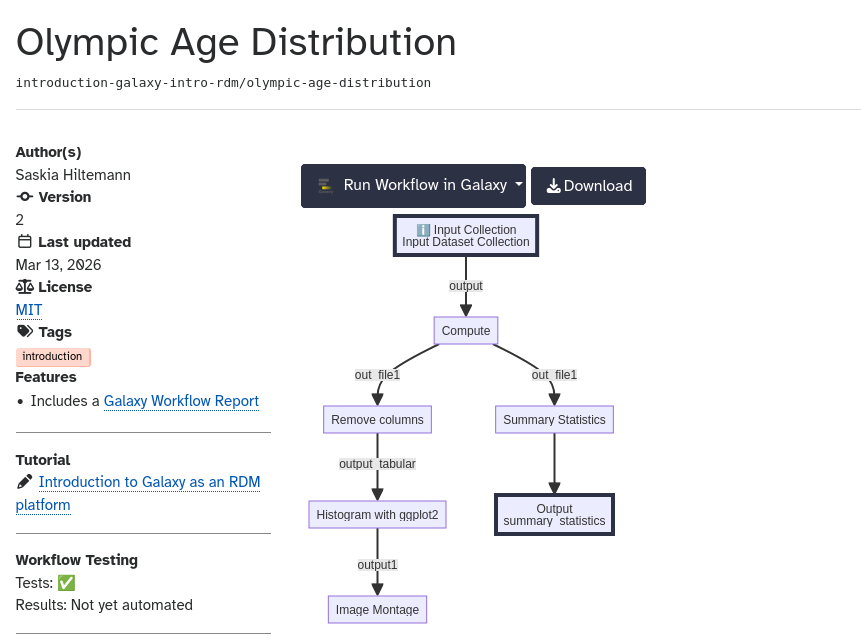
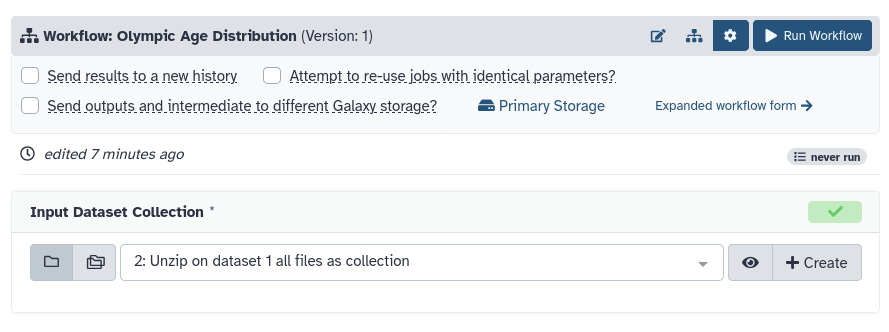
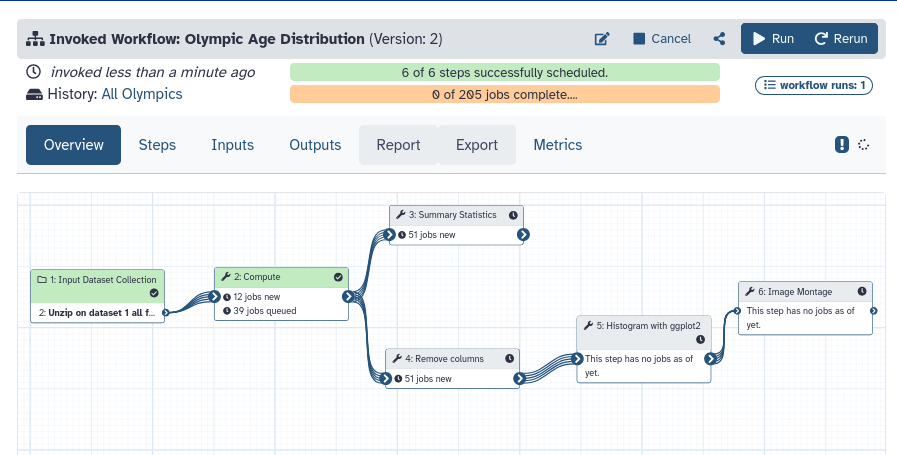
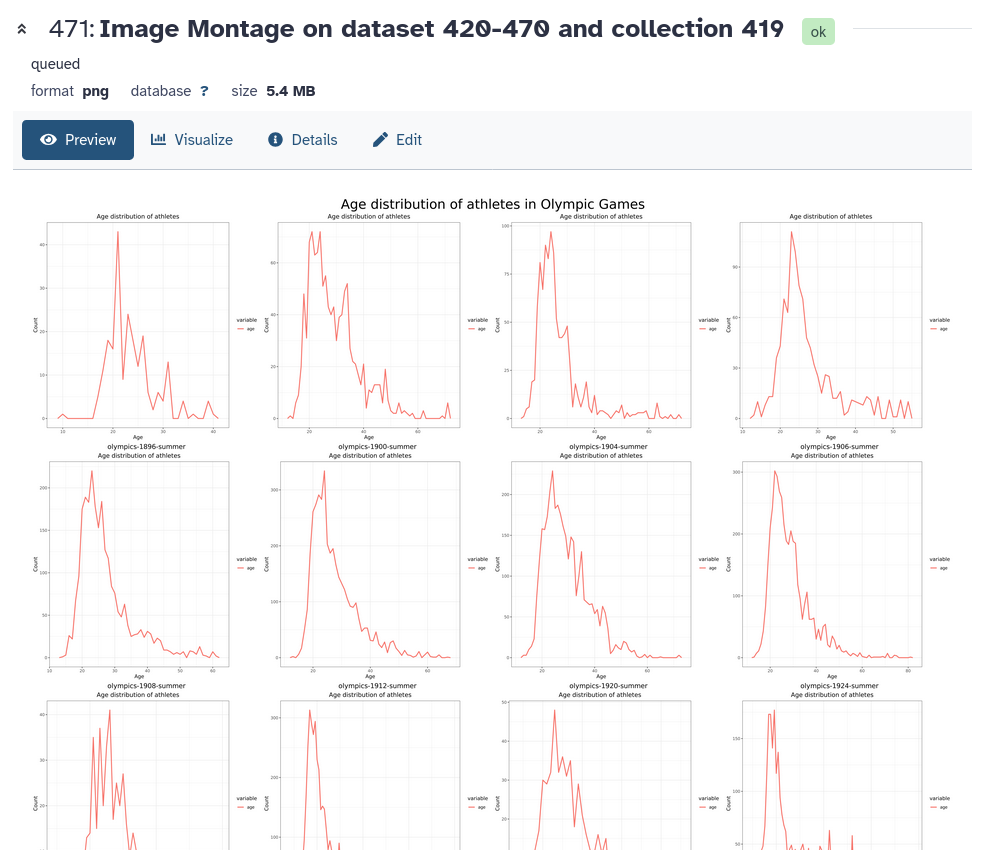 Open image in new tab